
In This Article:
Budgeting Overview | Model Budget | Lot Budget | Lot Costing and Reports
Budgeting Overview
The budgeting tool in HomeBuilder has many options to cater to the wide variety of preferences home builders might choose to manage and report their data. Because of the many options and possibilities, it can be challenging to know how to start. What we cover in these help files is a standard and recommended way to process budgets.
If you believe you would like to go in a different direction, we recommend that you speak with a HomeBuilder consultant.
Budgeting - What is the Final Result?
Tip
Review the following three things in the demo database to see how the base system produces reporting:
- Search Lots, then select the Budget Action.
- Search Lots, go to Reports, and select "Cost Detail (Excel)".
- Search Phases, go to Reports, and select "Phase Budget Report".
From Lots, select the Budget Button. This will bring you to the Lot Budget page. Let's analyze the final result:
-
Along the top of the Lot Budget matrix:
- Estimated Amount - think of this either as an initial estimate of a cost or as (Vendor Contract + "known unknowns") i.e., what you think the eventual cost is likely to be.
- Planned Cost Amount - 99% of the time this comes from the Vendor Contract.
- Actual Amount - This is automatically filled by posting purchases (or other transactions).
- System calculated fields:
- Budget Amount (Estimate or Planned based upon the Budget Amount Rule).
- Amount to Complete (Budget - Actual).
- System calculated fields:
-
Down the side of the matrix:
- Cost Groups (typically 10-20 lines).
- Cost Details (typically 100+ lines) - examples shown later in this chapter.
-
Other (Secondary) fields (normally not required or used, but still available):
- Budget Amount Rule.
- Defaults to "Planned|Estimate" which makes the Budget number the Planned Cost Amount if there is one, and Estimate Amount if there is no Planned Cost Amount.
- Go to HomeBuilder Setup (Budget fasttab) to allow more detailed control.
- Revision - you can add a full new revision version to the whole budget if you need to track changes to a complete budget (not normally required).
- Amendments - Shows the changes made in this revision.
- Anchored Amount - Click on the "Anchor" button to lock in all the budget costs so that you have a "point in time" record to compare.
- Budget Amount Rule.
Technical Note: Once you complete the HomeBuilder setup, adding Cost Groups and Details automatically creates Dimensions in Business Central. Any posting of any transaction in HomeBuilder will then split up your transactions by these codes at the GL, Lot, and all detail levels. You can then produce enterprise-level reporting if you like.
To verify your configuration, search General Ledger Setup and compare:
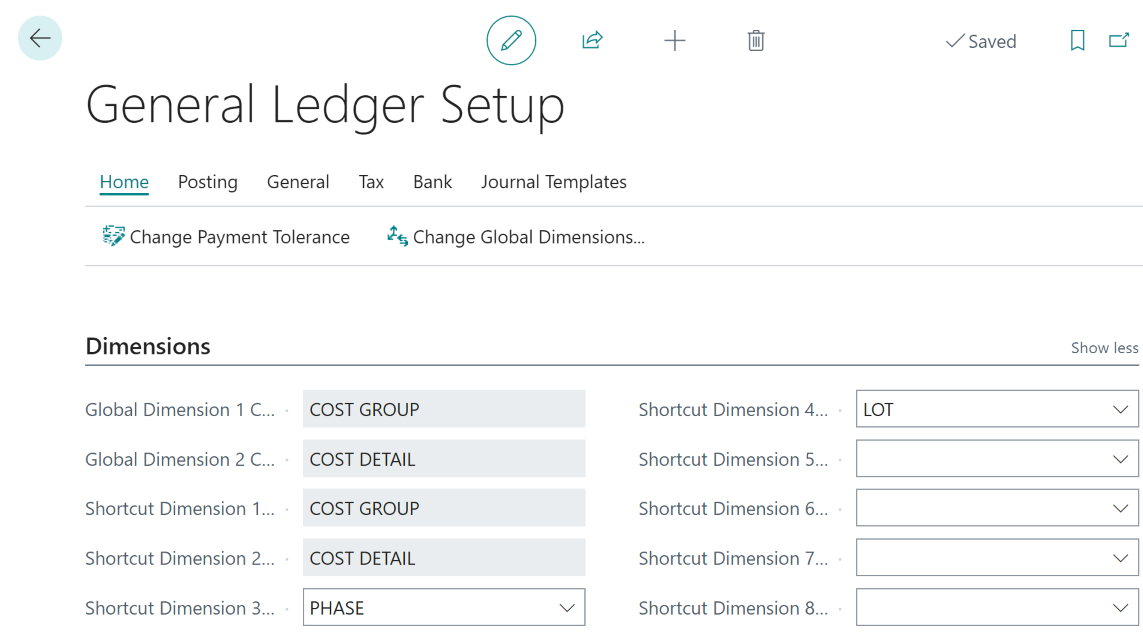
Model Budget
The application provides the ability to define an estimated budget for each Model. To do so, search Models, select a Model in the list of Models, and run the action "Model Budget".
This action opens the page "Model Budget" where a user can enter values of the "Estimated Amount" for each Cost Detail Code.
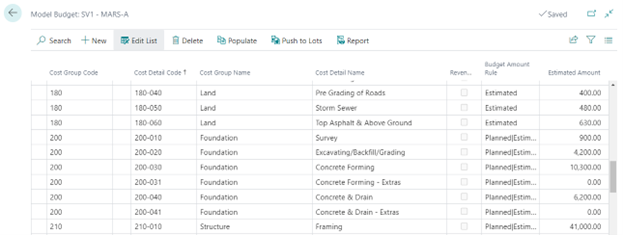
The page has the following actions:
- Populate
- This action populates Model Budget lines with the full list of Cost Details. You may remove Cost Details from a Model Budget if they are not applicable to the Model.
- Push to Lots
- This action pushes selected model budget lines to selected lots that belong to the model.
- On pushing model budget lines to lots, the "Estimated Amount" values in lot budget lines will be updated with model "Estimated Amount" values.
Lot Budget
The Budget for a Lot can be revised multiple times. Managing Lot Budgets is carried out via Lot Budget Revisions.
2 Options to Create a Lot Budget
Option 1- Lot Model still unknown, no Template Model
To open the page with the current Budget Revision, click the action "Budget" on the "Lot Card" or "Lots" page.
Initially, the page "Lot Budget" is empty, to populate Lot Budget Lines, press the action "Add Revision".
In the pop-up page enter "Revision Date" and press OK.
Populating Lot Budget Lines directly from Cost Details
Any posting related to a Lot is possible only if the Lot has Lot budget lines with Cost Details that are referenced by that posting.
There could be a need for posting against a Lot that has no Model Code assigned to it yet. When a user adds budget revision to such a Lot, the Lot budget lines cannot be automatically populated from a Model Budget.
To populate Lot budget lines for Cost Details required for posting against the Lot, proceed with the following steps:
- Make sure that the Lot has a Budget Revision (add one if necessary)
- Search Cost Details. Select the Cost Details you want, then Push the selected Cost Details to Lots by running the Action "Push to Lots".
In the pop-up page, select destination Lots and click "Push to Lots".
Option 2 (recommended)
Search Lots and select the Lot. On the Model Code line assign the Model to the Lot (In case it is not yet known which Model will be sited on the Lot, Create a Template Model with the standard Budget Lines and assign it to the Lot).
Assigning a Model to the Lot will create a Lot Budget (from Model Budget Lines) and will create the first Budget Revision automatically.
- The "Estimated Amount" will be transferred over. To view the Budget Line of a specific Revision, filter the records by "Revision No." Field using the page filter.
Lot Budget Lines within a Revision have the following columns:
-
Revision No.
- Auto-increments on adding new revisions.
-
Revision Date.
- The Revision Date entered by a user during the creation of a new revision.
-
Is Current.
- Indicates if the revision is current.
-
Is Revenue.
- Retrieved from Cost Group.
-
Budget Amount Rule.
- This is a read-only field retrieved from the Cost Detail record. It defines the rule for calculating the "Budget Amount" in the Lot Budget Lines. The rule takes the following options:
- Planned|Estimated
- Use Planned Amounts if they exist
- The reason is that Planned Amounts come from Vendor Contracts where estimates are just intended to be initial estimates created before quotes are obtained.
- The calculation is – if "Planned Amount" is not zero then "Budget Amount" is equal to "Planned Amount"; otherwise to "Estimated Amount".
- Use Planned Amounts if they exist
- Planned
- "Budget Amount" is equal to "Planned Amount".
- Estimated
- "Budget Amount" is equal to "Estimated Amount".
- Estimated+Planned
- "Budget Amount" is equal to "Estimated Amount" + "Planned Amount".
- Planned|Estimated
- This is a read-only field retrieved from the Cost Detail record. It defines the rule for calculating the "Budget Amount" in the Lot Budget Lines. The rule takes the following options:
-
Is Anchored.
- This field indicates if the budget line was anchored.
- The application allows a user to "anchor" the Budget Line, in other words, to secure the "Estimated Amount" at a certain point in time and record it in the "Anchored Amount" field, which will stay there regardless of the changes of the "Estimated Amount" in the future revisions. The purpose of anchoring is to create future references for external auditing. Anchoring is not mandatory and should be used only if the business requires it.
-
Anchored Amount.
- Amount secured from changes by action "Anchor" for future reference. The field is editable only in the current revision and if the flag "Is Anchored" is set to 'No'.
-
Estimated Amount.
- Amount based on estimation which is entered into the system manually either through a Model Budget or directly to a Lot Budget line. On changing "Estimated Amount", the "Amendment of Est. Amount" gets re-calculated as an "Estimated Amount" – "Prev. Estimated Amount".
-
Prev. Estimated Amount.
- Estimated Amount in the previous revision. It is 0.00 for the first revision.
-
Amendment of Est. Amount.
- Change of the "Estimated Amount" since the previous revision. On entering this value, the "Estimated Amount" gets calculated as "Prev. Estimated Amount" plus the "Amendment of Est. Amount".
-
Planned Cost Amount.
- The amount that is retrieved from Lot Planning Lines with the same "Cost Detail Code" as the "Cost Detail Code" in the Lot Budget Line. Double-click on the cell will open the page with Lot planning lines which constitute the cost amount.
-
Planned Revenue Amount.
- The amount that is retrieved from Lot Planning Lines with the same "Cost Revenue Code" as the "Cost Detail Code" in the Lot Budget Line. Double-click on the cell will open the page with Lot Planning Lines which constitute the revenue amount.
-
Planned Amount.
- Full planned amount, which is the sum of the "Planned Cost Amount" and the "Planned Revenue Amount".
-
Committed Amount.
- "Planned Amount" at the time of creation of the revision.
-
Budget Amount.
- The amount calculated based on "Estimated Amount" and/or "Planned Amount" and "Budget Amount Rule".
-
Actual Amount.
- The amount that was posted with the "Cost Detail Code" and retrieved from a sub-ledger called "Job Cost Ledger Entries". Double-click on the cell will open the page with Job Cost Ledger Entries which constitute the actual amount.
-
Amount to Complete.
- "Amount to Complete" is calculated as the "Budget Amount" minus the "Actual Amount".
Actions on the page "Lot Budget".
To access, search Lots and select the Lot. On the Lot page click the Budget Action Button or click the Budget cue on the right-hand side of Infopane. This will open the page Lot Budget with the following actions:
- Add Revision.
- This action adds a new revision with the "Revision Date" specified in the pop-up page.
- If there is no Revision for a Lot, the Lot Budget Lines of the first revision will be created from the Model Budget Lines.
- If a Revision exists, the Budget Lines will be created from the lines of the previous Revision. In this case, the "Prev. Estimated Amount" gets populated from the "Estimated Amount" in the previous Revision.
- In both cases, "Committed Amount" gets populated from "Planned Cost Amount" or "Planned Revenue Amount" at the time of the creation of the Revision.
- This action adds a new revision with the "Revision Date" specified in the pop-up page.
- Remove the Latest Revision.
- The action removes the latest Revision and its Budget Lines.
- Anchor.
- This action anchors the Budget, i.e. sets the flag "Anchored" to 'Yes' for all Budget Lines of the latest Revision. Afterward, the field "Anchored Amount" becomes non-editable.
- Un-anchor.
- This action is opposite to anchoring.
- Budget Revisions.
- This action shows the list of Budget Revisions for the Lot.
- History.
- This action shows the history of change in the current Budget Line.
- Cost Detail (Excel).
- This action outputs a Lot Budget in the form of an Excel report with sub-totaling by Cost Groups.
- Report option fields "Date From", and "Date To" determine the period for the report column "Actual for Period".
- Field "Date To" determines the date for the report column "Actual To Date".
- The amount "To Complete" is calculated as "Budget" amount minus "Actual to Date".
Lot Costing and Reports
Postings, which are executed against a Lot, are recorded in a sub-ledger called "Job Cost Ledger". To view the postings, from the Lot Card run the action "Job Cost Ledger Entries".
This action opens the page "Job Cost Ledger Entries" which has two actions:
- Navigate
- This action allows a user to view entries related to the Job Cost Ledger Entry in other ledgers.
- Reallocate to Lots
- This action allows a user to reallocate (move) the cost of the current Job Ledger Entry to one or more Lots.
Using Reallocate to Lots Action
In the pop-up page select "Job Batch Name", enter "Posting Date" and "Reallocation Rule", select destination Lots and click "Re-allocate to Selected".
The "Reallocation Rule" has the following options:
- Evenly
- The amount is distributed evenly between selected Lots.
- Per Sq. Footage
- The amount is distributed between Lots proportionally to Lot square footage.
- Per Lot Offer Price
- The amount is distributed between Lots proportionally to the Lot offer price.
- Manually
- The lines that are created in the Job G/L Journal will have zero amounts. A user should manually enter amounts and balance the transaction.
As a result of the action "Re-allocation to Selected", the system will create Job Journal Lines for the destination Lots, balance Job Journal Lines for the source Lot, and post those lines. The amount in the source Job Cost Ledger Entry will be split between destination Lots uniformly (by equal parts). This posting will be reflected in the Job Cost Ledger Entries of the source Lot and the destination Lots.
Job Cost Ledger Entries of a Phase
To view Job Cost Ledger Entries for the whole Phase, search Phases, highlight a Phase, go to Related, and click "Job Cost Ledger Entries" in the page menu.
Budget By Lot
Search Phases, highlight a Phase, go to Actions, and select Budget by Lot Action. This page can also be called from "Search " or the Role Center.
The page "Budget by Lot" shows budget summary amounts for each Lot. It provides the ability to calculate amounts using filters by Cost Group, and Cost Detail, as well as to include or not include revenue.
Lot Cost Summary Report
The report shows Estimated, Planned, Budget, Actual (for the period), Actual (to date), and "To Complete" amounts for each Lot. You can open this report by searching Lot Cost Summary or in a Role Center.
The report has an Excel output for manual work.
Phase Budget Report
The system provides the ability to run a budget report where the amounts for Cost Details are summarized for the whole Phase. To run this report, select a Phase and click Reports, then "Phase Budget Report" in the page menu.
- In the report options, enter the date interval and press "OK".