In this Article:
Summary Instructions | Detailed Instructions | Add a Delivery Address | Print/Email
Summary Instructions to Create the Purchase Order
- For any item that has a Vendor Contract, just use Purchase Invoices. In summary, you setup the Vendor Contract and upon siting the Model on the Lot, Planning Lines are automatically created. Purchase Invoices are easy to create against any these Planning Lines.
- For charges that are not typically through a vendor contract such as equipment rental, the Purchase Order is a good option. The summary process is as follows:
- Create a Purchase Order with one or more lines
- Enter the Item, Qty, Cost, Phase and Lot (typically the Overhead/General Lot) to each Line.
- Select all the lines that are to be linked to the Lot on the Lines and select the Line – Action “Create Planning Lines”. The system will automatically create the Planning Lines for each Purchase Line.
Detail Instructions to Create the Purchase Order
Add the Vendor and Enter the Lines
- Search for “Purchase Order” in the main menu.
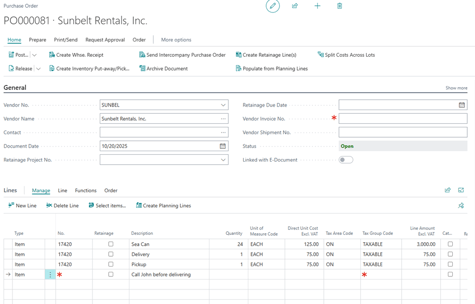
- Click on the “+” button at the top of the page to create a new purchase order, the PO number will be created by the system.
- Start in the Vendor No. field and enter either by typing in the number or name, clicking on the lookup.
- Enter the Item Lines as follows:
- Type = Item
- = Lookup to the Item list and pick the most appropriate e.g. Equipment Rental.
- Enter the description for what you are buying e.g. “Sea Can”.
- Enter a quantity e.g. 24 for 24 months. Note that you can increase or decrease this at any time.
- In the Direct Unit Cost field enter the cost per period e.g. 125/month
- Typically Tax Area = ON and Tax Group = TAXABLE, change if needed.
- Enter the Phase and Lot e.g. WS1A and OVERHEAD
- Click on the “Apply to Planning Line”. If you get an error message, make sure that the item that you used was pushed to the Model and to the Lot.
- Add as many lines as you wish and use the same item on each line if you like e.g. for Shipping charges for rental equipment, just use the Item No. and change the description.
- Enter comments to print on the purchase as follows:
- Type = Item or Comment (depends on settings and you may need to scroll up after drilling into the field)
- Enter the text you want to print in the Description.
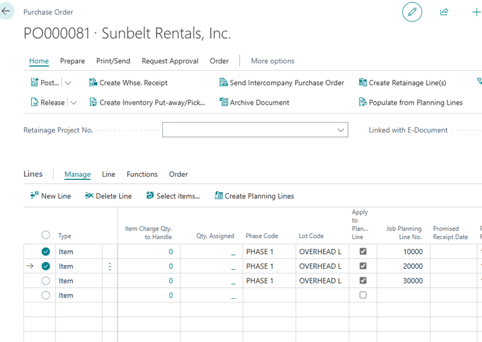
Create the Planning Lines
- We strongly advise that you create Lot – Planning Lines from the Purchase Lines as follows:

- Option 1: Create the Planning Lines from the Purchase Lines:
- Select all the lines that need to create Planning Lines and then click on the “Create Planning Lines” button as indicated above.
- If you did not enter the Phase and Lot, the system will give you an error message.
- Once completed you will see the “Apply to Planning Line” field is checked and the “Job Planning Line No.” has a unique number.
- You will also find that the PO No. is entered to the Planning Lines on the Lot.
- Option 2 (more advanced and not expected to be done for ad-hoc purchases): Link to existing Planning Lines from the Purchase Lines:
- Click on the “Apply to Planning Line” field to mark as checked
- A “Job Planning Line No.” will automatically be added if one exists. If you have more than one item you will want to choose a second Planning Line, drill up in the Job Planning Line No. field to chose one.
- Note: Although it is technically possible to use the same Planning Line No. on all Purchase Lines, this limits the budgeting options and is not recommended unless you are certain on why you are doing this.
Enter a Delivery Address (if you want it to print on the Purchase Order).
- Scroll down to the “Shipping and Payment” fasttab and click on “Show More” (to the right) to expand the tab (it changes to “Show Less” when you click on it.
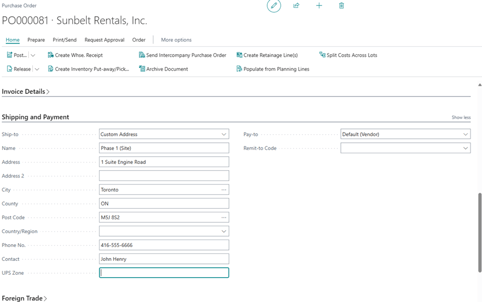
- Change the Ship-to to “Custom Address” and the Name and Address fields become editable for you to enter what you want.
Print or Email
- Back to the top of the Purchase, click on the Print/Send button

- Select Send by Email or Print.
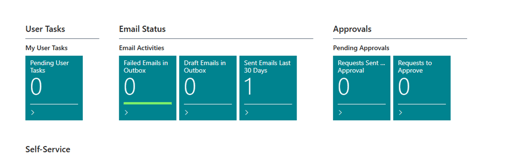
- If you want to see what you sent, most commonly just look on the main page of Business Central to look at the Email Status cues. Drill into the cue and if you want to see further back open the filters to expand the range. You can also open the page “Email Accounts” and navigate to sent emails from there.