
Back to the SaleFish - HomeBuilder Title Page
In this Article:
Understanding the Data
FAQs | Data Retrieval Locations |
Fault Finding
I See No Data | Advanced Data Analysis | Error Logs | Invalid HTTP Header | Error Log Examples
____________________________________________________________________________________________________
Understanding the Data
FAQs
- The “API Setup Company” in “SaleFish Setup” is pointing to the wrong company or I just want to change it:
- From Company Information – scroll to “API Set” Fasttab and turn on “Contains API Set for SaleFish”.
Data Retrieval - Locations of Staging to Actual Data
- The data is first brought into staging tables. These have no restrictions about having “bad data”. This has two key benefits:
- We can bring in any data whether it will pass the validation rules of Business Central and HomeBuilder.
- We have a place to view data just in case it did not make it into the final table.
- The staging tables are:
- "SaleFish Models"
- "SaleFish Lots"
- “SaleFish Lot Status History”
- "SaleFish Purchasers" (creates both customers and contacts)
- "SaleFish Installments"
- "SaleFish Lot Statuses" – a mapping table
- "SaleFish Payment Statuses" – a mapping table
- "SaleFish Frontages" – a mapping table
- The HomeBuilder tables that get updated from the staging tables are:
- "Model"
- "Lot"
- "Lot Installment" (accessed from the Lot or main page Cue)
- "Lot Closing Date" (accessed from the Lot)
- "Customer" (accessed from the Lot or Customer Page)
- "Contact" (accessed from the Lot or Contact Page)The eventual tables to be populated are the base HomeBuilder tables that you should already know.
FAULT FINDING
I See No Data in a New Company that I Just Setup
- Make sure that your company is licensed as either TEST or ACTIVE in HomeBuilder Setup.
-
Start with a general check of the setup:
- Open “Builder Projects”. Does the Project have “SaleFish Integration” turned on?
- Open the Phase. Do you have a “Project Code” and a “SaleFish No.” filled in?
- Is the SaleFish No. you used, entered to all relevant Lots in SaleFish?
- Go through the Company/Project/Phase specific setup outlined in the section above called “Ongoing Setup – New Projects/Phases”.
- Confirm that you have run the “Synchronize” function from the correct company (the one setup for global processing”.
- Does your SaleFish user have access to the company you are accessing? This is the user entered to the ClientID of the API Credential.
- Work from the most likely place data exists. Although it may seem counterintuitive, start in the Global Setup company, not the company you just set up.
- We now want to review that a call was made to SaleFish, and a response was received for the specific Phase in question:
- In BC, search for and open the page "API Sets".
- Edit/View the record SALEFISH and you should see a list the various calls (SaleInfoList, GetAllLotStatus etc.)
- If the Response Size (in the list) is zero. Check the following straight away:
- The Client ID (SaleFish user) that you are using has access to this company.
- Go to the “Get Token” function and run the “Execute” function.
Advanced Fault Finding
- Moving on (if the above does not work), Click on SaleInfoList record, click the “Response” button and then click on the “API Messages” button.
- You will get one record for each Project (you must click into (edit) the record to see which Phase. The information is held in the “Parameters” fasttab on the “Value” column.
- Work down the list of functions until you find a response that lets you know what has happened – could be a message, could be the response contents.
- (Advanced) To analyze the response contents in readable form, copy the response into Notepad++, install the “Pretty print JSON File” plugin and run it in the data set.
How to Install “Print Pretty Print JSON File” plugin:
- Install the JSON Viewer Plugin:
- Open Notepad++.
- Navigate to Plugins > Plugins Admin (or Plugin Manager in older versions).
- Search for "JSON Viewer" in the available plugins list.
- Select "JSON Viewer" and click Install.
- Restart Notepad++ after the installation is complete.
- Format the JSON:
- Open the JSON file you want to format in Notepad++.
- Select the JSON content within the file.
- Go to Plugins > JSON Viewer > Format JSON.
- Alternatively, you can use the shortcut Ctrl + Alt + Shift + M.
Error Logs and Manually Running the API Functions
- To view errors that may occur during synchronization, search for and open the page "SaleFish Integration Log".
- The message should give a clear indication of the error or at least a reason that the record could not make it past the staging table.
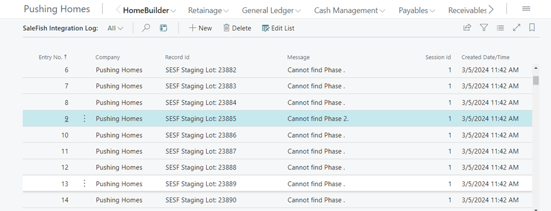
- It is generally useful to check the data integration by running the API Functions manually. See below for how to do this:
- Directly from the SaleFish Setup page – click on the Synchronize button.
- Individually, through the list of API Functions:
- From the API sets page, click on the Home button and select API Functions.
- In the API Functions page, you will see a series of functions e.g. SalesInfoList, GetAllLotStatus etc.
- Run the Get Token function first, check the results:
- Click on the GETTOKEN record.
- From the Response menu click on “API Messages”
- You should see a “Message Status” of “Complete” against the most recent record.
- To see more details click on the View button and scroll down to the Response section.
- Run the other API Functions in order, top to bottom; review the messages.
Error: "Invalid HTTP Header" When Synchronizing
The symptom
- Business Central stops with the error “Invalid HTTP header. Please, make sure the format of the header is correct.” It appears when you:
- Run Synchronize from SaleFish Setup, or
- Execute any SaleFish API function individually.
- Nothing is retrieved, the staging tables stay empty, and Last Date Time Synchronized does not move.
- The error comes from Business Central itself, before the request is sent, not from SaleFish.
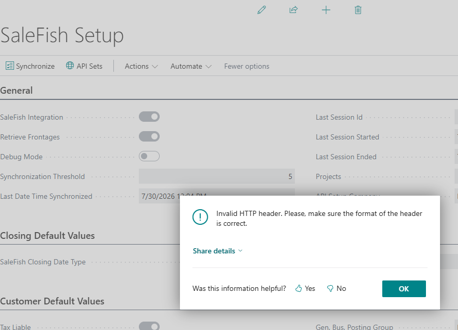
Why this happens
- To read anything from SaleFish, Business Central has to prove who it is on every call. It does that with a token, a temporary pass issued by SaleFish.
- The Get Token function is what fetches that pass. It signs in to SaleFish using the credentials held on the SALEFISH API credential, and saves the token that comes back.
- A token does not last indefinitely. Unless SaleFish says otherwise, it is treated as valid for three hours.
- Business Central attaches that saved token to every request. If it is missing, blank or past its three hours, there is nothing valid to attach, so the request is refused before it is sent. That refusal is the “Invalid HTTP header” message.
- you will usually meet in one of two situation:
- The first synchronization after a quiet period longer than three hours.
- A company that has just been created, copied or restored, where no token has been fetched into it yet.
Why this error does not appear in the SaleFish Integration Log
- The SaleFish Integration Log is only written while staging data is being processed into the HomeBuilder tables, Models, Lots, Customers and Contacts.
- This error stops the run before that stage is reached, so no log entries are created.
- An empty or unchanged log is therefore expected here, and is a useful clue in itself:
- It tells you the problem is with the connection to SaleFish, not with the data coming back from it.
Resolution — execute the Get Token function
Refreshing the token clears the error. Run GETTOKEN manually as follows:
- Confirm that you are working in the company named in the API Setup Company field on the SaleFish Setup page. The credential and its stored token exist in that company only, so running Get Token from anywhere else has no effect. If that field is blank or points at the wrong company, set it from Company Information → API Set FastTab → Contains API Set for SaleFish.
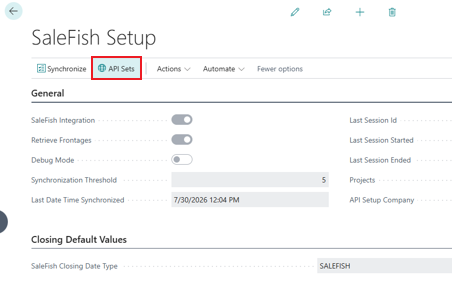
- On the SaleFish Setup page, choose API Sets.
- Select the SALEFISH record, then choose Home followed by API Functions.
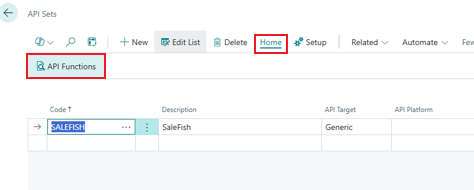
- In the API Functions list, select the GETTOKEN line. You can recognise it by the description “Get Token”, the HTTP method POST, and the static path Account/Login. Note that it sits below the retrieval functions in the list even though it has to run before them.
- Now run the action Execute.
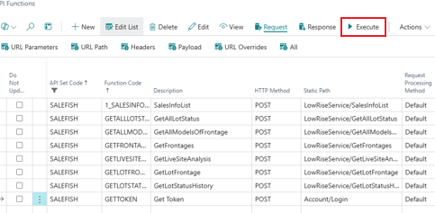
- Return to SaleFish Setup and choose Synchronize again.
Confirming that a token was actually issued
- Execute finishing without an error is not proof that a token arrived. To check:
- With GETTOKEN selected, choose Response, then API Messages.
- The most recent record should show a Message Status of Complete.
- Choose View and scroll to the Response section to confirm a token value was returned.
- Last Execution Timestamp on GETTOKEN will also show the current time.
- Any status other than Complete means the credentials are at fault, not the header. Work through the checks below.
If the error comes straight back
- Wrong company. All of the above must be done in the company shown in API Setup Company.
- Run anywhere else, Get Token appears to succeed while leaving the real credential untouched.
- Credentials. The live credentials sit on the SALEFISH API credential record.
- Confirm that the user name held there is a valid SaleFish user, and that its password has not been reset or expired in SaleFish itself.
- Ignore the Username and Password fields on the SaleFish Setup page. They are obsolete and hidden, and no longer used.
- Company access in SaleFish. That same user must also have access to the projects you are synchronizing.
- Missing access returns an empty response rather than this error, but the two are often reported together.
- Endpoint. The credential’s API Endpoint should address the SaleFish Low Rise API service (https://SaleFishLowRiseAPI.SalefishSoftware.net) unless Suite Engine has given you a different address.
Prevent it from happening again
- A token lasts three hours, so any scheduled job running less often than that will start each day with an expired one.
- On the SALEFISH credential, set Access Token Expiry Threshold to a non-zero duration, 15 minutes is a reasonable starting point.
- The token is then renewed shortly before it lapses, instead of failing on it.
- Access Token Renew API Set Code and Access Token Renew API Func. Code already point at SALEFISH and GETTOKEN, so nothing further is needed.
Error Log Examples with Potential Solutions:
- “Cannot find Model xyz” error. One difficult to find reason is that in SaleFish, the Lot is missing the elevation however the model list was created as a mix of Model – Elevation. Solution, add the elevation to the Lot in SaleFish and re-run the synchronize.

- Cannot change Model if Lot is Sited can come from various points of interest:
- The Model is missing from the Lot in SaleFish, but it was added manually to HomeBuilder, and the Model is sited on the Lot. Solution, add a Model to the Lot in SaleFish, generally it would be wise to make sure it is the same one in HomeBuilder before synchronizing again.
- The Model did not match the Model created by SaleFish and one that a user directly created in HomeBuilder and the Model is sited on the Lot. – solution, Change the Model in either system so that they match or un-site the Model on the Lot in HomeBuilder.

- Further Model errors (could be the same as the previous error) can come about when Models are created in HomeBuilder before synchronizing and the codes between the systems do not match up (remember that the Models created in HomeBuilder are two parts of SaleFish linked with a dash, e.g.,”
- In SaleFish the Model is PAX-335 and the Elevation is A, B or C.
- Three Models will be created in HomeBuilder as follows:
- PAX-335-A
- PAX-335-B
- PAX-335-C
- If this happens, the best solution is to:
- Delete the imported SaleFish records (they will not be on Lots, have budgets, Model Items etc. yet).
- Re-name the existing Models in HomeBuilder to have the same code as the incoming Models from SaleFish.
- Re-run the import and the integration will just update the existing Models (which were already in place on the Lot).