
In This Article:
Standard Inspections Overview | Recommended Inspections Flow (PDI, QA) | Recommended Inspections Flow (Ad-Hoc)
Overview
There are two primary ways of performing an inspection reflected in the Inspection types in the HomeBuilder system:
- PDI (Pre-Delivery Inspection), QA (Quality Assurance)
- These types of inspections rely on a predefined, standardized Checklist Item List.
- The inspectors have the flexibility to follow the list OR create a Service Issue as they come across them.
- Ad-hoc Inspection, like 90-day, Emergency Inspection.
- These types of Inspections do not follow an established protocol. An Inspection is focused on already-known issues and tackles issues as they are discovered.
Here is the flowchart that reflects the points described above:
[image coming soon]
For both of these processes, the beginning is similar:
[image coming soon]
Inspections – An Overview and Summarized Process Flow:
- Although there are many options in and routes through the inspection system, your primary objective is to create Service Issues for any deficiencies and indicate no issue for all checks that passed inspection. From these Service Issues, you can automatically create Work Orders for the trade or just process the Service Issue through the system.
- Conceptually, inspections are split into two types:
- Pre-determined checklist of objects that must be inspected, e.g., Windows, paint, etc.
- Inspections that don't require a pre-determined checklist, e.g., 30-Day Inspections or ad-hoc style, such as a customer call.
- Service Issues can be created by starting from an Inspection or directly in a Service Issue:
- Start with an inspection:
- From the Lot, create a new inspection and pick an appropriate Inspection Type:
- Populate a list of pre-determined Checklist Items (if the Inspection Type is setup that way). There are two ways to proceed from the Checklist style of Inspection.
- Work through the Checklist and indicate as deficiencies those tasks that have issues – if set up in Inspection Types, the system will automatically create a Service Issue, complete the Service Issue as explained below.
- Directly create Service Issues when you find an issue; the system will link the Service Issue you create with the Checklist so that you can see all the checklist items that have deficiencies vs. those that passed the inspection.
- See below the way to fill in a Service Issue.
- Start with an inspection:
- Directly in a Service Issue:
- Open the Service Issues. List and create a new one (if not already done).
- Pick the Phase and Lot (auto-picked if you start in a previous Service Issue card).
- Pick the House Area and Checklist Item (you can see which House Areas have no Checklist Items on the House Area page, you must add Checklist Items to any House Area that you wish to use).
- The assessment must be Deficiency to create a Service Issue.
- Pick a Deficiency Code (you can see which Checklist Items have no Deficiency Types on the Checklist Items page, you must add Deficiency Types to any Checklist Item that you wish to use).
- Add notes and a vendor if you do not see one and wish to create a Work Order.
- Open the Service Issues. List and create a new one (if not already done).
- Notes:
- The vendor comes from the Phase Item but the link to the Warranty Item is created in advance by linking it on the Deficiency Types page. It is common to re-use the same Warranty Item on many Deficiency Types.
- The only reasons we have a Warranty Item are to store a preferred vendor and to create the Planning Line on the Lot.
- An Inspection is automatically created upon creation of the Service Issue (only relevant if the Service Issue was created as a stand-alone document).
Standardized Setup
Before working on your inspections, review the configuration below and the tools that increase the efficiency of an Inspection performance, and afterward, manage it in the office.
Picture Resizing
Typically, a Phone or tablet will create a picture that is over 1 MB in size. This is too large to be easily handled in emails, as typically there will be multiple pictures. Therefore, the system can resize the picture you take and use it in your Inspection reports. To adjust the compression, search My HomeBuilder Settings and insert the Picture Compression %. By default, choose 10. Note: it will compress a 4MB picture to approximately 100kb (0.1 MB)
Default Checklist to "Okay"
Search Inspection Types. For an Inspection that uses a prepopulated checklist, like the Pre-Delivery Inspection, you can mark Default Ok for the Checklist.
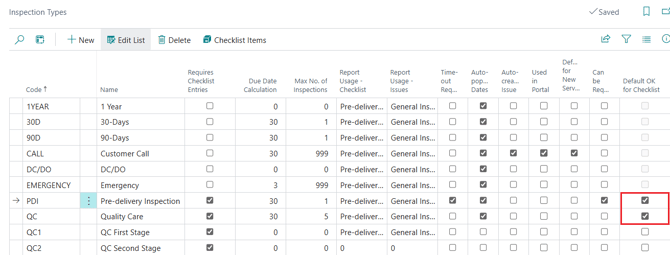
This means that by default, all checklist Items will be marked as “OK,” i.e., No Issues. This saves an inspector time as he or she will have to mark only the Deficiency Issues.
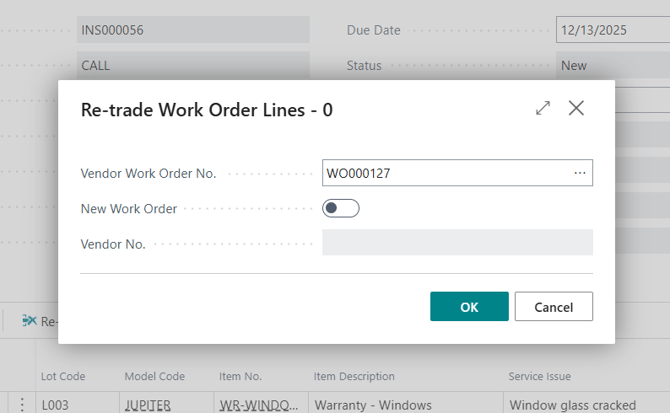
Re-trade Selected Lines on a Work Order
Search Vendor Work Orders or select Pending Service Orders Cue on the HomeBuilder main Page to open a Vendor Work Order. From the Vendor Work Orders List Page, select one and open the Vendor Work Order Card. Select a line in the Work Order that you want to move to a different Work Order, then from the sub-page menu select the Re-trade Selected button.
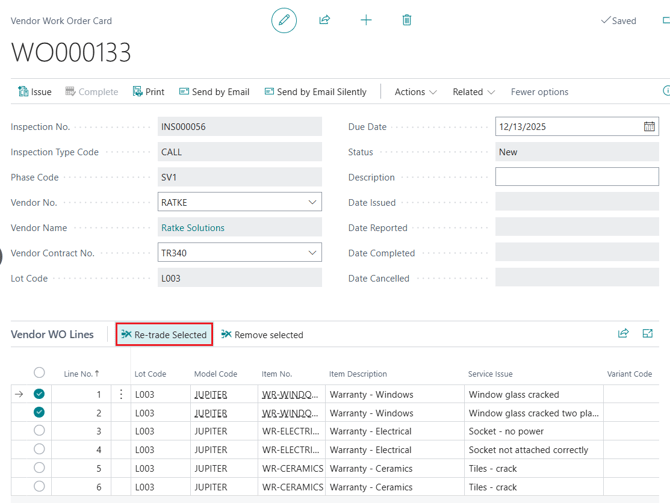
This allows you to move selected lines to a different open Vendor Work Order, even if the Vendor is different.
Note
The originating Work Order can be in the Status New or Issued. However, the target Work Order must be in the status New.
Service Issues Page with All Service Issues.
You can now group Service issues by:
- an Inspection:
- a Vendor Work Orders List
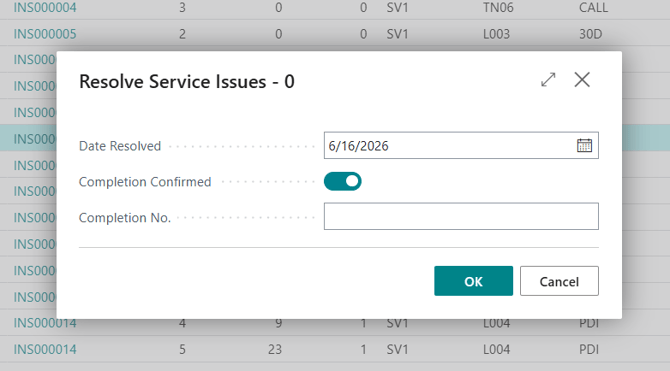
- or choose to see all service issues in the company. To do that, search Service Issues. The last grouping is preferred by most of our clients. You can now work on a Service Issue by Service Issue basis from 1 central page. Clicking the Resolve Action Button below will resolve a Service Issue. Resolving all Service Issues of a Work Order will complete the Work Order.
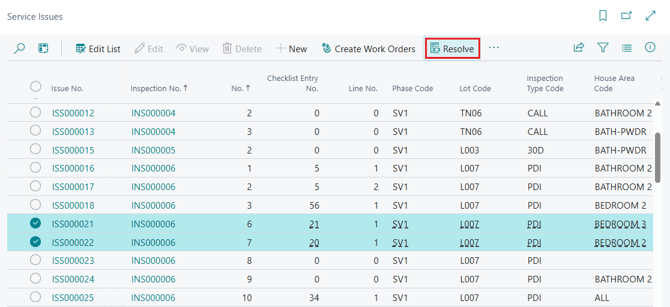
There are two options to resolve a Service Issue:
- Completion NOT confirmed: this means that the Vendor advised that the Service Issue was completed
- Completion Confirmed (on the Screenshot): This indicates that a person from your company verified completion of a Service Issue.
Recommended Inspections Flow (PDI, QA)
PDI / QA Inspections, relying on a checklist, have a similar beginning with Ad Hoc Inspections that do not contain an Item Checklist
[image coming soon]
The flow of events for the PDI / QA Inspection can be illustrated by this diagram:
[image coming soon]
The inspection is performed on-site with a phone or tablet. As described in the diagram above, you can create service issues as you find them without using the checklist on a tablet. To do this, on the Inspections Card, go to Service Issues. On the Service Issues Card, select the Plus button at the bottom of the screen:
[image coming soon]
Then choose the House Area (e.g. kitchen), select the Checklist Item, write your comments, and choose the Deficiency Type. You can take a picture of the deficiency from your device.
Select the vendor to whom remediation of the issue is going to be assigned and fill in the notes to the Vendor etc.
[image coming soon]
Now, at your discretion, from the Service Issues Card (above) you can create a Vendor Work Order (present below)
You can send the Work Order via email which will change the Work Order status to Issued. The System will prepare the email for you ready to be sent:
[image coming soon]
Creating a service issue this way will link the deficiency to the pre-populated Checklist Item List. If the Service issue was not part of the “default” Checklist Item list, it will be created.
Recommended Inspections Flow (Ad Hoc)
Ad Hoc / 30 or 90-day Inspections do not contain a Checklist Item List. However, they share a common beginning with PDI / QA Inspections (that rely on a checklist)
[image coming soon]
The flow of events for the Ad Hoc / 90 or 30-day inspection can be illustrated by this diagram:
[image coming soon]
Ad Hoc Inspections are simpler to perform than the PDI / QA Inspections. At a certain point, they follow the PDI / QA Inspection:
On the Inspections Card, go to service issues. On the service issues Card, select the Plus button on the bottom of the screen:
[image coming soon]
Then choose the House Area (e.g. kitchen), select the Checklist Item, write your comments, and choose the Deficiency Type. You can take a picture of the deficiency from your device.
Select the vendor to whom remediation of the issue is going to be assigned and fill in the notes to the Vendor etc.
[image coming soon]
Now, at your discretion, from the Service Issues Card (above) you can create a Vendor Work Order (present below)
You can send the Work Order via email which will change the Work Order status to Issued. The System will prepare the email for you ready to be sent:
[image coming soon]
Creating a service issue this way will link the deficiency to the pre-populated Checklist Item List. If the Service issue was not part of the “default” Checklist Item list, it will be created.