
In this Article:
Models Overview | Model Lot Types | Model House Areas & Measurement | Model Items | Copy from Another Model
Models Overview
A Model represents a specific type of housing unit (house, townhouse, or condo unit). It holds some basic information about the Model that you are building. Housing units of the same Model have the same physical structure and the same elements in construction. The main purpose of the Model is to link all the required data together to make Lots easy to set up and use.
To maintain the list of Models, open the page "Models" by searching for it or by navigating to a Role Center, i.e., HomeBuilder, then Operations, choose Principle, and click Models.
Key Points of Note
- A Model belongs to a Phase.
On the Models List page:
- You will see the Square Footage column. Click Edit List Action button to adjust Square Footage. The number entered here to the Model is informational only and is not mandatory, measurements used for calculations are entered in Measurement Types held within House Areas.
- Price is the Lowest Model price which set is per Model and Lot Type.
- Once you have created a Model, you can use the Action "Copy from another Model". The system gives you the option to copy all the attached information such as:
- Lot Types.
- House Areas.
- Budget.
- Key Dates.
- Model Items.
Actions Available on Models List Page
- Copy from another Model
- This action allows copying content of the tables related to another Model into the current Model.
- In the pop-up page "Copy from another Model", select the source Model, indicate what related entities you want to be copied, and press "OK".
- Validate Selected
- This action allows a user to validate the settings of selected Models. If the validation routine finds errors, warnings, or notices, the program displays them in the following window.
Column Definitions
The columns have the following meanings:
- Phase Code.
- Defines the Phase to which the Model belongs. .
- Model Code.
- Mandatory, should be unique within the Phase.
- Name.
- Name of the Model, mandatory.
- Square Footage.
- An estimate of the square footage of the Model. This is an informational, non-mandatory field.
- Price
- Lowest Model Price which set is per Model and Lot Type.
- Elevation.
- Elevation of the Model. This is an informational, non-mandatory field.
- Number of bedrooms.
- Informational, non-mandatory field.
Related Information: Model Lot Types
Deleting a (Fully Set Up) Model
Important
This is a more advanced function, and these are just guidelines for an experienced user. This is not to be attempted unless you are highly familiar with Dynamics BC and HomeBuilder. Contact your HomeBuilder consultant if you are in any doubt about what to do here.
This discussion is for people who want to remove Models that are set up but not used on an active Lot. If you can just delete the Model, it is not fully set up, and this will cause no problems.
If you receive errors when you delete, you will need to delete the contents of the tables listed below, in the order they are listed. If you are unable to delete any of the following tables, the most likely reason is that there are postings against a Lot with this Model, in which case, you may not be able to delete the Model.
From the Model List:
- Model Lot Types.
- Model Item Applicable House Areas (accessed from the Model Items page).
- Model Items (read the note below before you do this).
- Model House Areas.
- Model Budget.
You should now be able to delete the Model and if you cannot, refer to a HomeBuilder consultant for assistance.
Note
The system will automatically delete each Vendor Contract Line (Contract Revision Item table) and warn before each one. If you have many Vendor Contract Lines you will be better off deleting them first and then deleting the Model Items. To do this, open any Vendor Contract - click on "Current Prices", open the filter pane, change the filter to the Model you want to delete, and clear all other filters.
Model Lot Types
Model Lot Types are the Lot Types that are specific to the Model. You will only be able to select Models on the Lot where that Lot has at least one of the same Lot Types that exist on the Lot.
To access, search Models, open a Model Card, and select the Lot Types Action Button.
Note
Model Lot Type represents the relationship between Models and Lot Types and answers the question: “On which Lot Types the Model can be built?” Also, it answers the question: "How much does the house with this Model cost if it is built on the lot of the applicable Lot Type?" To define Lot Types, click Lot Types.
Model Pricing
Enter the base price for the model in the Model Lot Type table in the field "Price". The lowest price entered into these records will be shown in the "Price From" field on the Model, and this price will be used to determine the "Original Price" on the Lot.
Model House Areas & Measurements
Model House Areas
To access, search Models, open a Model Card, and select the House Areas Action Button. This will bring you to the page "Model House Area," which contains two grids. The main grid lists the House Areas that are included in the Model.
The bottom grid defines House Area Measurement values within the Model(described below). When the measurement Quantity changes, the value gets propagated to the Measurements of the Lot House Areas upon confirmation.
Note
- Inspection Order Column defines the order of inspection for after-sales service inspections (such as Pre-delivery Inspection).
- To view Model House Areas for all Models of the Phase, Click the filter sign on the top right, and remove the filter by Model Code.
The page "Model House Area" has the following actions:
- Add House Areas. - Select House Areas that you would like to add to the Model and press "Add House Areas to Model".
- Repopulate Measurements. - This action repopulates Model House Area Measurements.
Measurements
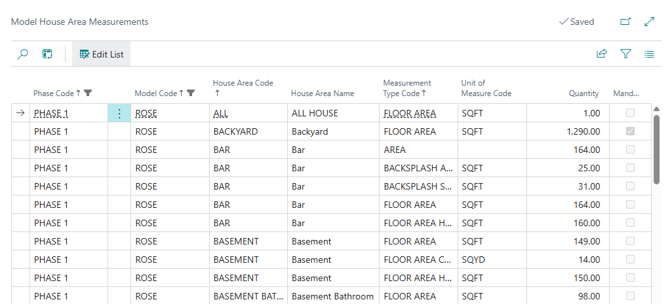
Page "Model House Area Measurements" lists measurements for House Areas of a Model and provides the ability to edit Quantities. To access, from the Model list click on Related and go to Measurements.
Note
To view measurements of all Models of the Phase, remove the filter by Model Code.
On the House Area Measurements page, you will be able to update using the Edit in Excel feature from the “Model House Area Measurements” page.
- If you want to update all Models, open the filter pane, and remove the filter for Models.
- If you have already put this Model on a Lot when you update using Edit in Excel, the system will automatically update the House Area Measurements on the Lot to the new values.
[image coming soon]
Note
You will only see entries in here for House Areas that have Measurement Type Codes defined for them. If you are looking at more or less options that you expect, go back to the Model, and click on House Areas. You will see a ” read-only” list of Measurements next to each House Area and when you click on a House Area that has Measurements, they will appear in the bottom pane. You can put values in here too after clicking on “Edit List”. If you added New Measurement Types to the House Area catalog list, you may need to click on the “Repopulate Measurements” button in the House Areas to pull in these new Measurement Type Codes.
[image coming soon]
Model Items
Model Items define which Items are applicable to the Model, House Areas of the Model where the Item can be installed, prices, and costs that are specific to the Model House Area.
To access the list of Model Items, search Models, then in the page "Models" (list page) select one Model and click the Action Button "Model Items".
The page "Model Items" contains a non-editable grid with Model Items.
Note
Please note that the House Area Code is empty for Items with Cost Scope 'Universal', whereas Items with Cost Scope 'Per Model/HA' have House Area Codes. The last is necessary to specify costs and prices on a 'per House Area' basis.
The page Model Items has the following actions (described in detail later in this article):
- Related
- Model Item Variants
- Model BOM Components
- Where-Used
- Applicable House Areas
- Actions
- Add Items
- Validate Selected
- Set Markup
Model Item Card
Page "Model Item Card" gets called from page "Model Items" by clicking "House Area Code" in the grid or "Edit" in the ribbon.
The page has the following actions:
- Related (same as Model Items list page above)
- Model Item Variants
- Model BOM Components
- Where-Used
- Applicable House Areas
- Actions
- Validate
Note
The actions on the Model Item Card are the same as in the "Phase Items" page.
Model Item Variants
On the Model Item Card, select the Model Item Variants Action Button. The page "Model Item Variants" shows variants of the Model Item. It allows editing Item Variant Cost and Price for combinations of Model/House Area (for the Items with Cost Scope "Per Model/HA").
The field "Unit Cost" is editable if the Designation is 'Single Item' or 'Component'. "Unit Cost" for bundles is calculated based on the BOM Components.
Fields Price/Profit Calculation, Markup, Unit Price, and Use Component Prices are enabled only if the Item has the "Color Chart" field set to 'Yes'.
The page has the following actions:
- Set Markup
- This action is enabled if the Item has a "Color Chart" field set to 'Yes'. To set markup, select variants and press "Set Markup". In the pop-up page, enter the markup value and press "OK".
Model BOM Components
On the Model Item Card, select the "Model BOM Components" Action Button. Page "Model BOM Components" allows for editing BOM component cost and price for combinations of Model/House Area (i.e. for Items with Cost Scope "Per Model/HA").
The field "Unit Cost" is editable if "Use Component Cost" is set to 'No'.
Fields Price/Profit Calculation, Markup, Unit Price, and Use Component Prices are enabled only if the bundle Item has the "Color Chart" field set to 'Yes'.
The page "Model BOM Components" has the following actions:
-
Set Markup
- This action is enabled if the bundle Item has a "Color Chart" field set to 'Yes'. To set markup, select BOM components and press "Set Markup". In the pop-up page, enter the markup value and press "OK".
-
Model Item Card
- This action is enabled if the BOM Component has type 'Item'. It opens the Model Item Card for the Model Item referenced by "No.".
Where-Used
This action is enabled for Model Items with the Designation 'Component'. The page called by this action shows the phase bundle items where this Component Item is used.
Applicable House Areas
The page "Model Item Applicable House Areas" allows a user to define a list of House Areas applicable to a Model Item. When a user enters "Item Category Code" for a Model Item, the applicable House Areas will be populated from House Areas of the Global Item Category.
Deletion of a House Area is possible only if the combination of Item / House Area does not exist in Planning Lines or in Lot Selection Choices of Lot Selection Packages which are closed in all companies. On deletion of a House Area from an Item, the system does the following:
- Delete Model Item House Areas with the House Area and with the Items of the Item Category or its sub-categories in all companies.
- Delete Color Selections with the House Area and the Item Category or its sub-categories in all companies.
- Delete Lot Selection Choices with the House Area and the Item Category or its sub-categories from open Lot Selection Packages in all companies.
"Actions" Menu
Add Items
Search Models, and select the Model Items Action Button to open the Model Items list page. Click the Add Item Action button.
This action allows a user to add items from Phase Items to a Model. Alternatively, the items get added to a model upon executing the action "Push to Models" in the page "Construction Items".
The action opens the page "Add Items to Model". In this page, select items you would like to add to the phase and click "Add Selected Items".
Validate Selected
Search Models, and select the Model Items Action Button to open the Model Items list page. Click Validate Selected.
This action allows a user to validate the settings of selected Model Items. If the validation routine finds errors, warnings, or notices, the program displays them in the following window.
Set Markup
Search Models, and select the Model Items Action Button to open the Model Items list page. Click Actions, then the Set Markup Action Button.
This action allows you to set markup for the Phase Items that satisfy the following criteria.
- "Designation" is 'Single Item' or 'Component'
- "Use Component Prices" is set to 'No'
- "Default Variant Code" is empty OR "Cost per Variant" is set to 'No'
- Cost Scope is 'Per Model/HA'
- "Color Chart" is set to 'Yes'
You may select any Model Items for setting markup, but only those that satisfy the listed criteria will be affected.
Copy from Another Model
The function Copy from another Model is useful when you want to copy information from 1 Model to another. To access, search Models, and on the Models List page, go to Actions and select Copy from another Model Action Button.
[image coming soon]
In the example above:
- You copy TO Phase 1, Model Lily, from Phase 1, Model Daisy.
- You selected to copy Budget and Model Items (with Model Item Prices)
Note
This tool is especially suitable for situations where you have one model completed and are introducing a similar new Model to your offering. Limitations: If your target Model (here Lily) already contains Model Items, you have 2 options:
- Just use the copy function. The existing Model Items that have the same number in the target as in the source company (Daisy) will not be updated (changed)
- Delete the Model Items in the target company (Lily). This will cause the Copy from another Model function to copy complete information and will create new Model Items in the target Company (Lily)