HOMEBUILDER: PURCHASING SETUP
Discover best practices for setting up purchasing within HomeBuilder ...
In this Article:
Best Practices | Purchasing Essentials | Work Order Vs. Purchase Order | Working with Work Orders | Managing Purchase Orders | Vendor Emails Report
Industry Norms and System Design Philosophy
Trades are often instructed to begin work directly, and invoices are issued upon completion of the work rather than based on a prior Purchase Order.
Matching incoming Purchase Invoices to specific Purchase Orders will regularly require manual intervention because trades release Purchase Invoices as work is completed, and not based on the Purchase Order that you send them. Consider a scenario: a Work Order is issued for lots 5, 6, 7, and 8, and the incoming invoice includes charges for lots 1, 3, and 6. Reconciling this invoice with the corresponding Purchase Order becomes complex and time-intensive.
Feedback from users has consistently highlighted that managing trades and their invoicing timelines can be challenging, particularly when attempting to align invoices with Purchase Orders. Therefore, we recommend using Work Orders rather than Purchase Orders for base contract purchases.
Solution: Incorporating Purchase Orders, Work Orders, and Purchase Orders for Extras
In multiple systems designed for Homebuilders, the term “Purchase Order” is used for documents that effectively function as "Work Orders", i.e. the purchase invoice does not need to align directly with the Purchase Order in these cases. This introduces flexibility but also potential confusion in terminology.
Within our system, the workflow using a Work Order involves a series of statuses: "New," "Issued," and eventually "Completed." A completed Work Order does not necessitate direct alignment with a purchase invoice. However, if a Purchase Order is created, it will require reconciliation with the associated purchase invoice.
Regarding Purchase Orders for Extras (POE), it is not mandatory to complete these within the system. A POE remains open and unreconciled, allowing for purchase invoices to be processed independently as they are received. For example, a POE can be issued, printed, and left in the system without closure. This accommodates scenarios where the purchase invoice is processed separately.
Work Orders and Base Contracts
The system is designed for efficient use of Work Orders based on pre-agreed costs, typically outlined in vendor contracts. Work Orders act as formal requests to initiate work, ensuring alignment with contractual terms. For example:
- A base contract specifies the scope of work, such as installing tiles.
- A Work Order is created to signal readiness to begin,(e.g. in Lot 5.) supported by predefined costs and scopes from the contract. Work Orders are integrated into the system without the need for traditional Purchase Orders.
Recommended Process for Base Contracts and Vendor Agreements
The recommended approach:
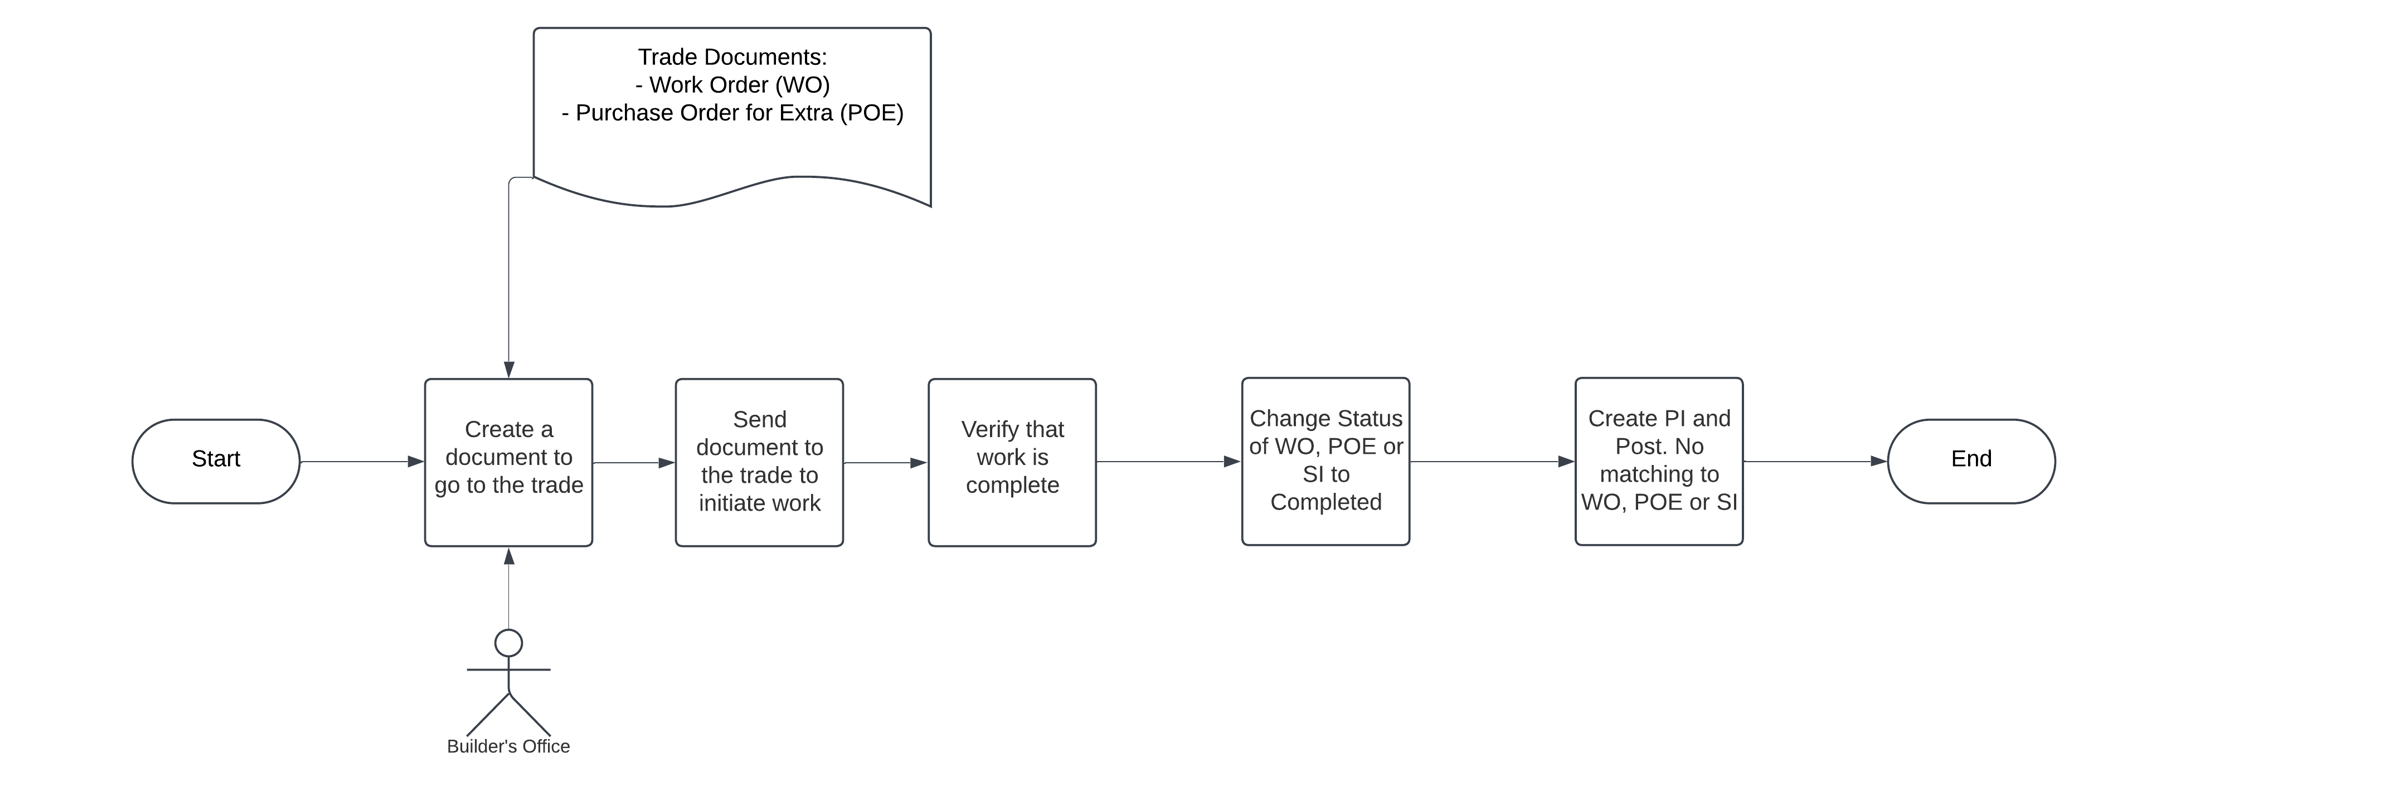
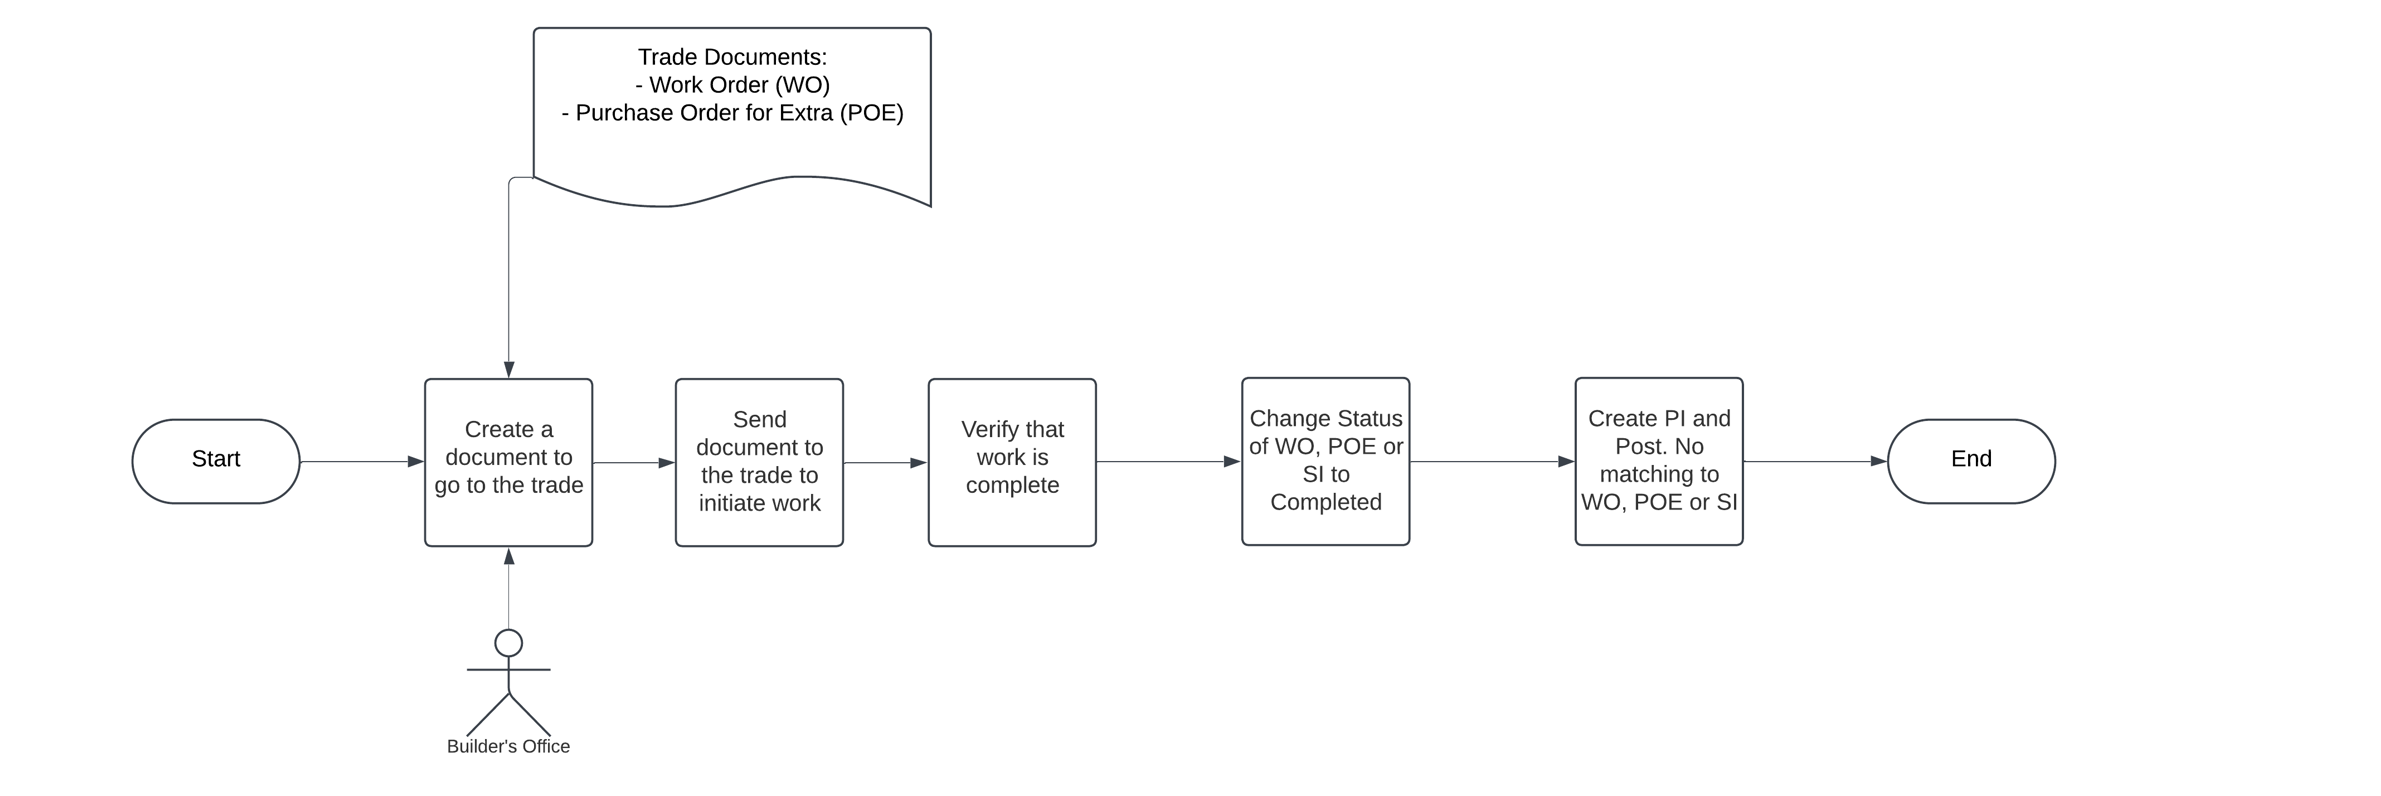
- Set Up Vendor Contracts: Establish base contracts with vendors and create model items that become Planning Lines on a Lot.
- Initiate Work with Work Orders: When ready, generate Work Orders to signal work commencement, optionally including cost details.
- Confirm work completeness.
- Process Purchase Invoices: Upon receipt of Purchase Invoices, use Planning Lines to post them. (process them "stand-alone", i.e., without the need to match with a WO or POE)
- Selection Package Workflow: For selection packages, Purchase Orders for Extra (POE) are released. Purchase Orders (POs) are generated only where necessary.
- For inspections, service orders are used instead of Purchase Orders. These service orders do not require invoicing, as they represent requests for remedial work rather than contractual transactions.
Flexibility and Adaptation to Business Needs
While the Work Order approach is the recommended process, the system accommodates flexibility to suit various business requirements. Some organizations may prefer initiating every vendor transaction with a Purchase Order as a legal document.
This approach may be chosen for reasons such as:
- Lack of reliable vendor contracts.
- The need for strong controls when it comes to dealing with trades.
- A preference for formalized documentation for each request. (hence the need to use Purchase Orders)
- A division of responsibilities, where one team creates Purchase Orders and another reconciles invoices against them. In such cases, the system allows the use of Purchase Orders to ensure control, even in the absence of vendor contracts.

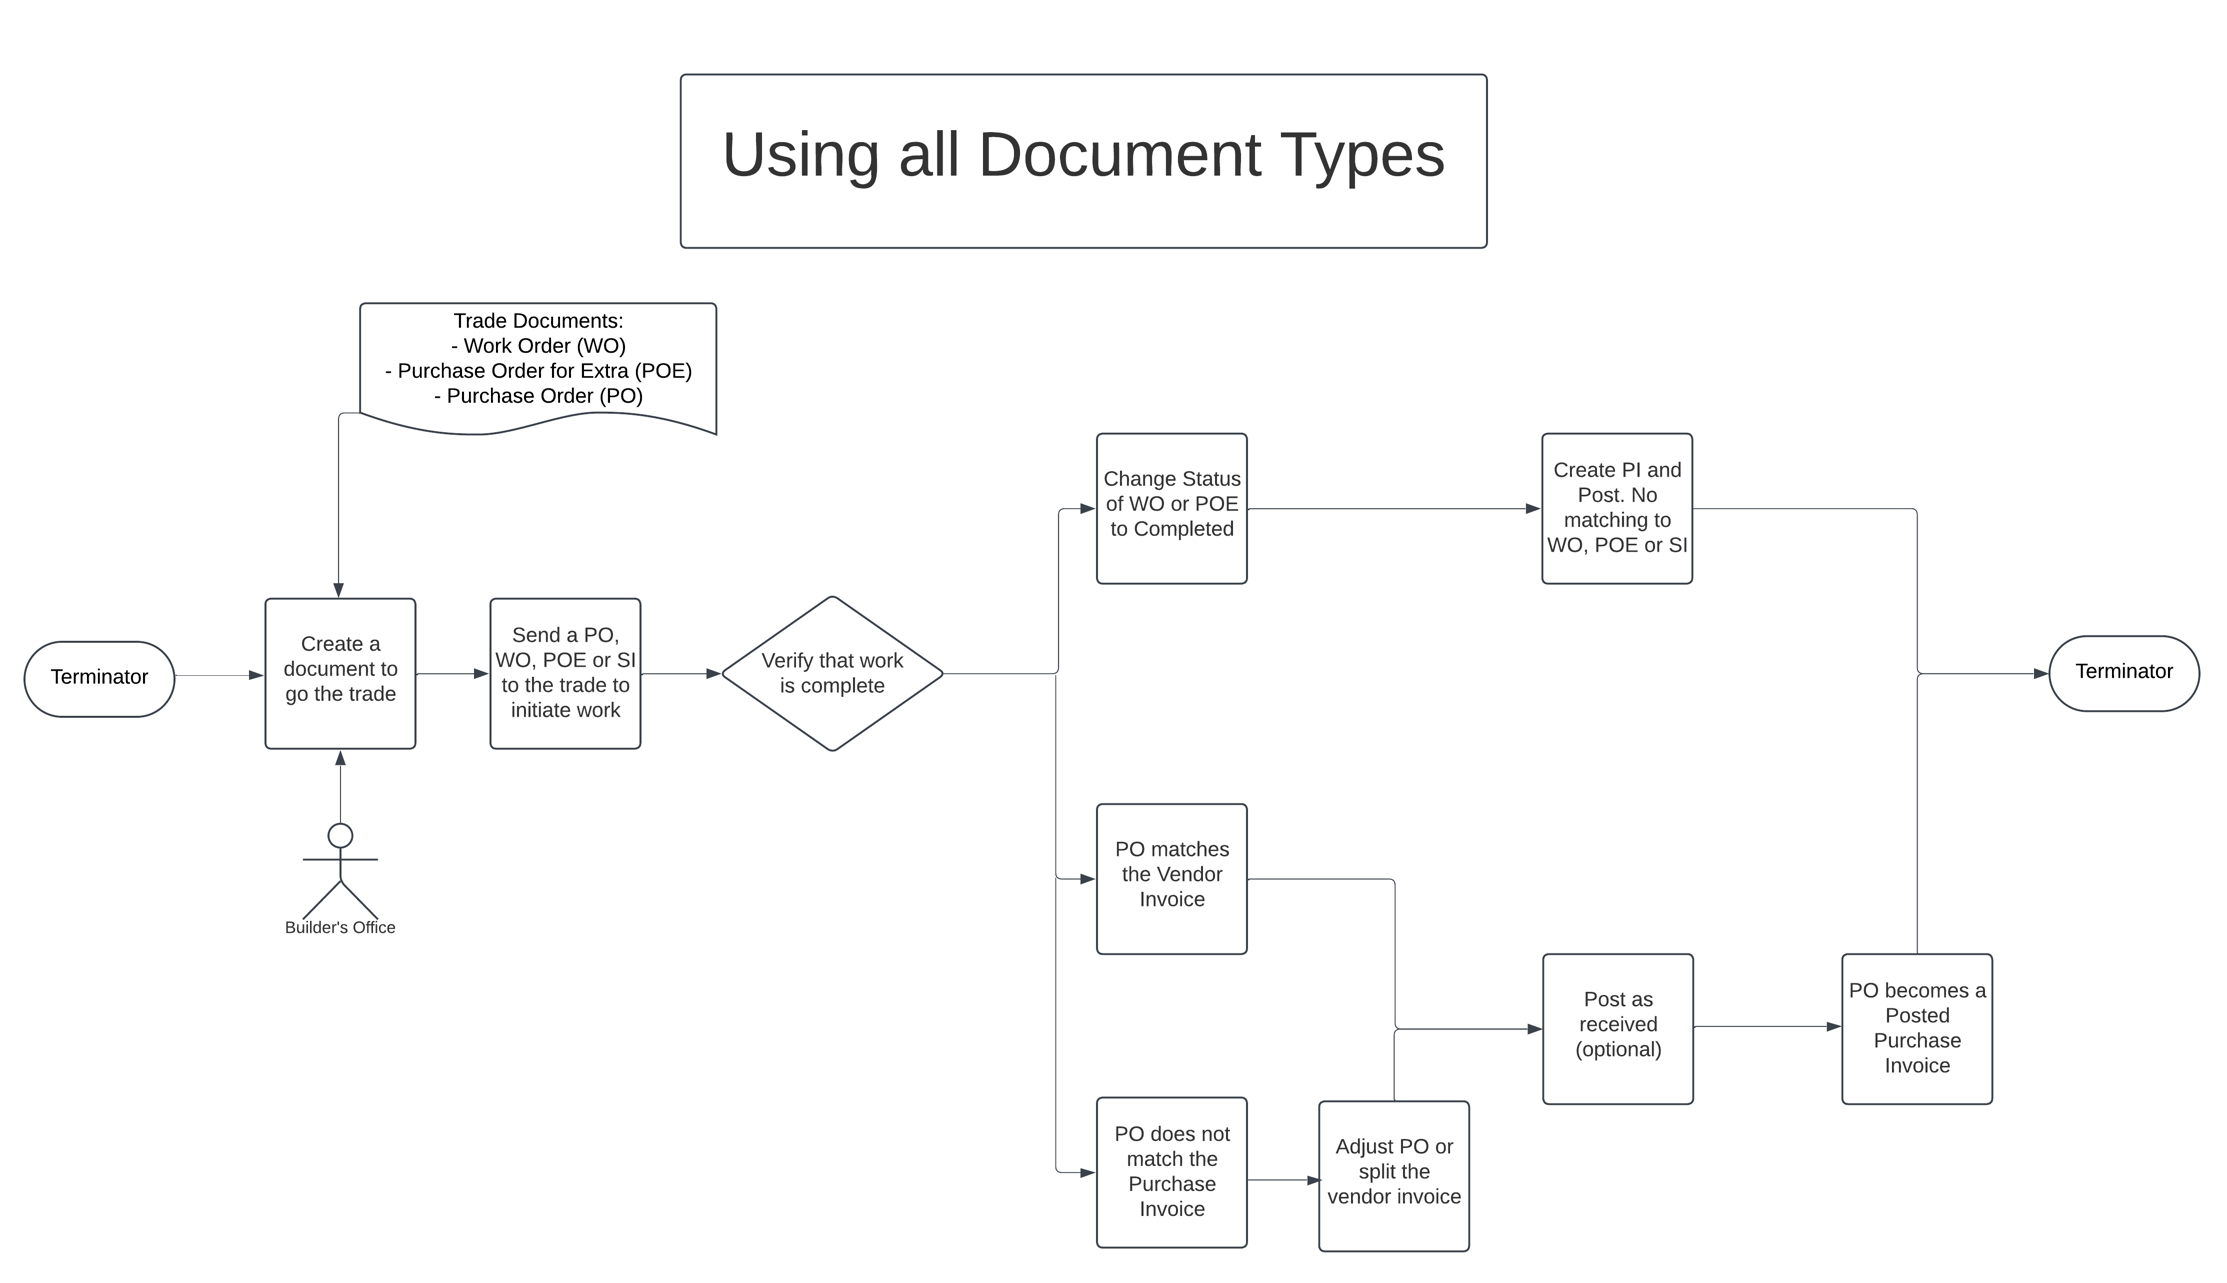
Using all Document Types
It is possible to use both Work Orders and Purchase Orders within a single company. The process can be illustrated as follows:
Purchasing Essentials in HomeBuilder
General Discussion on Purchasing Best Practices in HomeBuilder
Note
This online help only covers the advanced purchasing features for HomeBuilder; to learn how base Dynamics BC handles purchasing, use the Microsoft Learn.
There are three methods of creating purchase documents related to lot costing.
- By populating Purchase Lines from Planning Lines – pull the lines from Lot Planning Lines to the Purchase document. (Recommended option to get the most out of your system)
- From a Purchase Invoice or Purchase Order, use Populate from Planning Lines button.
- By manually entering Phase, Lot, and Cost Details in purchase lines with either G/L Account No. or Items.
- By creating a Purchase Invoice from Progress Bill (described in section Progress Billing).
Pre-requisites to be able to post a Purchase to Lot Costing
Posting purchase documents related to lot costing has the following prerequisites:
- Lot Budget Line with Cost Detail Code specified in the purchase must exist in the Lot Budget. Refer to the article Lot Budget
- The Lot must have a "Customer No." assigned to it. If the Lot was not purchased yet, create and assign some temporary customer, for example, 'INVENTORY'.
- If you create a purchase document by entering Phase, Lot, and Cost Details then make sure the Task associated with the Cost Detail record (in page "Cost Details") exists under the Lot. Refer to the article Construction Workflow Templates, action "Push to Lots".
- Budget Revision must exist on the Lot.
1. Populating Purchase Lines from Planning Lines
Tip
If you setup the system correctly, this method of processing purchase invoices not only is quicker and will avoid costly errors; but it also gives a useful view of intended costs as you go through the process.
- Create a purchase document (Purchase Invoice) and enter the Vendor No. Click on the Button "Populate from Planning Lines".
- The page "Select Planning Lines" is opened for you. Select the Phase Code and Vendor Contract No. unless you have setup your default Phase in "My HomeBuilder User Settings" (which is accessed from the standard search in BC).
- In the field "To Invoice", specify what kind of Planning Lines you want to bring to the invoice: All, Base Contract, POE, or Other. When in doubt select All.
- With the flag "Completed Only" specify if you want to bring only completed Planning Lines or not. Lines are completed in the Task Operations part of the Lot.
- With the flag "Include lines with zero Remaining Cost" you can populate purchase lines where there are zero "Remaining Total Cost". This can be useful when vendor prices are not known in advance.
- Planning Lines with zero "Remaining Qty." are always excluded.
- Press "OK".
- After clicking OK from the previous process the page "Planning Line Selection" is opened.
- Select the Planning Line/s you want to bring onto the invoice and click "Add Selected to Purchase Lines".
- The purchase lines are created for you in two groups: 'Standard' and 'Upgrade and Extras'.
Note
In case of a partial payment for the Planning Line, enter the exact value specified into the field "Amount to Invoice" (highlighted in blue)
- This amount always starts with the "Remaining Total Cost". When "Amount to Invoice" is changed, the "Qty. to Invoice" is recalculated automatically.
- If you change the value yourself on the Purchase Line (and do not use this function), you might get results that are complicated to unravel.
- The "Quantity" and "Line Amount Excl. VAT" are populated from fields "Qty. to Invoice" and "Amount to Invoice" in page "Planning Lines Selections", the field "Direct Unit Cost Excl. VAT" gets calculated accordingly.
2. A. Manually Entering Purchase Lines Using an 'Item'
This is better than using a GL Account, but not as good as using "Suggest Planning lines". There are other ways of entering Purchase Lines against an Item, but the method described here is the safest and best. Watch the video at the bottom of this page to see how this can work.
To make sure you get the correct Lot costing when you manually create Purchase Lines with an Item, you must enter the following fields of Purchase Line in the following order:
- Type - 'Item'.
- No. - Select from the list.
- Phase Code - Select from the list.
- Lot Code - Select from the list.
Important
- Enter values to the Phase Code not the Dim Phase Code field.
- Enter values to the Lot Code not the Dim Lot Code field.
Note
- The field "Job No." is taken from the Job record referenced by the "Phase Code" and "Lot Code".
- The fields "Cost Detail Code" and "Job Task No." will be populated automatically from the Item.
- If a Task is missing in the Lot, the system suggests creating a workflow that contains this Task for the Lot.
- If Cost Detail is missing in the Lot Budget, the system suggests adding it there.
2. B. Manually Entering Purchase Lines Using a 'G/L Account'
Note
There are other ways of entering Purchase Lines against a GL Account, but the method described here is the safest and best. The user does not enter the GL Account; they enter the Cost Detail code, and the GL account is pre-determined for them. This method assumes you have set up your Cost Details correctly, and you have entered a GL Account against each Cost Detail that you intend to use like this. Watch the video at the bottom of this page to see how this can work.
To make sure you get the correct Lot costing when you manually create Purchase Lines with a GL account, you must enter the following fields of the purchase Line in the following order:
- Type - 'G/L Account'.
- Phase Code - Select from the list.
- Lot Code - Select from the list.
- Cost Detail Code - Select from the list.
Important
- Enter to the Phase Code not the Dim Phase Code field
- Enter to the Lot Code not the Dim Lot Code field
- Enter to the Cost Detail Code not the Dim Cost Detail Code field
Tip
If you intend to use this method on a regular basis you will find it helpful to "Personalize" the page of a purchase document. See the base Microsoft document on Personalization or contact your HomeBuilder consultant.
The following fields will be populated automatically.
- "No.".
- "Job No.".
- "Job Task No.".
- The "Job No." is taken from the Job record referenced by the entered "Phase Code" and "Lot Code". Fields "No." and "Job Task No." are taken from the Cost Detail record referenced by "Cost Detail Code".
- If a Task is missing in the Lot, the system suggests creating a workflow that contains this task for the Lot.
Split Cost Across Lots
This is an automation tool to automatically create multiple purchase lines based upon one amount.
The function "Split Cost Across Lots" is available in purchase documents and allows a user to split amounts or item quantities between multiple Lots.
How to do it:
- Create your Purchase Invoice (or Purchase Order).
- Before entering any lines, click on the button "Split Costs Across Lots".
- In the "Split Costs Across Lots" Page:
- Select what to split: 'Amount' or 'Quantity', in the field "To Split" (normally Amount).
- Specify "Quantity", "Quantity Rounding" and "Unit Cost" if you are splitting the quantity.
- Specify "Net Amount" if you are splitting the amount.
- Select "Split Rule" which takes the following options:
- 'Evenly' (split Quantity or Amount evenly between the selected lots).
- 'Per Square Footage' (split Quantity or Amount proportionally to the Square Footage of the selected lots).
- 'Per Lot Offer Price' (split Quantity or Amount proportionally to the "Offer Price" of the selected lots).
- 'Manually' (The fields "Quantity" and "Direct Unit Costs" in the purchase lines will be filled-in with zeros. You will need to enter them manually).
- Select the Lots to split the cost across in the bottom part of the page.
- Click on the "Populate with Split Cost" button at the top of the page.
- Select what to split: 'Amount' or 'Quantity', in the field "To Split" (normally Amount).
Tip
If your vendors are not set up for this process, you will receive an error along the lines that the Default Line Type is not set up. Just come out of the page, go to the bottom of the Purchase Document, and enter the Default Line Type, No. and Cost Detail if necessary - see notes on "Split Cost Across Lots Setup" lower on this page.
Vendor Card HomeBuilder Options
The Vendor Card has the following custom fields:
- T5018 Eligible.
- Fields used to assist with "Split Cost Across Lots" functionality:
- Default Line Type.
- Default Cost Detail Code.
T5018 Eligible
Indicates if the vendor should be included in the T5018 report required by Canadian authorities.
Split Cost Across Lots Setup
Default Line Type
The Type of purchase line to be used by the action "Split Cost Across Lots". It can be 'Item' or 'G/L Account'.
Default Cost Detail Code
Can be specified if the "Default Line Type" is 'G/L Account'. It is to be used by the action "Split Cost Across Lots".
The Default Cost Detail Code will be automatically assigned to the purchase line of Type "G/L Account" after entering the Phase Code and the Lot Code.
Note
If the Default Line Type is Item, the Cost Detail Code is taken from the Item, and the Vendor is not relevant.
Default No.
Defines the default G/L Account No. or Item No. depending on the "Default Line Type". It is to be used by action "Split Cost Across Lots".
Upon entering "Vendor No." into a purchase document, the fields: "Default Type", "Default Cost Detail Code" and "Default No." get populated from the Vendor record.
Processing a Purchase Invoice Without a Vendor Contract:
Using Work Order Vs. Purchase Order
Document Definitions (for documents used in Vendor Interactions):
- A Vendor Work Order (WO) is a document listing the items that must be completed by a Vendor within a Vendor Contract.
- A Purchase Order for Extras (POE) is a document that informs a vendor about upcoming upgrades and extras.
- A Purchase Invoice (PI) is a document that processes a line-by-line breakdown of charges for anything from a vendor. This can be related to Work Orders, POEs, Purchase Orders, or just a fee to be paid.
- Purchase Order (PO) is a rarely used document in HomeBuilder as it is replaced with WO and POE. If you have inventory items that you need to store and do not have them, go directly to a Lot, you may want to use this document.
- The posted Purchase Invoice (PI) is the posted version of the Purchase Invoice. The posting of the Purchase Invoice produces this document, deletes the original Purchase Invoice (when all lines are fully posted), and posts the GL, tax, and other ledger transactions.
Why Work Orders instead of Purchase Orders?
- You can create a Work Order automatically from a list of Planning Lines. Planning Lines are typically created from Vendor Contracts. Note that you can also populate a Purchase Order from Planning Lines however the process is less intuitive and less automated.
- The system will automatically gather all Planning lines that you select and merge all lines into one Work Order per vendor.
- If you select Planning Lines from multiple vendors, the system will automatically create a Work Order for each vendor, potentially saving time.
- Work Orders have a process flow. There are multiple statuses of Work Orders so that you can track them through the system; these statuses are viewable from the Work Order and the Planning Lines.
- New (the default status upon creation).
- Issued (When ready to send Work Order, you will issue from within HomeBuilder).
- Reported (this can be done within the system, on a mobile device or PC, or this can be done by the vendor in the Contractor’s Portal if you have turned this feature on and setup permissions).
- Completed (Work is complete and indicated as such in HomeBuilder. This status change will also update the Task Operations. (mark them as Completed) and automatically update the timeline of the construction of the Lot)
- The relationship between Task Operations and Work Orders is bi-directional.
- This means that your process (to indicate the task is complete) is via the Work Order screen rather than the Task Operations. Once you have marked all Work Orders of a Task as complete, the Task will automatically be marked as complete.
- You can also mark Task as completed directly. (from the Lod Card, select Task Operations)
- The system will not prevent you from using the 2 above mentioned methods simultaneously. However, it is best practice to pick 1 method and stick to it to avoid confusion in your office.
Note
Work Orders are used for any Planning Line tracking mechanism; however, you should consider that they are primarily set up to be used for Base Contract task initiation and tracking. When it comes to Selections (aka Color Chart), Purchase Orders for Extras (POE) are typically used. Partly because these have a price by default on the document, but also because they indicate that a new purchase has been initiated. Unlike base contract items, where the vendor knows that they will be working on this task at some point, POEs are an addition to the base contract.
Working with Work Orders
If there is a desire to match a Work Order with an invoice, it is critical to note that all operations begin with a Planning Line. Deviating from this foundational rule can lead to process inefficiencies.
For example, if we examine Planning Lines for Lot #3 and attempt to process a purchase invoice for excavation, the system may indicate missing or incorrect data, such as no remaining quantity or unrecorded lines. Adjustments can be made to correct quantities or reissue Work Orders. While this process is straightforward, careful attention is required to ensure accurate reconciliation.
Ultimately, the system's design allows for flexibility in managing Work Orders and Purchase Orders, allowing invoices to be processed independently (Work Orders) or matched, (Purchase Orders) depending on operational needs.
Case Study:
Search Phases, then go to Phase Planning Lines. Aleternatively, from the Lot card, click Planning line on the right hand Infopane. Find a line with a remaining quantity of more than zero, a valid vendor, and no purchase invoice. We are going to process a Work Order. Once Planning lines are selected, click Create Work Orders

You should receive a message "1 Work Order has been created" and your screen will show the created Work Order (in the example WO000124) applicable to each line.
Click on the Work Order and open it. It will bring you to the Vendor Work Order Card. Here you can:
- Click the Print button
- Print the Work Order without prices. This is just to notify the trade and provide details of the job without prices. Print (without Costs) would go to the work site.
- Click Print with Costs
- Print with costs is a replacement for some of the functions of other systems. This will print the Work Order with prices.
- Print with cost would go to the back office of the trade without creating a Purchase Order, to confirm that we've picked the correct cost, and that's quite important for the Builder's cost control.
- Click Issued
- This means that the Vendor has been notified that he can start the work
- Click Complete
- Use after the work is performed by the Vendor. This process will mark the Planning Line as Complete. Marking all Planning Lines of a Task as Complete will change the Task Status to Complete. (This applies only to Tasks that are Construction Tasks, i.e. they are part of a Construction Workflow and have a Construction Task Flag marked.)
The Permissions Required to See and Print Costs.
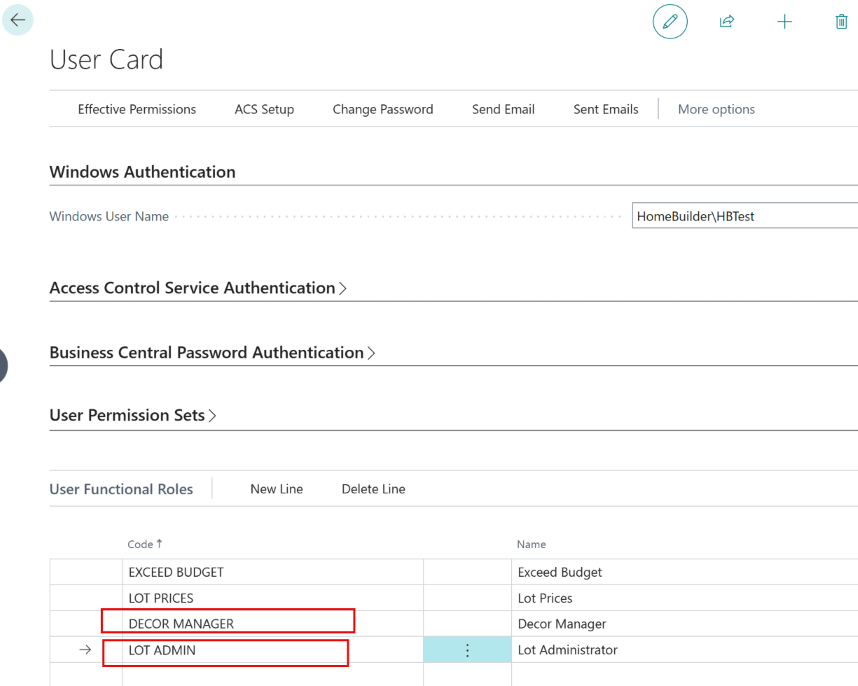
Search users and select the User.
On the User Permission Sets tab, the user must have either
- ***Decor Manager ***
or
- Lot Admin
permission
Important
Users should either
- Utilize Work Orders to complete tasks (as mentioned above) or
- Use the "Mark/Unmark" or "Check/Uncheck" completed methods, but not a combination of both. (To do it, on the lot, select Task Operations and on the Lot Task Operations page, mark a Task as Completed) From a system perspective, the software does not enforce a single method, allowing for flexibility in the approach. However, for the sake of consistency and clarity, it is strongly recommended that customers select a single, consistent process (process 1 or 2). Mixing and matching these methods can lead to confusion and inefficiencies. Adopt a uniform approach company-wide.
Practical Example: Purchase Invoices and Work Orders
Search Purchase Invoices, select a Vendor, and click Populate from Planning Lines. The process will lead you to the Planning Lines selection page where you can select the Planning Lines for that Purchase Invoice. Since the Work Order had a status Completed, the Planning Line Progress Status will also be flagged as Completed.


On the Planning Line, the Work Order number and its lines are visible.
Now, you can select the Planning Lines that are relevant to this invoice and add them. You are ready to post this invoice.
- If you post an invoice for a partial Quantity, e.g.: 0.25 of the full quantity of 1, after posting the last invoice for the quantity of 0.75, only the last Invoice Number will be visible on the Planning Lines.
Note
For further reporting purposes, you can:
- Navigate to the Planning Lines and see both the existing Work Order and a newly posted Purchase Invoice
- For full financial tracking, on the Lot List or on the Lot Card, go to Related and select Job Cost Ledger Entries. (You can select that option from the right-hand side infopane as well) This ledger will provide:
- The Work Order Number issued originally.
- The initial Purchase Invoice Number, Cost, and posted quantity of 0.25.
- The same (original) Work Order Number and subsequent Purchase Invoice Number completing the (original) Work Order.

Working with Purchase Orders for Extras
If you decided to use Work Orders for your Base Contract Items, you will most likely use Purchase Orders For Extras (POEs) On the Lot Card, select Selection Packages. It will bring you to the Lot Selection Packages page. Highlight the relevant Lot Selection Package, go to Related, and pick Work Planning. It will bring you to the Package Work Planning page where you can highlight and then click Release for POE. This will enable the Creation of POEs. To do it, click Create POEs.
Once the POE is released on the Work Planning Page, you can also create a POE from the Phase Planning Line.
Note
If this is preferred, a POE can be substituted with using a Work Order. However, a Work Order typically is issued in a situation where there is a Vendor Contract in place. POE is for extra work based on the Color Chart Selection made by the home purchaser. POEs can not be released for the Base Contract Items.
Working with Work Orders of Type 'Service' for selected Service Issues
These matters are covered in Service Issues and Work Orders.
Performing an Inspection describes situations where Service Issues are created and, subsequently, "Work Orders of Type 'Service' for selected Service Issues" are issued.
Managing Purchase Orders Instead of Work Orders
The Purpose of Purchase Orders in the System
Purchase Orders within HomeBuilder primarily exist due to their terminology in other systems, where they are referred to as "orders." However, they are not traditional Purchase Orders as typically understood. Instead, they function as confirmations indicating readiness to initiate work.
In our system, we refer to these as "Work Orders" because they can include pricing details and serve as both a work initiation request and documentation of pre-agreed costs. The only scenario where a traditional Purchase Order would be appropriate is when an organization wants to predefine charges for a transaction, allowing the individual responsible for processing to simply confirm and post the details.

Understanding Challenges with Purchase Orders
One potential challenge arises when work is completed across multiple lots, but the invoicing from the Vendor and Purchase Order processes is not aligned. For example, if a vendor completes work on Lot #3 and Lot #5, they may issue a single invoice covering both lots. However, if the original Purchase Order was created for Lots #3, #4, and Lot #5, this creates a reconciliation issue for the recipient.
In such a scenario, the recipient must manually separate the invoice amounts to match the corresponding Purchase Orders. While this is a manageable task, it becomes increasingly cumbersome if such situations occur frequently.
Note
- You must process a Purchase Invoice against a Purchase Order. Processing a Purchase Invoice and deleting a Purchase Order is a wrong process.
- Simplifying Invoice Reconciliation with Work Orders
- Instead, upon the receipt of a purchase invoice, you can update the status of the associated Work Orders to "Completed,". This approach eliminates the need for detailed reconciliation between invoices and Purchase Orders (as there are no Purchase Orders), streamlining the workflow and reducing administrative burden.
- In cases where this issue arises repeatedly, the organization should reconsider its chosen process. Specifically, rather than using Purchase Orders and matching them to invoices, it would be more appropriate to adopt a Work Order and purchase invoice approach.
Working with Purchase Orders
On the Lot Card, select Lot Planning Lines from the right-hand side Infopane. Select a Planning Line and click Create a Purchase Order, then, optionally, create a Work Order. You can also click 1 button - "Create WOs and POs".

To process Purchase Invoice, search Purchase Orders and fing your PO or hit +New button if you did not start with creating a PO from a Planning Line.
The Purchase Order contains Phase and Lot number. You can adjust the Unit Cost or Quantity (here: from 1 to 0.5) if necessary:
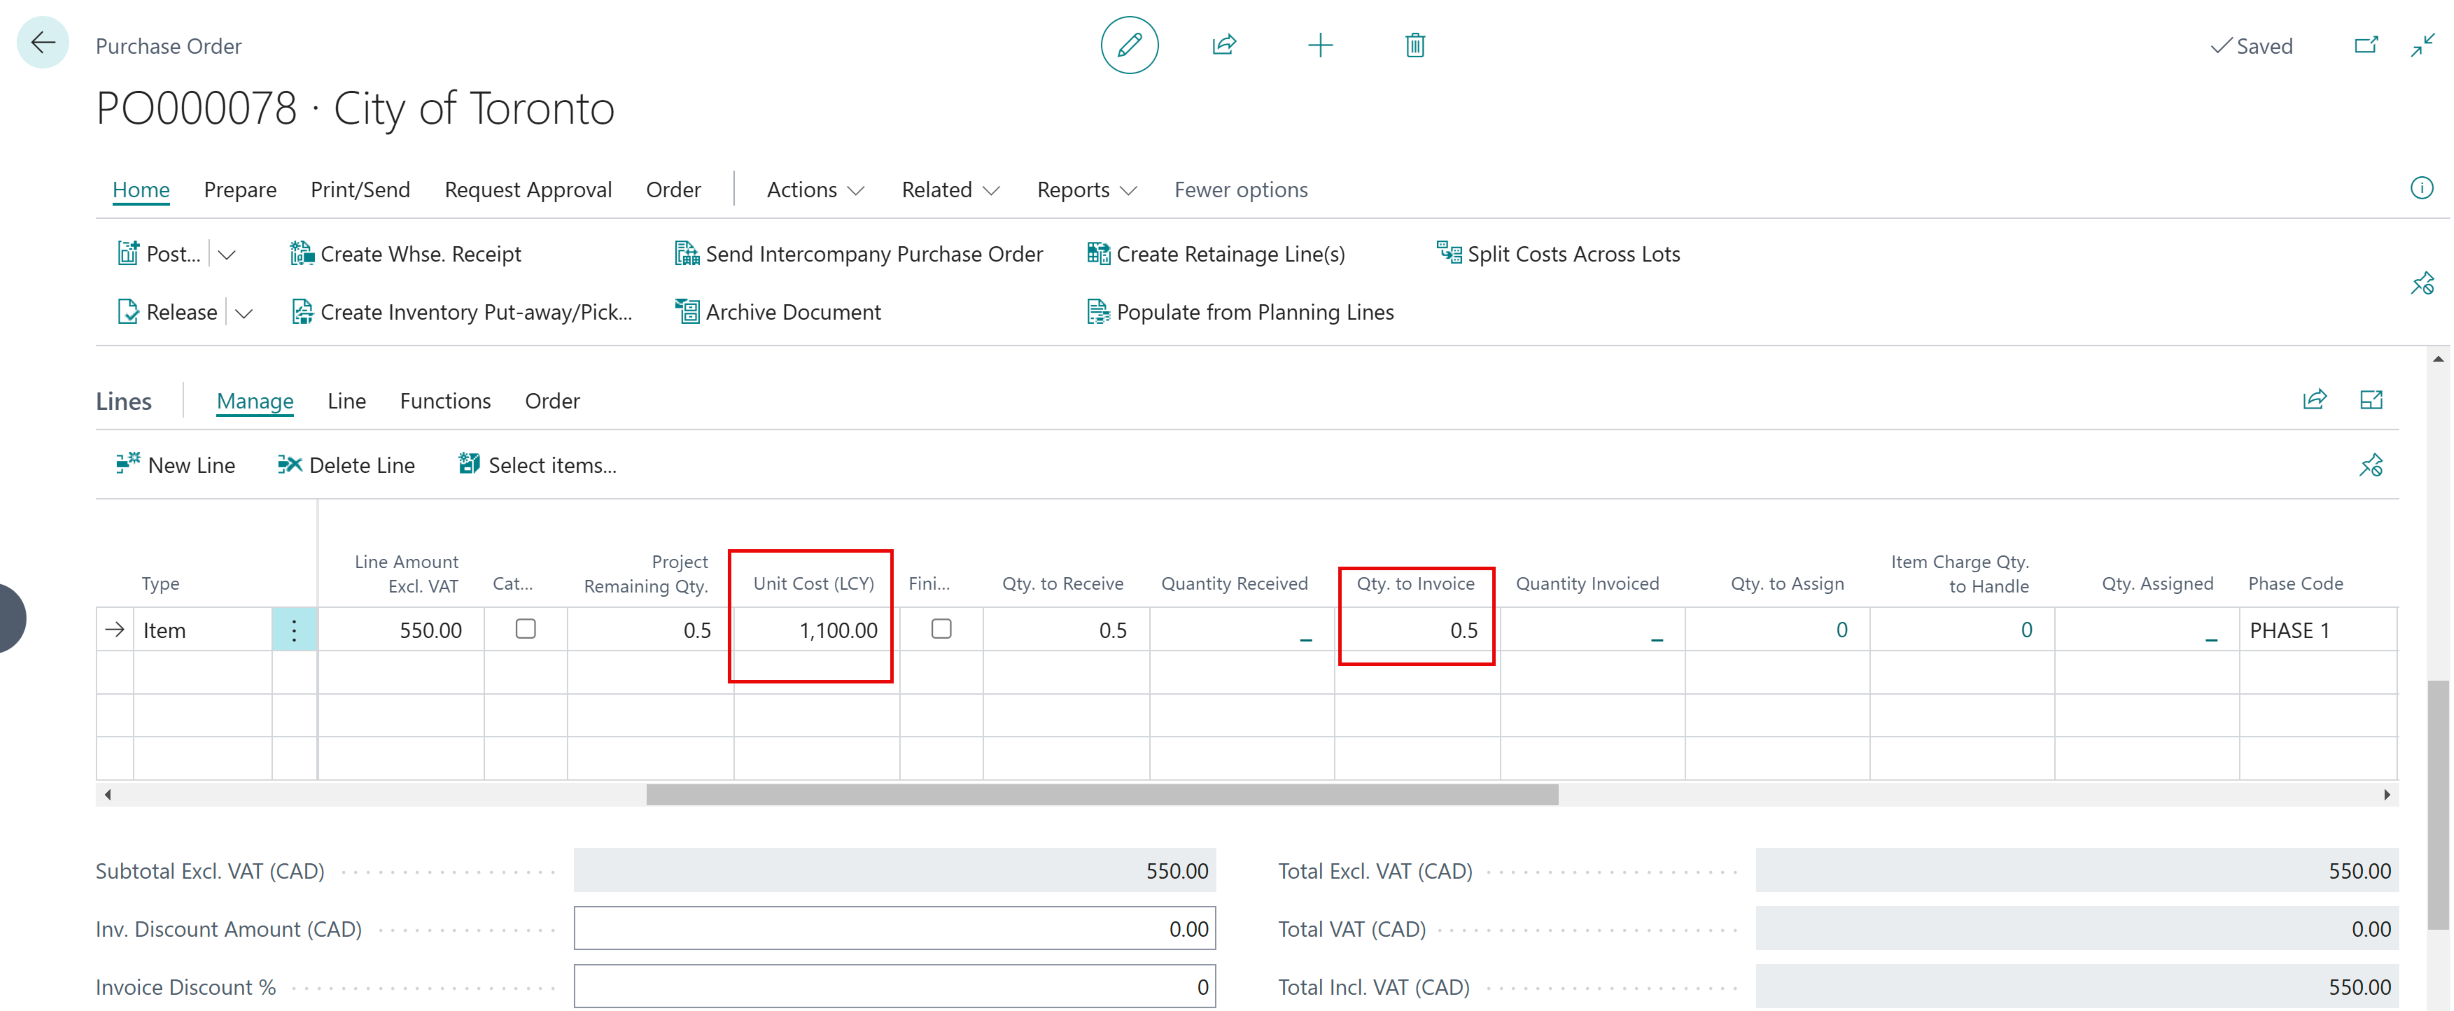
As the time progresses, you have 3 options:
- Receive.
- The work / job is completed, but the vendor did not send the invoice yet.
- Invoice.
- Vendor has sent the invoice, but the work / job has not been completed.
- Receive and Invoice.
- Choose when the work is complete and you received an invoice. This is the most commonly chosen option.
Vendor Emails per Report using Vendor Document Layouts
General Concepts
There is an email address on the Vendor, if you do nothing else in the system, this will be the default for any email sent out to the vendor.
If you want to use a different email for different documents to go to the vendor then you need to use "Vendor Document Layouts".
Base Busines Central Function explained in brief
Base Business Central provides a basic ability to do this from the Vendor Card (not list). Go to the Vendor Button and you will see "Document Layouts". There is a function called "Copy from Report Selection" which brings in all the reports setup for vendors, in here you can change the email address. This is a slow process as it must be done vendor by vendor.
Update all reports for all vendors in one page
-
In HomeBuilder there is an option to update all reports for all vendors in one page. From the HomeBuilder menu, go to Setup – Document Management – Vendor Document Layouts:
-
The page will be filled in with any vendor reports already setup. To fill in any missing vendors/reports click on the “Copy from Report Selections”.
- Select the reports in the top page of the page (you will need to scroll down to see all reports)
- Select all the vendors that you would like to add to the list.
Note
You need to multi-select reports and vendors in the “Copy from Report Selections” function; otherwise, this function will do very little.
- Click on the button “Copy to Document Layouts” and follow the prompts but be very careful here. You will be given two options, one will override any email address you have entered already, one will just add the vendors to the list.
Important
When you see the message "Would you like to update Email in existing Document Document Layout records from Vendor Card?", choosing Yes will override any email addresses you have already entered. Select No and the system will add the vendors but keep previously entered email addresses intact.
- Once back in the "Vendor Document Layouts" page, Click on “Edit List” and enter the email addresses that you want to use.
