
Pre-defined packages typically include a coordinated set of features such as finishes, fixtures, or enhancements that can be selected instead of choosing individual options manually. These packages are used to streamline the selection process, ensure consistency across homes or lots, and simplify data entry.
This article covers how to configure, import, and apply pre-defined selection packages in HomeBuilder for Microsoft Dynamics 365 Business Central.
Prerequisites
Before setting up Pre-defined Packages, ensure you have already configured the following elements:
- Construction Item Categories
- House Areas
- Construction Items specifically for Color Chart items, their variants (if applicable), alongside House Areas where the items can be installed.
Pre-defined Package Setup
To access Pre-defined Packages, navigate to menu HomeBuilder > Setup > General > Pre-defined Packages in the "HomeBuilder Executive" or "HomeBuilder Admin" role centers, or open this page using the Search function.
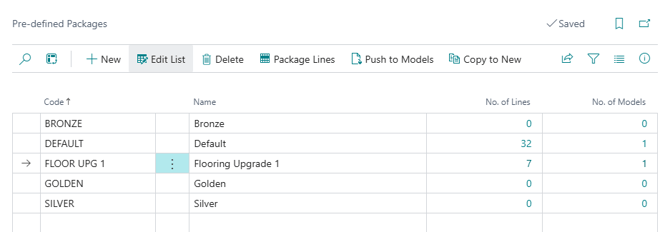
To define the content of a Pre-defined Package, run the "Package Lines" action.
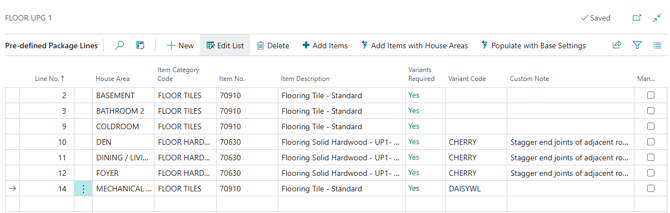
There are several ways of populating Pre-defined Package Lines:
- Adding lines manually one after another. Make sure that you enter Item Category Code and House Area Code (unless the category is for customer fee items). Enter Item No. and Variant Code if you want to pre-define the choice. When required, you can override the Item Description. The "Mandatory" checkbox signifies that the purchaser will have to make a choice for this line.
- "Add Items" action allows you to select multiple items and bring them to Pre-defined Package Lines. This action leaves the House Area Code blank, you will need to fill it in manually.
- "Add Items with House Areas" action allows you to select multiple items and bring them to Pre-defined package Lines together with House Areas where the these Items can be installed.
- "Populate with Base Settings" action brings all Color Chart Items applicable to Models associated with the Pre-defined Packages together with House Areas where the Items can be installed. The Item No. and Variant Code get assigned according to the defaults in Color Selections defined for the Phase. Afterwards, you can delete unnecessary lines.
- Importing Pre-defined Package via Configuration Packages.
Creating and Importing the Pre-defined Package via Configuration Packages
Business Central uses Configuration Packages to quickly import your predefined choices into the database.
Prepare the Excel Template
- Open Configuration Packages in Business Central.
- Use or create a package containing Table 70526289 (Pre-defined Package Header) and Table 70526292 (Pre-defined Package Line).
- Click Export to Excel to get an Excel file to use as a template.
- Open the template and populate your package structures using data from your base model map:
Package Code: Define unique identifiers (e.g., DEFAULT for base options or FLR-UP1 for flooring upgrade level 1).
Line Numbers: Assign chronological lines (1,2,3...) foreach distinct package bundle.
House Area Code: Copy these columns directly from your base model map.
Category Code: Copy these columns directly from your base model map.
Item Numbers (Optional): If a package enforces a mandatory standard item (like a baseline carpet or a specific upgrade tile), enter the item number directly in the sheet. Leave it blank if you want the sales agent to choose the color/variant later.
Import to Business Central
- Back in the Configuration Packages page, click Import from Excel and choose your saved sheet.
- Click Apply Package to write the records into HomeBuilder tables.
- Review any errors. If a warning flags a legacy or modified category code, resolve the code conflict or manually modify the record inside Business Central.
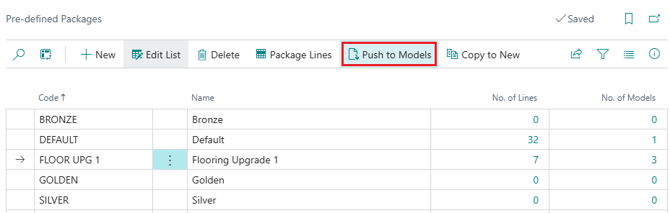
Managing Pre-defined Packages
Once a Pre-defined Package is set up, you can define for which Models this package can be suggested. Do do so, run the "Push to Models" action in the "Pre-defined Packages" page.
To create a new Pre-defined Package based on the current one, use the "Copy to New" action.
TIP
To create Upgrade Level 2, 3, or 4 packages, choose an existing package and use the Copy to New function at the top of the page rather than re-importing an Excel sheet.
Assigning Packages to Models
Alternatively to using the "Push to Models" action in the "Pre-defined Packages" page, you can link Pre-defined Packages to Models right on the Model level.
- Open your Models list page and select your target design (e.g., Phase 1 – Daisy model).
- Go to Related > Pre-defined Packages on the selected model or from the model card.
- Add the valid package codes (e.g., add both DEFAULT and FLR-UP1) to the model lines. This authorizes these specific bundles for use on any lot running this design.
Applying Packages to a Lot Selection
When a home buyer is ready to make design choices, apply your prepared packages directly to their lot card.
- Navigate to the specific Lot (e.g., Lot 22) and open the Lot Selection Packages page. Select (or create new) Lot Selection Package open Choices.
- Instead of clicking Populate, click Add Pre-defined.
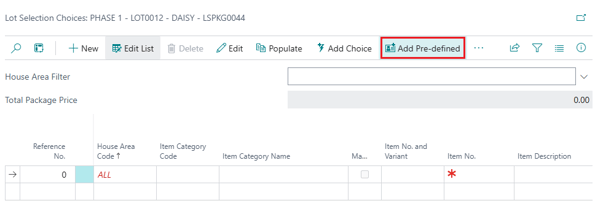
- Select your base package (e.g., DEFAULT) and confirm. The system populates the pre-determined items and baseline categories instantly.
- To layer upgrades, click Add Pre-defined again and select your upgrade package (e.g., FLR-UP1).
Note
HomeBuilder will merge the upgrade items into the existing list. It automatically keeps the layout sorted by House Area Code then Category, instantly adding any associated dependencies (like matching trim or quarter-round items) while flagging missing entries (such as a mandatory color variant choice) with a red asterisk.
Cleaning Up Lot Reference Numbers
Applying multiple distinct packages sequentially can cause the underlying system reference numbers to become out of order. Before printing selection documents for a customer or locking in a contract, update the line indexing:
- On the lot choices screen, click Actions.
- Select Renumber Reference No.
- The system will cleanly re-index the list sequentially based on House Area and Category, preparing your selection documents for client sign-off.