
Quick 1-Pager Guide to Importing Opening Retainage Receivables
Detailed Guide to Importing Opening Retainage Receivables
User Manual: bringing your existing, unreleased retainage into Business Central
Version 1.1 | October 2026 | For Business Central North America and W1 (the differences are marked as they come up)
How to Use This Document
If you are an experienced user of Business Central; are familiar with Configuration Packages and are technically comfortable – use the Quick Guide. For all other people, the full guide follows the quick guide.
What this Document Covers
When you start using Retainage Receivables, some of your posted sales invoices may already have retainage (holdback) withheld that has not been released yet. This manual shows you how to bring those outstanding amounts into Business Central as opening balances, using a standard configuration package and an Excel workbook.
Once they are imported, these retainage amounts behave exactly like retainage posted in Business Central: they appear in Release Sales Retainage and can be released when they fall due. Step 7 explains how to add or correct dimensions on the retainage, which cannot be imported.
Quick 1-Pager Guide to Importing Opening Retainage Receivables
Quick Guide for experienced Business Central users | Mandatory fields only | NA and W1
Loads unreleased retainage on posted sales invoices as opening balances. Imported entries release like any other retainage.
Before you start
- Freeze retainage posting until applied, so Entry Nos. don’t clash.
- NA or W1 determines the tax fields on the Detail table.
- Dimensions are not imported; set them at release if needed.
- Export to Excel, note the last Entry No. on each sheet, delete the existing rows and add yours (1 if empty, otherwise last + 1).
- Import, validate and apply. Expect 0 errors.
- Check Customer Retainage Entries (Open ticked, retainage amounts populated), then release from Release Sales Retainage as normal.
- Dimensions: release with Don’t post releasing invoices on, edit each releasing invoice, then post.
1. Configuration package
Add both tables (Processing Order 1 parent, 2 child) and include only these fields:
|
Parent: one row per invoice with open retainage
|
Child: one row per tax combination on that invoice
|
Example: 1,000.00 work, 100.00 retainage withheld, 117.00 tax. Parent Amount 1,017.00; Detail ‑100.00 / ‑13.00 / ‑113.00.
2. Export, import and apply 3. Verify and release
*** END OF QUICK GUIDE ***
Detailed Guide to Importing Opening Retainage Receivables
The steps
- Set up the configuration package with the two retainage tables and the right fields (once).
- Export the package to Excel. This gives you the template.
- Fill in the Customer Retainage Entry sheet: one row per invoice with outstanding retainage.
- Fill in the Detail Customer Retainage Entry sheet: one row per tax combination of that retainage.
- Import and apply the workbook.
- Check the result and release the retainage when it falls due.
- Optional: add dimensions to the retainage when you release it (Step 7).
Before you start
- Have your list of outstanding retainage ready. For every posted sales invoice with unreleased retainage you need: customer number, posting date, invoice number, invoice total including tax (after the retainage was withheld), the retainage amount with its tax, the date the retainage is due for release, and the project number if there is one.
- Make sure nobody posts retainage transactions while you prepare the workbook. Every posting uses up the next entry number, and your spreadsheet numbers would then clash.
- Know whether your Business Central is North America (NA) or W1. The tax fields you use are different (see Step 1).
- Dimensions are not part of the import. If your retainage needs particular dimensions, you can add or edit them manually if needed when you release it (see Step 7).
- Use desktop Excel. Do not delete columns from the exported file (see Step 2).
- The tables are empty (nothing posted yet): start both sheets at 1.
- The company already has retainage records: the export contains them. Look at the last row of each sheet and start your new rows at the next number. The two sheets are numbered independently.
How the two tables fit together
The import loads two linked tables. Understanding the link makes the spreadsheets much easier to fill in.
|
Table |
What one row represents |
|
Customer Retainage Entry (the parent) |
One posted sales invoice with outstanding retainage. |
|
Detail Customer Retainage Entry (the child) |
The retainage on that invoice, one row for each combination of Tax Liable, Tax Area Code and Tax Group Code. Most invoices need one row; an invoice with retainage under two different taxations needs two. |
Each Detail row points to its parent through the Customer Retainage Entry No. column. Because a child cannot exist before its parent, the Customer Retainage Entry table must always be processed first and the Detail table second.
Step 1. Set up the configuration package
You do this once. If your consultant has already prepared the package, check it against this step and move on to Step 2.
1.1 Create the package and add the two tables
- Choose the search icon, type Configuration Packages and open the page (the Tell Me search shows it under Lists).
- Create a new package. Give it a short Code and a Package Name you will recognise, for example IMPORTING RET RECEIV and Importing Retainage Receivables.
- Add the two tables to the package: Customer Retainage Entry (70526463) and Detail Customer Retainage Entry (70526460).
1.2 Set the processing order
On the Tables lines, set Processing Order to 1 for Customer Retainage Entry and 2 for Detail Customer Retainage Entry.
IMPORTANT The Detail table is the child of Customer Retainage Entry, so it must be second. If both tables have the same order, the detail rows can be processed before their parents exist and the import fails (see Troubleshooting at the end).
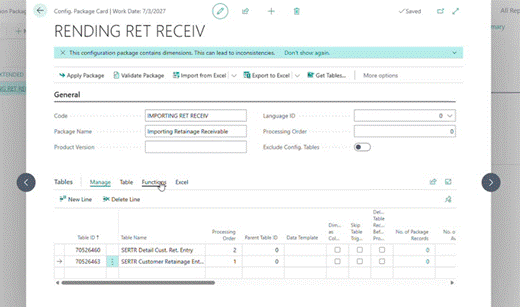
Figure 1. The configuration package with its two tables: Customer Retainage Entry (Processing Order 1) and Detail Customer Retainage Entry (Processing Order 2).
1.3 Choose the fields for Customer Retainage Entry
Select the Customer Retainage Entry line, open the Table tab and choose Fields. Tick Include Field for the fields below and leave all others unticked.
|
Tick (include) |
Leave unticked |
|
Entry No. (always on, greyed out) Customer No. Posting Date Document Type Document No. Retainage Type Description Amount User ID Open Retainage Due Date Document Date Job No. (appears as Project No. in Excel) |
External Document No. Customer Name Currency Code Customer Ledger Entry No. All the "Closed by ..." fields Closed at Date Applying Entry No. |
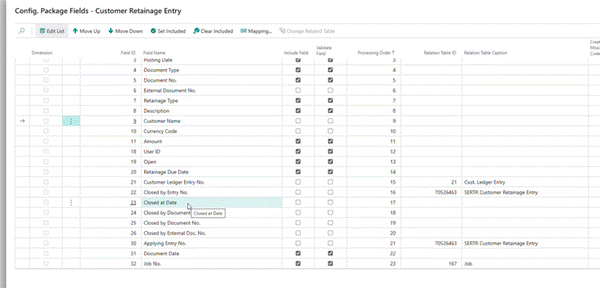
Figure 2. Config. Package Fields for Customer Retainage Entry, final selection. Customer Name, Currency Code and Customer Ledger Entry No. are not included; Open, Retainage Due Date, Document Date and Job No. are.
1.4 Choose the fields for Detail Customer Retainage Entry
Do the same for the Detail Customer Retainage Entry line.
|
Tick (include) |
Leave unticked |
|
Entry No. (always on, greyed out) Customer Retainage Entry No. Customer No. Posting Date Document Type Document No. Retainage Type Tax Liable * Tax Area Code * Tax Group Code * Amount Tax Amount Amount Incl. Tax Remaining Amount Remaining Tax Amount Remaining Amount Incl. Tax Document Date Job No. (appears as Project No. in Excel) |
External Document No. Applied Amount, Applied Tax Amount, Applied Amount Incl. Tax (nothing is applied yet, so they are zero) All the "Closed by ..." fields Applying Entry No. and Applying CRE Entry No. Customer Ledger Entry No. VAT Bus. Posting Group * VAT Prod. Posting Group * Dimension Set ID |
* The tax fields depend on your version of Business Central:
|
Field |
Business Central North America |
Business Central W1 |
|
Tax Liable, Tax Area Code, Tax Group Code |
Tick |
Leave unticked |
|
VAT Bus. Posting Group, VAT Prod. Posting Group |
Leave unticked |
Tick |
|
Dimension Set ID |
Leave unticked |
Leave unticked |
NOTE Dimension Set ID is never part of this import. Dimensions can be added or edited manually if necessary when the retainage is released: see Step 7.
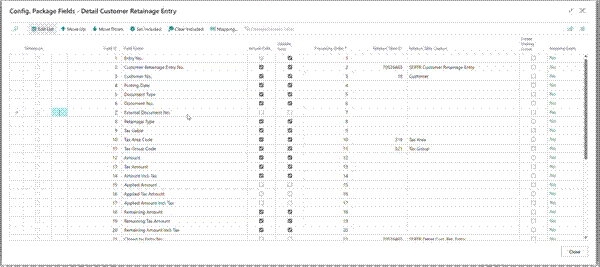
Figure 3. Config. Package Fields for Detail Customer Retainage Entry (North America), top of the list. Customer Retainage Entry No. links to the parent table; Tax Liable, Tax Area Code and Tax Group Code are included; External Document No. and the Applied fields are not.
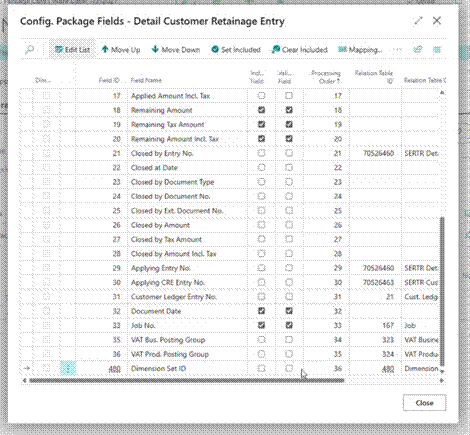
Figure 4. Bottom of the same list. Document Date and Job No. are included; VAT Bus. Posting Group, VAT Prod. Posting Group and Dimension Set ID are not (North America).
Step 2. Export the Excel template
- On the configuration package card, choose Export to Excel.
- Open the downloaded file. You may rename it, for example Import Retainage Receivables.xlsx.
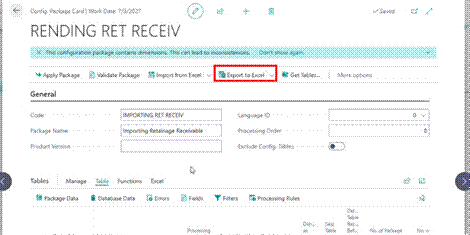
Figure 5. Export to Excel on the configuration package card.
The workbook has two worksheets: one for Detail Customer Retainage Entry and one for Customer Retainage Entry. Row 1 holds the package code, table name and table number, and row 3 holds the column headings.
IMPORTANT Never delete columns, rows 1 to 3 or the sheet names in this workbook. It carries hidden information that Business Central needs to read the file back in.
If a column should not be there, go back to Step 1, untick that field in the package and export again.
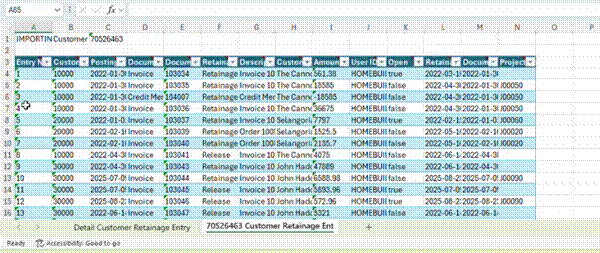
Figure 6. The exported workbook has one sheet tab per table (bottom). The Customer Retainage Entry sheet already contains the existing records of the company.
2.1 Find your starting Entry No.
Every row in both sheets needs a unique Entry No. It is the table's primary key, so you cannot reuse a number that already exists. There are two situations:
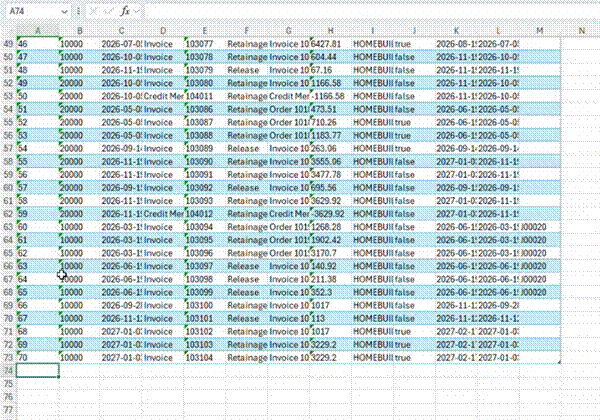
Figure 7. The last existing rows of the Customer Retainage Entry sheet. The last Entry No. is 70, so the first new row is 71.
Once you know your starting numbers, delete the existing rows from both sheets so that only your new rows remain. Those records are already in Business Central and must not be imported again.
TIP Keep the date format of the existing cells (for example 2026-09-03). The easiest way is to copy a cell from the row above and overwrite its value.
Step 3. Fill in the Customer Retainage Entry sheet
Add one row for each posted sales invoice that still has unreleased retainage. Everything you need is on your original invoices.
|
Column |
What to enter |
Notes |
|
Entry No. |
Next free number |
See 2.1. Each number must be unique. |
|
Customer No. |
The customer's number in Business Central |
|
|
Posting Date |
Posting date of the original invoice |
Same format as the existing cells. |
|
Document Type |
Invoice |
Always. Outstanding retainage sits on an invoice. |
|
Document No. |
Number of the posted sales invoice |
|
|
Retainage Type |
Retainage |
Always. Never "Release": your outstanding retainage has not been released. |
|
Description |
Any text, for example ‘Invoice 103456 – Import’ |
Informational only. |
|
Amount |
Invoice total including tax, after the retainage was withheld |
See the example below. |
|
User ID |
The user doing the import |
For example DOMAIN\USERNAME. |
|
Open |
TRUE |
Always. See the warning below. |
|
Retainage Due Date |
The date the retainage should be released |
Document Date plus the retainage term. For example, posted 3 September with a 3-month term: 3 December. |
|
Document Date |
Normally the same as the posting date |
Enter the real document date if it differs. |
|
Project No. |
The project the invoice belongs to |
Leave blank if the invoice has none. |
Example: what goes in Amount
On this posted invoice the work is 1,000.00 and 10% retainage (100.00) is withheld, leaving 900.00 before tax. Tax is 117.00, so the invoice total, and therefore Amount, is 1,017.00.
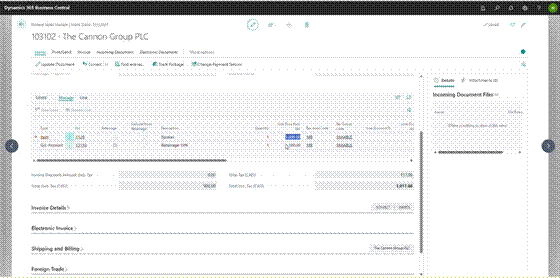
Figure 8. An example posted sales invoice: total excluding tax 900.00, total tax 117.00, total including tax 1,017.00. The retainage line is the 100.00 deducted.
OPEN MUST BE TRUE Set Open = TRUE on every row. You are importing retainage that has not been released, and only open entries can be released later.
When retainage is released, Business Central posts a releasing invoice, applies it to the original entry, and sets Open to false on both. If you import an entry as false, it can never be released.
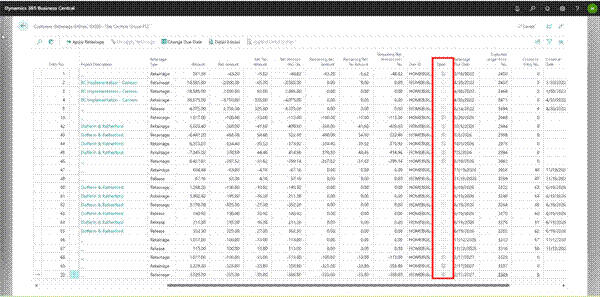
Figure 9. Customer Retainage Entries. The Open column is ticked for retainage that is still outstanding and clear for entries that were already released.

Figure 10. The finished Customer Retainage Entry sheet: two new rows (72 and 73) for invoices 103456 and 103467, with Document Type Invoice, Retainage Type Retainage and Open true.
Step 4. Fill in the Detail sheet
Switch to the Detail Customer Retainage Entry sheet. Add one row per tax combination of the retainage on each invoice, and point each row at its parent with Customer Retainage Entry No.
|
Column |
What to enter |
Notes |
|
Entry No. |
Next free number for this sheet |
Numbered independently of the first sheet (1 if empty, otherwise last + 1). |
|
Customer Retainage Entry No. |
The Entry No. of the parent row from the first sheet |
This is the parent/child link. Every row for the same invoice carries the same number. |
|
Customer No., Posting Date, Document Type, Document No., Retainage Type, Document Date, Project No. |
Copy from the parent row |
Identical to the parent. Document Type is Invoice and Retainage Type is Retainage. |
|
Tax Liable * |
TRUE if the retainage is subject to tax |
|
|
Tax Area Code *, Tax Group Code * |
The tax area and tax group used for this part of the retainage |
For example MB and TAXABLE. |
|
Amount |
Retainage amount before tax, as a negative number |
For example -100. |
|
Tax Amount |
Tax on that retainage, negative |
For example -13. |
|
Amount Incl. Tax |
Amount plus tax, negative |
For example -113. |
|
Remaining Amount, Remaining Tax Amount, Remaining Amount Incl. Tax |
The same three values as above |
Nothing has been applied yet, so remaining equals the full amount. |
* North America. On W1, these three columns are replaced by VAT Bus. Posting Group and VAT Prod. Posting Group.
SIGNS The parent row's Amount is positive (the invoice total). The detail amounts are negative (the retainage withheld). The releasing invoice later posts the exact opposite signs, which is how the two entries cancel out.
When one invoice has retainage under two taxations
An invoice can hold retainage taxed in different ways, for example part TAXABLE and part NONTAXABLE under the same tax area. The parent stays one row; the detail gets one row per combination, both pointing at the same parent.
In this example, invoice 103467 withheld 260.00 of taxable retainage and 65.00 of non-taxable retainage, so it has two detail rows (168 and 169), both pointing at parent 73:
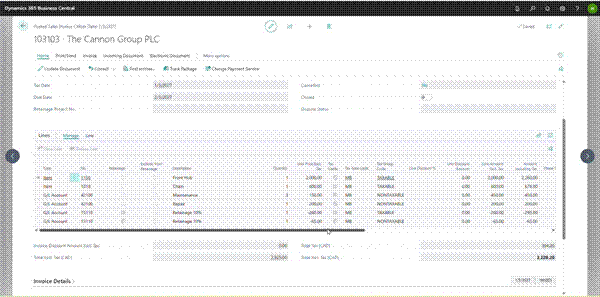
Figure 11. A posted invoice whose retainage lines are taxed differently: Retainage 10% of -260.00 with tax group TAXABLE, and -65.00 with tax group NONTAXABLE.

Figure 12. The finished Detail sheet. Row 167 belongs to parent 72. Rows 168 (TAXABLE, -260 / -33.8 / -293.8) and 169 (NONTAXABLE, -65 / 0 / -65) both belong to parent 73.
Step 5. Import and apply the workbook
Save and close the workbook, then go back to the configuration package card.
5.1 Import from Excel
- Choose Import from Excel and select your file (or drop it into the box).
- The Config. Package Import Preview lists the package and the two tables found in the file. Choose Import.
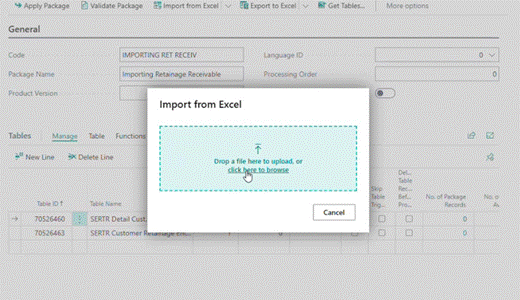
Figure 13. Import from Excel: choose "click here to browse" and select the saved workbook.
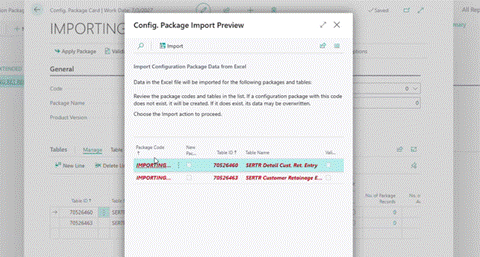
Figure 14. Config. Package Import Preview: both tables are listed. Choose Import to continue.
The card now says the package has been imported and needs to be applied. Check that No. of Package Records matches your sheets. In the example, 2 parent rows and 3 detail rows.
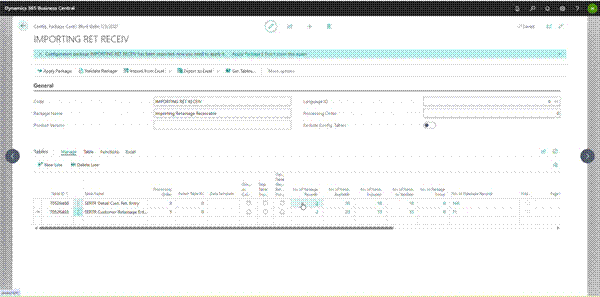
Figure 15. After the import: 2 records for Customer Retainage Entry and 3 for Detail Customer Retainage Entry are waiting to be applied. Processing Order is 1 and 2.
5.2 Validate, then apply
- Choose Validate Package and answer Yes. It is better to validate first; you want to see no errors.
- Check the Processing Order column once more. It must read 1 for Customer Retainage Entry and 2 for Detail Customer Retainage Entry. In both recordings the values had changed back to 1 by this point, and the first apply then failed with the error described under Troubleshooting. Check it every time you import, including repeat imports.
- Choose Apply Package and answer Yes.
- A message reports the tables processed, the errors found and the records inserted. You want 0 errors.
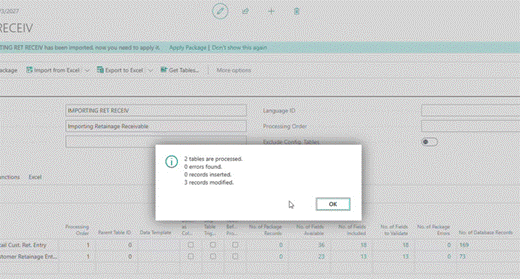
Figure 16. Apply Package finished with 0 errors found.
Step 6. Check the result 6.1 Look at the imported entries
Open the customer card and choose Customer Retainage Entries. Your imported invoice is at the bottom of the list (entry 72 here) with Open ticked and the Retainage Due Date you entered. The retainage amounts are calculated from the detail rows, so if they show up correctly the parent/child link works.
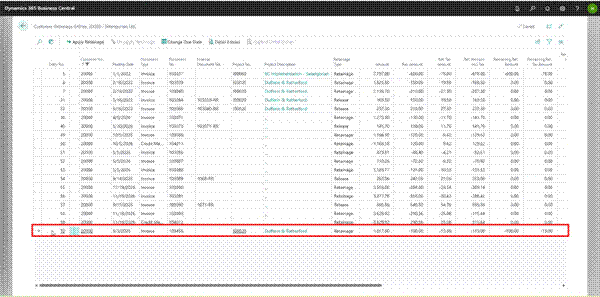
Figure 17. Customer 20000: the imported entry 72, Retainage type, Amount 1,017.00, retainage -100.00 with -13.00 tax, remaining -100.00.
Choose Detail Entries to see the child rows. The example invoice with two taxations shows one TAXABLE row and one NONTAXABLE row, exactly as entered.
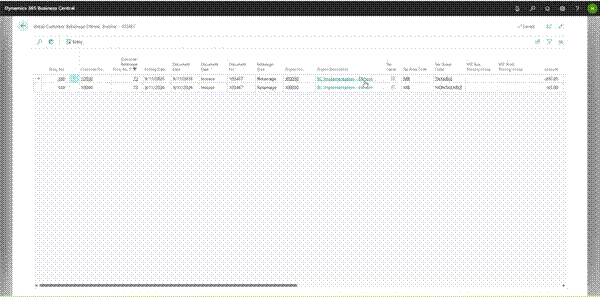
Figure 18. Detail entries of parent 73: TAXABLE -260.00 and NONTAXABLE -65.00.
6.2 Release it when it falls due
Imported retainage is released like any other. Search for Release Sales Retainage: your imported entries (72 and 73 here) are listed with the other open retainage.
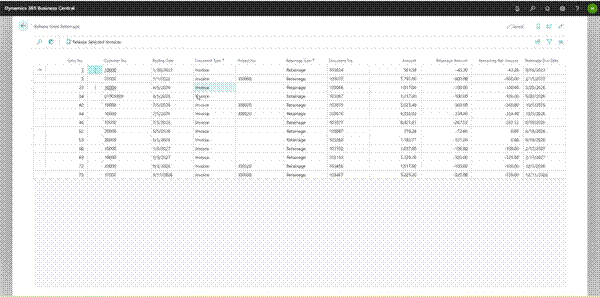
Figure 19. Release Sales Retainage lists the imported entries 72 and 73 together with the other outstanding retainage.
- Tick the lines to release and choose Release Selected Invoices.
- In the Create and Post Releasing Invoices dialog, keep Release Method on For each invoice and Set Posting Date From on Retainage Due Date, then choose OK.
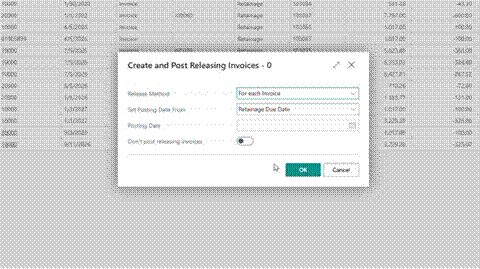
Figure 20. The Create and Post Releasing Invoices dialog.
NOTE Releasing posts real invoices. If you only want to test the import, do it in a test company.
Business Central creates and posts a releasing invoice for each selected line. The original entry and the new Release entry apply to each other: remaining retainage becomes zero and Open becomes false on both.
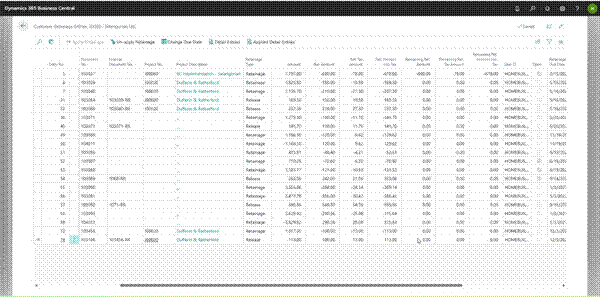
Figure 21. After the release: the new entry 74 has Retainage type Release, and the entries are no longer open.
NEED DIFFERENT DIMENSIONS? This normal release posts the releasing invoices straight away, with the dimensions inherited from the customer. If you need to change them first, use the "Don't post releasing invoices" option described in Step 7 instead.
Step 7 (optional). Add or correct dimensions when you release
The retainage import does not bring in dimensions (Dimension Set ID is left out of the package in Step 1). If the retainage must carry particular dimensions, you add them when the retainage is released, by creating the releasing invoices without posting them, correcting the dimensions on each invoice, and then posting the invoices yourself.
HOW IT NORMALLY WORKS By default, Release Selected Invoices creates the releasing invoice and posts it in the background, using the dimensions inherited from the customer. That is fine for most retainage, so use the steps below only for the retainage that needs different dimensions.
7.1 Release without posting
- Open Release Sales Retainage, tick the lines that need their dimensions changed and choose Release Selected Invoices.
- In the Create and Post Releasing Invoices dialog, switch Don't post releasing invoices on, then choose OK. (The option is off by default.)
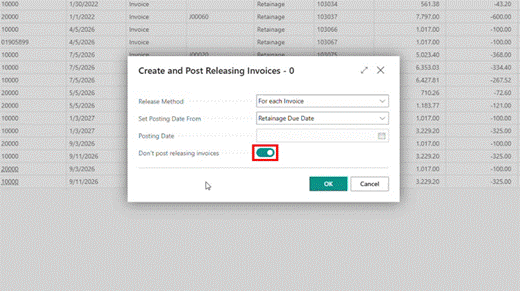
Figure 22. Create and Post Releasing Invoices with "Don't post releasing invoices" switched on.
This time the releasing invoices are only created. The lines stay in Release Sales Retainage, because nothing has been posted yet.
7.2 Open the releasing invoices
Search for Sales Invoices. The new invoices are ordinary unposted sales invoices. Their External Document No. is the original invoice number followed by -RR (for example 103780-RR). Each has one retainage release line (G/L account 13110, "Retainage Release for Invoice # ..."). An invoice whose retainage had two taxations has two lines, one per combination.
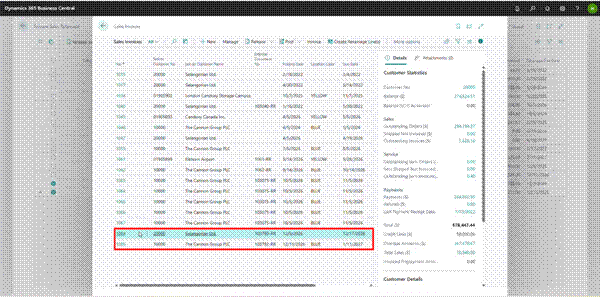
Figure 23. Sales Invoices: the two releasing invoices (1084 and 1085) created but not posted.
7.3 Change the dimensions
You can change dimensions in either of two places. Use whichever suits you:
On a line
- Select the line. In the Lines section, on the Line tab, choose Related Information and then Dimensions.
- In Edit Dimension Set Entries, change the Dimension Value Code you want and close the window.
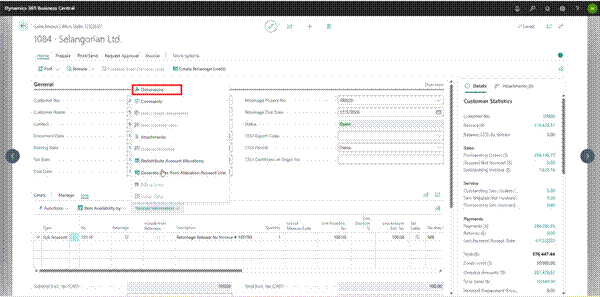
Figure 24. Lines > Line > Related Information > Dimensions opens the dimensions of the selected line.
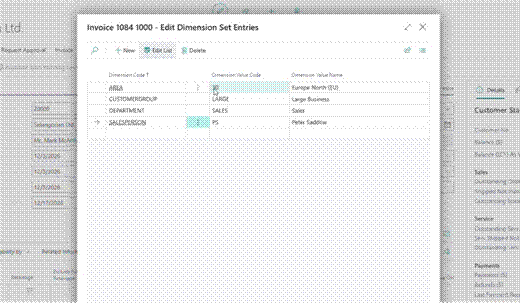
Figure 25. The dimensions of invoice 1084, line 1: AREA 30, CUSTOMERGROUP LARGE, DEPARTMENT SALES and SALESPERSON PS. These came from the customer and can be changed here.
On the invoice header
- Choose Invoice in the ribbon, then Dimensions.
- Change the Dimension Value Code and close the window.
- Business Central asks "You may have changed a dimension. Do you want to update the lines?" Choose Yes so that the lines follow the header.
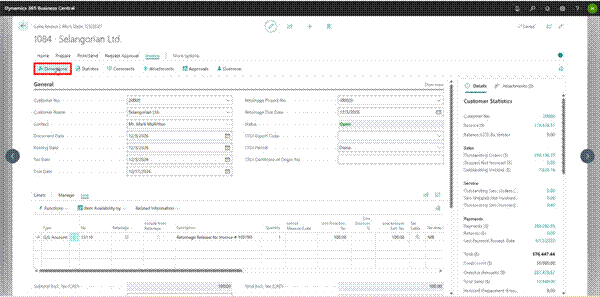
Figure 26. Invoice > Dimensions on the invoice header.
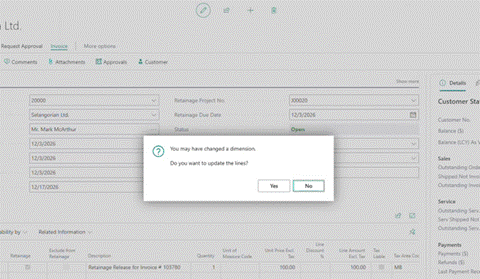
Figure 27. After changing a header dimension, choose Yes to update the lines.
If the invoice has several lines (invoice 1085 has two, 260.00 and 65.00), you can give each line its own dimensions. In the example the DEPARTMENT value of one line is changed.
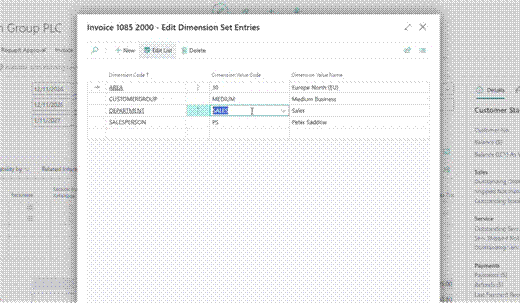
Figure 28. Invoice 1085, line 2: changing the DEPARTMENT dimension value from SALES.
7.4 Post each invoice
- On the invoice, choose Post and answer Yes to "Do you want to post the invoice?".
- A message confirms the number of the posted invoice and asks whether to open it. Choose No (or Yes to review it).
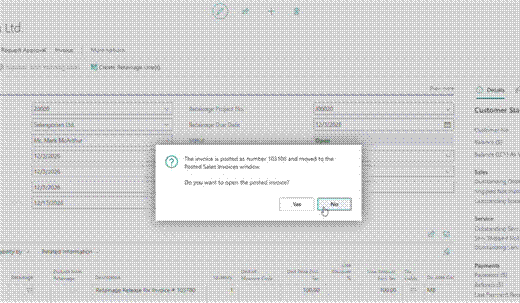
Figure 29. Invoice 1084 posted as 103108. The invoice has moved to Posted Sales Invoices.
Once posted, the line disappears from Release Sales Retainage, exactly as with a normal release: the original entry and the releasing entry are applied to each other and closed.
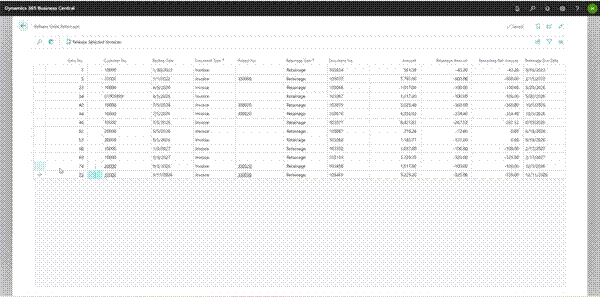
Figure 30. Release Sales Retainage after both invoices were posted: the released entries are gone from the list.
ONE BY ONE There is no bulk way to change these dimensions, for example through a spreadsheet. Correct each invoice individually, then post it.
Troubleshooting
Apply Package reports errors on the Detail table
The error reads: Customer No. must have a value in Customer Retainage Entry. Entry No. = 72. It cannot be zero or empty. The Detail table was processed before its parent. Open the card, set Processing Order to 1 for Customer Retainage Entry and 2 for Detail Customer Retainage Entry, and choose Apply Package again.
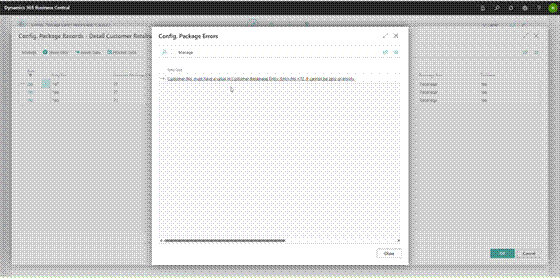
Figure 32. Config. Package Errors: the Detail records fail because their parent was not processed first.
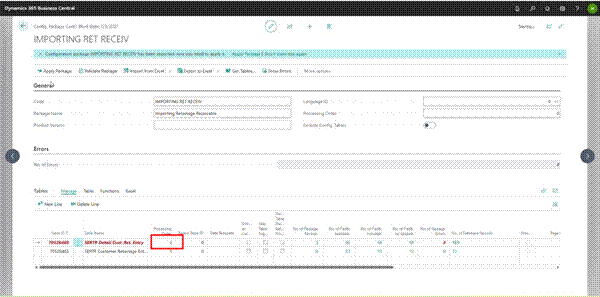
Figure 33. The fix: Processing Order 2 on the Detail line (highlighted), then Apply Package again.
|
If you see... |
Do this |
|
Imported retainage does not appear in Release Sales Retainage |
Check that Open is TRUE on the Customer Retainage Entry row. Only open retainage can be released. |
|
You deleted a column or changed a sheet name in the workbook |
Export the package again (Step 2) and re-enter your data. Remove unwanted columns by unticking the field in the package instead. |
|
Retainage amounts show as zero on the customer's entries |
The Detail rows are missing or point to the wrong Customer Retainage Entry No. Check the link column. |
|
The dimensions on the released retainage are not what you want |
Dimensions are not imported. Release with "Don't post releasing invoices" on and correct them on each invoice (Step 7). |
|
Released retainage is still listed in Release Sales Retainage |
The releasing invoice was created but not posted. Open it from Sales Invoices and post it (Step 7.4). |
Quick reference
|
Item |
Rule |
|
Processing Order |
Customer Retainage Entry 1, Detail Customer Retainage Entry 2. Re-check before every Apply. |
|
Customer Retainage Entry: Document Type |
Invoice |
|
Customer Retainage Entry: Retainage Type |
Retainage (never Release) |
|
Customer Retainage Entry: Open |
TRUE |
|
Customer Retainage Entry: Amount |
Invoice total including tax, after retainage withheld (positive) |
|
Detail: Amount, Tax Amount, Amount Incl. Tax |
Retainage withheld (negative); the Remaining columns are the same values |
|
Detail: Customer Retainage Entry No. |
Entry No. of the parent row |
|
Detail rows per invoice |
One per Tax Liable / Tax Area Code / Tax Group Code combination |
|
Entry No. (both sheets) |
1 if empty, otherwise last existing number + 1; numbered separately per sheet |
|
North America |
Tick Tax Liable, Tax Area Code, Tax Group Code; untick VAT Bus./Prod. Posting Group |
|
W1 |
Tick VAT Bus./Prod. Posting Group; untick Tax Liable, Tax Area Code, Tax Group Code |
|
Never include |
Customer Name, Dimension Set ID, Applied and "Closed by" fields |
|
Dimensions |
Not imported. To set them: release with "Don't post releasing invoices" on, edit the dimensions on each invoice (line or header), then post it manually. One invoice at a time. |
|
Never do |
Delete Excel columns, rows 1-3 or sheet names; post retainage transactions while preparing the sheets |
*** END OF DETAILED GUIDE ***