
In This Article:
Overview | House Area Group List Page | Setup | Actions | Grouped House Areas List Page | Assigning a House Area Group to a Construction Item | Deleting a House Area Group | Reviewing House Area Assignments Across Items | Best Practice | Related Articles
House Area Groups Overview
This article explains what a House Area Group is, why you would use one, how to set one up, and what each action on the House Area Groups pages does. It also covers how a group is assigned to a Construction Item and what happens to that item’s House Areas as a result.
If you are not yet familiar with House Areas themselves, read House Areas and Measurement Types first.
What is a House Area Group
A House Area Group is a named, reusable set of House Areas. You build the set once, give it a Code and a Name, and then assign the group to any Construction Item that needs exactly that set of House Areas.
From that point on, the group is where the set is maintained. Add a House Area to the group and every item assigned to it gains that House Area. Remove one and every item assigned to it loses it.
Note
House Area Groups have a global scope, which means once set up in one company, they are available for use in all companies.
Why Use House Area Groups
Without groups, the House Areas of a Construction Item are maintained on the item itself, or inherited from the item’s Item Category. Both work, but both have limits at scale.
- Bulk Maintenance. A builder who adds a new room type to the standard house has to add that House Area to every affected Construction Item. With groups, it is simply one line added to one group.
- Consistency. When fifty flooring items are supposed to apply to the same twelve rooms, a group guarantees they do. Item-by-item maintenance guarantees only that they did on the day someone last checked.
- Independence from the Item Category. A group lets you give two items in the same category two different sets, or one set to items spread across several categories.
Before You Begin
- The House Areas themselves must already exist. Blocked House Areas are not offered when building a group.
- To create and maintain House Area Groups you need a permission set that grants full access to the House Area Group table (HB SETUP or HB Setup Principal Records). The general HB All permission sets grants read access only, so a user with HB All alone can see groups and their contents but cannot change them.
To open the page, use the Search, or navigate from the Role Center: HomeBuilder → Setup → General → House Area Groups.
The House Area Groups Page
The House Area Groups page is the list of all groups in the system.
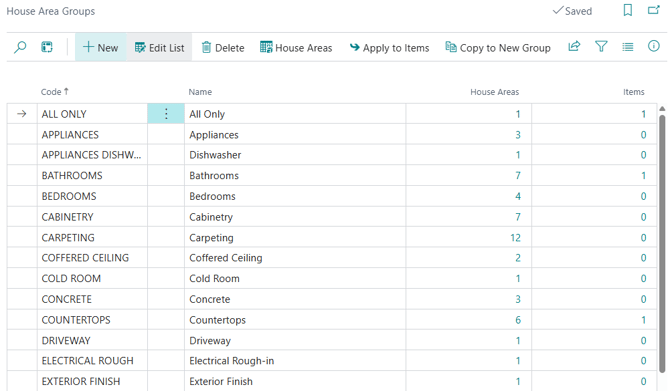
Field Definitions
| Field | Description |
| Code | Identifies the group. Is a required field, cannot be left blank. |
| Name | Describes the group. Is a required field, cannot be left blank. |
| House Areas | The number of House Areas currently in the group. Calculated. Drill down to open the Group House Areas page for this group. |
| Items | The number of Construction Items currently assigned to the group. Calculated. Drill down to open the Construction Items list. |
A Related Information fact box on the right repeats the two counts as cues, and both are drillable from there as well. It is the quickest way to answer “how many items would this change affect?” before editing a group.
Setting Up a House Area Group
Step 1 — Create the Group
- Open House Area Groups.
- Create a new line.
- Enter a Code and a Name. Both are mandatory, and a group with either missing cannot be assigned to a Construction Item.
Use a Code that describes the set rather than the items that happen to use it today, for example ALL-BATHS or EXTERIOR-STD. Because the same group is likely to be picked up by item categories you have not thought of yet.
Step 2 — Add the House Areas
A new group starts empty. Fill it using the House Areas action, described below.
Step 3 — Assign the Group to Construction Items
See Assigning a House Area Group to a Construction Item below.
House Areas
Opens the Group House Areas page for the selected group, which is where the group’s membership is maintained. The action is disabled until a group is selected.
This is the same destination as drilling down on the House Areas count, either in the list or in the fact box.
See The Group House Areas Page below.
Apply to Items
Re-synchronizes the Construction Items assigned to the group with the group’s current membership. For every item assigned to the group, the system:
- Adds any House Area that is in the group but missing from the item
- Removes any House area on the item that is not in the group.
The end state is that the item’s House Areas match the group exactly.
Membership changes normally reach the items on their own (see Keeping Items in Step with the Group below) Meaning, this action is a deliberate catch-up rather than part of the daily routine. Use it when:
- Items were assigned to the group before the group was fully built
- House Areas were edited directly on an item and you want the group to win
- You simply want to be certain the items and the group agree, for instance before a data migration or an audit.
Note
The action stops with the error “The House Area Group <Code> contains no House Areas.” if the group is empty. This is a safeguard: applying an empty group would strip the House Areas from every item assigned to it.
Copy to New Group
Creates a new group as a copy of the current one. Use it when a new set differs from an existing set by only a few House Areas. You can copy, then adjust, rather than picking every House Area again.
- Select the group to copy from and run Copy to New Group.
- In the Copy to New House Area Group dialog, enter the Code and Name of the new group. Both are required; the system will not proceed with either left blank.
- Press OK. The new group is created and every House Area of the source group is copied into it. The system confirms with “Copying has been completed.”
The copy is independent from that point on, later changes to either group do not affect the original.
Group House Areas Page
The Group House Areas page lists the House Areas that make up one group. Its caption shows the group’s Code, so it is always clear which group is open.
The page is reached only from the House Area Groups page, through the House Areas action or a drill-down (not from the Search). It is always scoped to a single group.
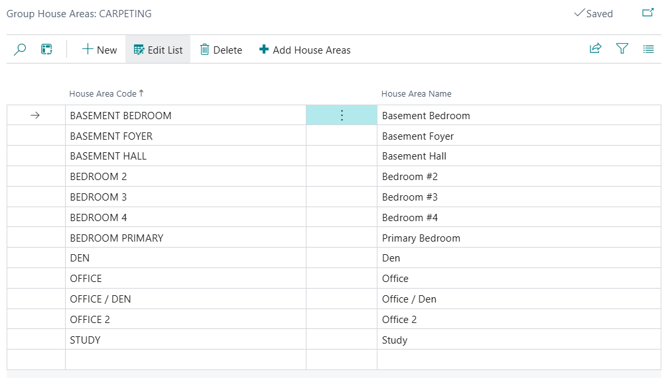
Field Definitions
| Field | Description |
| House Area Code | The House Area that belongs to the group. |
| House Area Name | The House Area's name. Display only. |
The page also carries Group Code and Group Name columns, hidden by default because the page only ever shows one group. They can be revealed through Personalization.
Add House Areas action
This is how House Areas are put into a group. The Add House Areas page opens, listing the House Areas available to be added, with:
- House Area Code
- House Area Name
- Exterior, which flags House Areas outside the building envelope (useful when you are assembling an exterior-only group).
Select one House Area, or several at once, and confirm with Add House Areas. The selected House Areas are added to the group and the page closes.
Note
The list offers only House Areas that are not blocked, so a blocked House Area cannot find its way into a group by accident. House Areas already in the group are simply skipped if re-selected, so the action is safe to run repeatedly.
Removing a House Area from a Group
Delete the line on the Group House Areas page. Be aware that this immediately removes that House Area from every Construction Item assigned to the group. See below.
Note
House Area Group members cannot be renamed. If the wrong House Area was added, delete the line and add the correct one.
Assigning a House Area Group to a Construction Item
Open a Construction Item Card, or work directly in the Construction Items list, and fill in the House Area Group Code field. The read-only House Area Group Name beside it shows the group’s name.
The same field is available on Construction Item Templates and on the Item Worksheet, so items can be created with their House Area Group already assigned rather than having it added afterwards.
Which Items Can Have a Group
The field is only editable when the item’s Designation is Single Item or Bundle. Attempting to set it on any other designation produces the error “For Designation <Designation> the House Area Group Code should be empty, in Item <Item No.>.”
The reason is that House Areas are only meaningful on items the purchaser or the site chooses by location. Components inherit their placement from the Bundle that contains them, Customer Fees are not placed anywhere, and After-sales items are located by the inspection rather than in advance.
What Happens When You Assign a Group
On assignment, the system makes the item’s House Areas match the group exactly — House Areas in the group that the item lacks are added, and House Areas on the item that are not in the group are removed.
Note
A group must contain at least one House Area before it can be assigned. If it is empty, the system stops with “The House Area Group <Code> contains no House Areas.” Build the group before assigning it.
Effect on the Item Category
Normally, changing the Item Category Code on a Construction Item clears the item’s House Areas and re-populates them from the House Areas of the new Item Category.
Once a House Area Group is assigned, that no longer happens. The group becomes the single source of the item’s House Areas, and changing the Item Category leaves them untouched. Item Category House Areas continue to drive items with no group assigned.
This is worth knowing before assigning groups in bulk: it is a deliberate change of behavior, not a defect, and it is what allows two items in the same category to carry different House Areas.
Keeping Items in Step with the Group
Group membership is live. Once items are assigned to a group:
- Adding a House Area to the group, immediately adds that House Area to every Construction Item assigned to the group.
- Removing a House Area from the group, immediately removes it from every Construction Item assigned to the group.
No further action is needed in normal use. Apply to Items exists for the exceptions described earlier, such as items that joined the group late or items whose House Areas were edited directly.
Deleting a House Area Group
Deletion is deliberately restricted, because a group that is in use is holding the House Areas of every item assigned to it.
A House Area Group cannot be deleted while it is still referenced by a Construction Item, a Construction Item Template, or an Item Worksheet Line. The check runs across all companies, not only the one you are working in (due to the group’s global scope). Clear the House Area Group Code on those records first.
Once nothing references it, deleting the group also deletes all of its House Area members.
Reviewing House Area Assignments Across Items
To check House Area assignments across many items at once, use the Item House Area Matrix. Use the Search, or navigate from the Role Center: HomeBuilder → Construction Items → Item House Area Matrix.
Set any combination of the four filters at the top of the page ( Item Filter, Item Category Filter, House Area Group Filter, House Area Filter ). Then run Show/Reload Matrix. Changing a filter afterwards refreshes the matrix automatically.
Note
The lookup on Item Filter deliberately offers only non-blocked Construction Items that have no House Area Group assigned (items whose House Areas are still maintained individually).
Use the House Area Group Filter to examine group-driven items instead.
Reading the two views side by side is a good way to find items that should be on a group but are not.
Best Practice
| Situtation | Recommended Approach |
| Many Construction Items share the same set of House Areas. | Use a House Area Group. This is what groups are for, and the saving grows with every item added. |
| The House Areas follow naturally from the Item Category, and new items should inherit them automatically. | Use Item Category House Areas and leave the House Area Group Code blank. |
| Two items in the same Item Category need different House Areas. | Use House Area Groups. This is the case Item Category House Areas cannot express. |
| A genuinely one-off item. | Maintain its House Areas directly on the item. |
| A new set differs from an existing set by a few House Areas. | Copy to New Group, then adjust. |
One further practice worth adopting during implementation is: to check the Items count before editing a group. It tells you how many Construction Items the change is about to touch, and a surprisingly high number usually means the group is being used more broadly than you assumed.