
In This Article:
Understanding House Areas | Applicable Items and Applicable Checklist Items | Adding House Areas to Construction Item Categories | Removing House Areas to Construction Item Categories | Measurement Types Setup | Managing Measurement Types | Related Articles
Understanding House Areas
House Areas is a widely used part of the system. It is used to speed up selection, restrict what can be used where, and generally make a massive amount of data make more sense.
Note
The concept of a House Area is typically handled differently between functions:
- Base Contract - normally just one House Area called "ALL" or "BASE". The system requires a House Area to function correctly; we enter one House Area to each Base Contract Item just to fulfill the system control requirement.
- Color Chart - Commonly, 20-40 House Areas are defined. Most of this page is focused on the requirements for the Color Chart. Put simply: "When the home buyer is making Color Chart selections for upgrades and extras, in how many areas in the home do they need to make a decision?". Anticipate entering many House Areas for each Color Chart Item.
- After-Sales - Inspections are generally carried out by the House Area. Unlike the Base Contract and Color Chart processes, the inspection itself determines the House Area before the Item is chosen. Because there is no requirement to pre-determine the House Area on the Item, no House Area is entered for After-Sales Items.
Important
For Color Chart (a.k.a. Lot Selection Packages); you will be using the combination of House Area AND Construction Item Category. The purchaser will need to make a decision for each House Area and Construction Item Category combination.
Tip
Color Charts is the area where your biggest focus should be.
You should expect that you have hundreds, if not thousands, of Items and selections for the user to make. Carefully chosen House Areas will make using the system easier in the long run.
Note
House Areas have a global scope, which means once configured in one company, they are available for use in all companies.
Examples of House Areas
- Internal for the unit: Master Bedroom, Stairs, Attic, Furnace Area.
- External for the unit: The examples of exterior House Areas: Driveway, Roof, and Porch. The whole house can also be represented by a House Area.
- Common area (Complex Buildings or Condominiums): Gardens, elevator, floor structure.
See the Demo Database for more examples:
Examples of how House Areas can be used for restrictions:
- You might create a House Area called "Cold Room" and assign it to the Construction Item Category "AC Units". When you create a Construction Item, for example, called "AC Model 99-10" and assign the "AC Units" Construction Item Category to it, the House Area "Cold Room" is automatically assigned. If you do not have this House Area on the Model that you associate with a Lot, then this Construction Item is not available for you to pick.
- You might create a House Area called "Kitchen" and assign it to the Construction Item Category "Appliances". When you create a Construction Item, for example, called "Stove Model PA123" and assign the "Appliances" Construction Item Category to it, the House Area "Kitchen" is automatically assigned. If you have this House Area on the Model that you associate with a Lot, then this Construction Item (and any other Stove in this category) is available for you to pick.
Applicable Items and Applicable Checklist Items Actions
Applicable Items Action
Search House Areas, then select the Applicable Items button. The Page "House Area Applicable Items" shows which construction items can be installed in the House Area. The list of applicable items is non-editable and serves informational purposes. The relation between construction items and house areas is to be set in the page "Item House Areas" (see sections "Construction Items", "Construction Item Card", "Item House Area").
To open a "Construction Item Card" for a selected Item, run the action "Construction Item Card" from the page "House Area Applicable Items".
Applicable Checklist Items Action
Search House Areas, then click Applicable Checklist Items Action.
The Page "Applicable Checklist Items" defines what checklist items can be checked in the House Area during after-sales service inspection.
Note
Sorting Order determines in which order the checklist items will be listed in the "Checklist Entries" list for a service inspector during an inspection.
House Areas Follow this Route Through the System
A Construction Item can receive its House Areas by either of two routes:
- From its Construction Item Category. Adding a House Area to an Item Category cascades it to the category’s sub-categories and to the items within them. This is the default behavior and applies to any item that has no House Area Group assigned.
- From a House Area Group assigned directly to the item. Once a group is assigned, the group becomes the source of that item’s House Areas, and changing the item’s Item Category no longer re-populates them. See House Area Groups.
From the Construction Item onwards the route is the same whichever way the House Areas arrived. They flow to Models, and finally to Lots. When pushing a Construction Item to a Model, its House Area is automatically added. The system also copies House Areas to Lot Planning Lines, Vendor Contracts, and Lot Selection Choices.
Note
Each Time you push a Construction Item to a Model, the House Area is automatically added to this Model.
Warning
You are not restricted from manually removing the House Area from the Model. However, if you do this, you will not see the Item on this Model listed in the look-up screens. Reporting will still work for any transaction already done with this Item prior to the removal of the House Area
- Copied to Lot Planning Lines (not to Lot Budgets)
- Copied to Vendor Contracts - specifically the Contract Revision Items within the Vendor Contracts.
- Where applicable, copied to Lot Selection Choices a.k.a. Color Chart
Adding House Areas to Construction Item Categories
Search Construction Item Categories and select the Category that needs new House Areas. Click House Areas Action to open the Item Category House Areas page, where you hit Add House Areas Action. Select multiple House Areas by holding the Control Button and click Add House Areas to Item Category.
Note
On adding a House Area to an Item Category, the system does the following:
- Add the House Area to the sub-categories of the Item Category.
- Add the House Area to the Items of the Item Category or its sub-categories.
- House Areas have a global scope, which means once set up in one company, they are available for use in all companies.
Removing House Areas from Construction Item Categories
In order to maintain data integrity, the process of removing House Areas from Item Categories is necessarily difficult. It is not automated as it can cause harm to your setup. We suggest that this is restricted to a system administrator to make sure you do keep your data clean and intact.
If you have just added the House Area and not processed much information through the system, this is not a big task. However, if you have been using the Item Category and/or House Area for some time, you should expect this task to be time-consuming.
Warning
Deletion of a House Area is possible only if the combination of Item Category / House Area does not exist in Planning Lines or in Lot Selection Choices of Lot Selection Packages that are closed. On deletion of a House Area from an Item Category, the system does the following:
- Delete the House Area from the sub-categories.
- Delete the House Area from the Items of the Item Category or its sub-categories.
- Delete Model Item House Areas with the House Area and with the Items of the Item Category or its sub-categories.
- Delete Color Selections with the House Area and the Item Category or its sub-categories.
- Delete Lot Selection Choices with the House Area and the Item Category or its sub-categories from open Lot Selection Packages.
Set Up "Measurement Types" for Each House Area
Although not mandatory, setting House Area Measurement Types allows you to control pricing better when you get to setting up Vendor Contracts.
Purpose of Measurement Types
The purpose of Measurement Type is to pre-define how you want to measure a standard feature within a House Area.
For example, you may define a House Area as Bathroom 1, within each Bathroom 1 you may have e.g., 3 features that you need to focus on (typically for the purpose of Vendor Contract quoting – 1. Shower Floor, 2. Shower Walls, and 3. Floor Tiling).
Associated with each of these Measurement Types is normally measured in either Sq. Ft./Meters or is just regarded as a single unit.
Tip
If your Trade Contractors quote you a price to, e.g., floor Bathroom 1 for Model "XYZ" and give a different quote to floor Bathroom 2 for the same model, then use a single unit Measurement Type such as "EA" or "PCS".
If your Trade Contractors just quote flooring per square foot, use this as the Measurement Type and make sure that you define the area to be covered in the "Model Item Applicable House Areas" Page accessible from Model Items within Models.
Note
Measurement Types have a global scope, which means once set up in one company, they are available for use in all companies.
Setting up Measurement Types
To define measurement types, open the page Measurement Types by searching for it or by navigating to a Roles Center (i.e., Homebuilder - Setup - Measurement Types).
On deletion of a measurement from a House Area, the measurement gets deleted in all Model House Areas and Lot House Areas in all companies upon confirmation by a user.
On adding a measurement to a House Area, the measurement gets added to all Model House Area Measurements and all Lot House Area Measurements in all companies.
The page House Areas has the following actions:
- (House Area) Applicable Items.
- (House Area) Applicable Checklist Items.
House Area Applicable Items
On the page House Areas, click Action House Area Applicable Items. It shows which Construction Items can be installed in the House Area. The list of applicable items is non-editable and serves informational purposes. The relation between construction items and house areas is to be set in the page "Item House Areas" (search "Construction Items", select "Construction Item Card", and click "House Area" Action Button to arrive on the Item House Areas page).
- From this page, you can open the "Construction Item Card" for a selected Item (Click action "Construction Item Card").
House Area Applicable Checklist Items
On the page House Areas, click Action Applicable Checklist Items.
The Page "Applicable Checklist Items" defines what checklist items can be checked in the House Area during after-sales service inspection.
Sorting Order
- Determines in which order the checklist items will be listed in the "Checklist Entries" list for a service inspector during an inspection.
House Area Groups
Adding and removing House Areas one item at a time is manageable for a handful of items, but not for a full catalogue. When many Construction Items need exactly the same set of House Areas, you can define that set once as a House Area Group and assign the group to each item.
From then on, the group is where the set is maintained. Add a House Area to the group and every Construction Item assigned to it gains that House Area; remove one and every item loses it. House Area Groups have a global scope, so once set up in one company they are available for use in all companies.
How to set up a group, details of each of its actions and how a group interacts with Item Category House Areas are described in the article House Area Groups.
Managing Measurement Types (on Construction Items and House Areas). Practical Walkthrough.
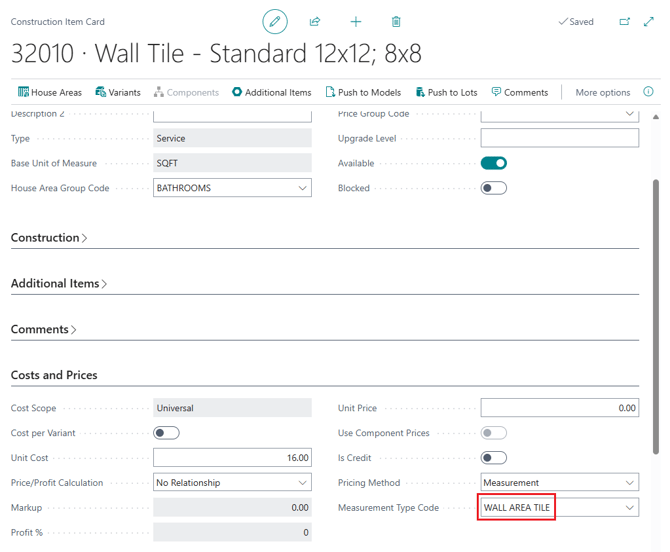
In this example, you would like to change the measurement type Code in the Item to a new one.
- Change the measurement type Code in the Item to a new one. (here: Wall Area Tiles)
- Ensure All House areas that are assigned to the Item have that measurement type
- Click House Areas on the Construction Item Card to see HA assigned to this Construction Item (see Screenshot above)
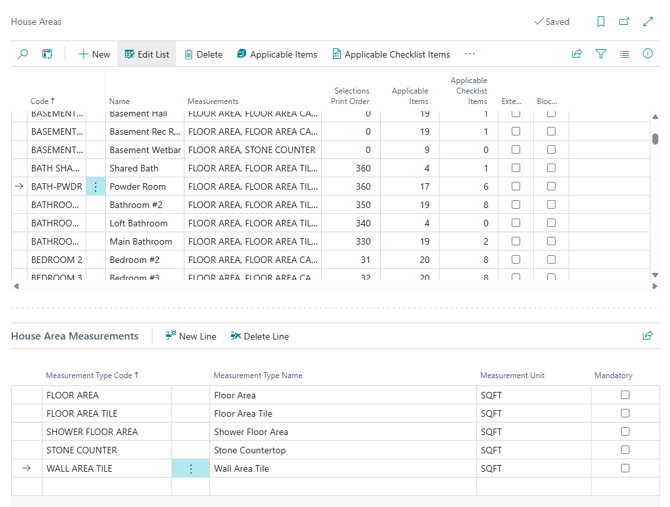
- Search House Areas, select one by one the House Areas assigned to the relevant Item (Here: BATH-PWDR), and add House Area Measurement (here: Wall Tiles)
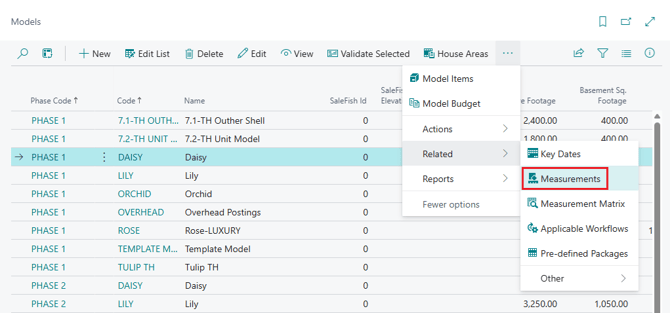
- Select a Model this Item is relevant to.
- Search Models, then select Related and click Measurements
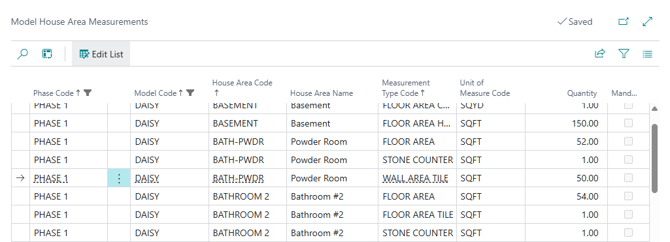
- In this example, Model Daisy has Wall Tiles in Powder Room defined to be 50 SQFT.
Tip
You can remove the Model Code Daisy from the Filter to see House Area Measurements for all Models. To do this, click the X next to the Model Code in the Filters Pane.
- Once you have defined all House Area Code and Measurement Type Code combinations for a particular Model, you can push the Construction Item to that Model. Repeat point 3 for every Model you want the Item to be pushed to. Repeat points 1-4 for Every Item you want to push to Models.