
In this article:
Overview | Before Setting Up a Vendor Contract | Create Vendor Contracts and Auto-Populate | How to Create Vendor Contracts | Creating a Full Set of Contracts with "Populate From Trade Types" | Default Contract for a Trade Type | Updating the Vendor Contract Price | Vendor Contracts Actions | Price Revisions Page | Price Revision Actions | Revision Price Page | Revision Price Actions | Price Revision Items Technical Notes
Overview
A Vendor Contract is essentially a price list from a Vendor that may have multiple revisions.
The prices that you enter into the Vendor Contracts are used to automatically fill in the budgets (precisely, Lot Planning Lines) on the Lots (upon siting a ***Model***on the Lot).
If you wish, you can push new prices on a Vendor Contract to Lot Planning Lines that you already created (presumably on a Lot under construction). The system will not automatically override budgets already created, but it will allow you to do that easily.
Once you have pushed the Vendor Contract prices to the Lot Planning Lines, you can automatically fill in your purchase lines on Purchase Invoices using the Populate from Planning Lines button found on the Home button on the Purchase Invoice.
You can control if you want a user to be allowed to exceed the Budget - see below.
For details on purchasing from Vendor Contracts, read Purchasing Using Vendor Contracts.
Trade Types and Why They Matter Here
A Trade Type is one of the trades that builds the house such as, FRAMING, PLUMBING, HVAC, ROOFER, DRYWALL, LANDSCAPING, and so on. It is a short list you set up once, at the start of an implementation. Each entry has a Code and a Name, and both are mandatory.
The list is shared by every company in the environment; you do not maintain it company by company.
To open it, use the Search, or navigate from the Role Center: HomeBuilder → Catalogues → Trade Types.
Where You Set It
You set the the Trade Type in one place and it travels from there.
- On the Construction Item Category. Trade Type Code is mandatory here, and this is where the trade for a whole class of items is decided.
- On the Construction Item. Entering the Item Category Code copies the category's Trade Type onto the item. Override it if a particular item is another trade's work. Leave it empty on Bundles and Customer Fees, a Bundle takes its trades from its components, and a Customer Fee is not work done by a trade.
- On the Vendor Contract. The contract carries a Trade Type of its own. This is what pairs a vendor's price list with the work it prices.
Change the Trade Type on a Construction Item and the change follows the item through to its Phase Items, Model Items, price list lines and Planning Lines. You do not have to push the item again.
Why It Matters Here
Three things depend on it.
- Which contract an item lands on when you push it to a Model — see Which Contract an Item Lands On below. This is the one that bites. An item with no Trade Type and no default vendor gives the system nothing to match on, and its Phase Item ends up with no contract against it.
- Which vendor wins when a trade has more than one — see The Default Contract for a Trade Type below.
- Trade notifications from purchaser selections. A Color Chart item can carry a list of Item Trades to Notify — trades that need to know about a choice even though they are not supplying it, such as telling the electrician about an appliance upgrade. Siting the choice creates an extra Planning Line for each of them, routed to that trade's default contract. If the Phase has no contract for the trade, siting fails.
Note
Agree to the Trade Type list, before Construction Item Categories are set up, because the category cannot be saved without one. Trade Types are also hard to remove once they are in use, the system will not delete one that is still referenced anywhere, in any company.
Before Setting Up a Vendor Contract
Prior to creating a Vendor Contract, you must have the following in place:
- Core Tables and Posting setup (behind-the-scenes setup).
- Vendors.
- Phases.
- Models (this is only mandatory if the Cost Scope on the Item is Per Model rather than Universal).
- House Areas
- Minimum of a single "ALL" House Area. However better to setup a complete set of House Areas.
- Assign House Areas to Models and Items.
- Note that when you push the Items to the Models, Model Items will be created only for House Areas which are applicable for the Item and at the same time defined for the Model.
- An example is that of the Item House Areas of Bed2, Bed3, and Bed4. However, the Model only has Bed2 and Bed3 (not Bed4). The Model Items will be created just for Bed2 and Bed3.
- Trade Types
- The list of trades that build the house. Trade Type Code is optional on the Construction Item Category.
- Item Categories.
- Items:
- You do not assign the Vendor or the Vendor Contract at the Construction Item level. Push the Items to the Models first, which automatically pushes to the Phase, creating Phase Items, and assign the Vendor Contract on the Phase Items afterwards.
- You can do this with a group of Items from the Phase Items Page as shown below.
-
What you can set on the Construction Item is its Trade Type Code, and optionally a Default Vendor No. and Default Contract No.; between them these are what the push uses to put the item on the right contract, often leaving nothing to assign by hand. See Which Contract an Item Lands On below.
Note
- Implementation topics above are described in detail in Implementing Homebuilder and HomeBuilder Base Setup.
Prior to creating the Vendor Contract, you do not need to have the following in place:
- Lots.
- Lot Types.
- Other Model and Lot-based setups, such as Measurement/Ownership Types and Construction Attributes.
Create Vendor Contracts and Auto-Populate
This section describes how to create vendor contracts and then auto-populate them with Construction Items.
When you want to create Vendor Contracts the following steps are most effective when run in the order described here:
- Create the Construction Items (see note below). You should have already created Construction Item Categories and House Areas along with general setup before Construction Items.
- Click on the Push to Models button on the Construction Item Card or list.
How to Create Vendor Contracts
Automatic and Preferred: Creation of Vendor Contracts by Pushing Items to Models
- Assign a Vendor and a Vendor Contract to the Construction Items. This takes place on the Construction Item Card in the FastTab "Construction"
- Use the field "Default Vendor No." to assign a default vendor for this Construction Item.
- Use "Default Contract No." to define the default Contract used to create the Item.
- From the Construction Item Card or Construction Items list, run Action Push to Models. - Vendor Contract will be created automatically in the Phase of the Model. - The New Revision is created automatically once the steps above are performed. - The assigning of Vendor and Vendor Contract numbers to Phase Items is performed automatically.
Which Contract an Item Lands On
When you push a Construction Item to a Model, the system has to put the resulting Phase Item onto a Vendor Contract. What you set on the Construction Item beforehand decides which one, and there are three set-ups worth knowing.
| What you set on the Construction Item | What the push gives you |
| Trade Type Code only. No default vendor. | The item joins the Phase's contract for that trade. If the Phase has no contract for the trade yet, one is created and held open by the Trade Type with no vendor against it, ready for a vendor to be filled in when the work is awarded. Use this when the catalogue is built before the trades are awarded. |
| Trade Type Code and a Default Vendor No. | The item joins that vendor's contract for that trade in the Phase, and the contract is created if the vendor does not have one yet. Use this for the normal case, where you know who does the work. |
| Trade Type Code, Default Vendor No. and Default Contract No. | The item joins exactly that contract, which is created if it does not exist. Use this when one vendor holds more than one contract in the Phase and you need to say which. |
Where more than one contract could apply, the one flagged Default wins. See The Default Contract for a Trade Type below.
Note
If you are asked to assign a Trade Type to a contract. You may see: "We found Vendor Contract *X* for Item *Y*. Would you like assign this contract with the Trade Type *Z* of the Item?" This means the contract has no trade against it yet, usually because it was created by hand. Answer Yes. The item's trade is stamped onto the contract, and the contract becomes the default for that trade if no other contract in the Phase holds it.
Caution
Two things that can go wrong. If the push stops with an error saying the contract's Trade Type differs from the item's, the two genuinely disagree and one of them has to change, check the item's Item Category first, since that is where its Trade Type normally comes from. And if a Phase ends up full of Phase Items with no contract against them, the cause is almost always Construction Items with no Trade Type and no Default Vendor No.: the push had nothing to match on. Fix it on the Item Category and the items will follow.
Creation of Vendor Contracts explicitly
- Go to the Phase and perform these functions:
- Create a Vendor Contract.
- Select a Phase and choose Vendor Contracts Action Button, then fill out the fields. This will create a new Vendor Contract.
- Create A Contract Revision.
- Go to Contract Revisions and run Action Create New Revision.
- Assign Vendor No. and Vendor Contract to Phase Items - (Back in the Phase page) Click on the Phase Items button and then click on the Assign Vendor Contract button to attach this Contract to the Items you are on.
- Create a Vendor Contract.
Once complete you can go to the Contract and you will see the Items were automatically added here by clicking on the button Latest Revision Items from the Vendor Contract page.
From the Vendor Contract, click Contract Revision Items to edit Contract Revision Items.
Creating a Full Set of Contracts with "Populate From Trade Types"
Rather than letting contracts appear one at a time as Items are pushed, you can lay out the whole set for a Phase in advance, one contract per trade.
- Open Vendor Contracts for the Phase — from the Phase, using the Vendor Contracts action, so that the page has a Phase in context. The action is disabled until it does.
- Run Populate From Trade Types.
For every Trade Type that does not already have a contract in that Phase, the system creates one:
| Field | Description |
| Phase Code | The Phase you are in. |
| Vendor No. | Blank. The vendor has not been awarded yet. |
| Contract No. | The Trade Type Code. |
| Description | The Trade Type Name. |
| Contract Date | Today. |
| Trade Type Code | The Trade Type. |
| Default | Yes. |
Trades that already have a contract in the Phase are left alone, so you can run it again after new Trade Types have been added.
No price revision is created, because there is no vendor to price against yet. Fill in the vendor when the trade is awarded, then create the revision and its prices in the normal way.
Note
Why do this at the start of a Phase? It guarantees that every Item you push finds a contract waiting for it, and it gives you a single list showing which trades have been awarded and which have not.
Tip
Don't worry too much if you perform these tasks out of sequence and do not see items in the Vendor Contract - Latest Revision Items page. There is a Re-populate button in the Latest Revision Items page, click on it and the system will add all your Phase Items back in. It is best to create Vendor Contracts from the link in the Phase. Search Phase, and select the Vendor Contracts button. If you want to create them from the Vendor Contracts cue in the main page, you can search My HomeBuilder Settings and have a default Phase entered there. Regarding Construction Items: Create Base Contracts first, Colour Chart next, and finally After-sales. Even though these are all Construction Items, it is best to treat each group of items individually.
Note
What has been described in this section is the standard setup. There are many more options than described here, and a guide to creating additional settings is explained later in this article.
The Default Contract for a Trade Type
Most of the time one vendor does one trade on a Phase. Sometimes two do — two framers, or a second drywall crew brought in for the back half of the site. When that happens the Phase holds more than one contract for the same trade, and the system needs to know which one to reach for when it is choosing on your behalf. That is the Default flag.
Only one contract per Phase and Trade Type can be Default. Setting it on one contract clears it on the others, so you never have to clear the old one first and you cannot clear it on the only contract for a trade, because that would leave the system with nothing to fall back on.
What Happens When You Turn It On
Turning Default on is an instruction to re-point work at this contract, and the system asks before it does anything.
It first confirms the sweep: this contract will be assigned to the Phase and Model Items for that trade, to the Lot Selection Choices in packages that have not yet been released, and to Planning Lines that have no contract against them.
It then asks a second question, whether to also move Planning Lines that are already assigned to a different contract. Answer Yes when you are switching vendor and want the existing budget to follow.
Note
Work that has already been committed is never moved, whichever way you answer. Planning Lines on a Work Order, a POE or a purchase document stay with the vendor they were ordered from, as do choices in a released Selection Package.
When to Use It
- Awarding a trade. Fill in the contract, then set Default to Yes.
- Changing vendor mid-Phase. The same action, answering Yes to the second question. Committed work stays put; everything not yet ordered follows the new default.
- A second vendor for the same trade. Leave the incumbent as Default and assign the second contract to specific Phase Items by hand. The Default is what the system falls back on, not a restriction on what you can assign yourself.
Updating the Vendor Contract Price
Using Excel to Import Prices and Price Changes
Search Vendor Contracts, then select the Current Prices button. This will bring you to the Contract Revision Items page.
On the Contract Revision Items page, you have two buttons - Export and Import:
- Export:
- This action exports contract revision items into an Excel spreadsheet, which can be given to the Vendor to fill in "Unit Cost".
- The spreadsheet has a pre-defined format that allows a user to import this spreadsheet later to update "Unit Cost" in the Contract Revision Items page and in the entities of origin.
- Advise your Vendors not to change the format of the Excel spreadsheet, but to change values only in the "Unit Cost" column.

- Import:
- This action allows a user to import "Unit Cost" values from an Excel spreadsheet to existing Contract Revision Items, i.e.: the importing routine only updates "Unit Cost", it does not create Contract Revision Items.
Note
If you change the columns in the Excel sheet, the import will not work. If you add lines or change Items in the Excel sheet, the import may not work. The import does not add new Contract Revision Items.
What Gets Updated and When?
- If the Cost Scope on the Construction Item is Model/HA then the Unit Cost on the Model Items is automatically updated.
- If the Cost Scope on the Construction Item is Universal then the Unit Cost on the Phase Item AND the Model Items is automatically updated.
- By selecting lines in the Contract Revision Items page within the Contract AND then by clicking on the Push Costs to Lots button; the system will ask you if you want to update all Lots. If you continue, you will get a message about how many Lot Planning Lines were updated.
See the below video to see how to Update Lot Planning Lines (Budget) from Vendor Contracts.
Note
If you do not want to push new prices from Vendor Contracts to all Lots; you will need to find all the Planning lines that you do want to update and change them one by one. You may find this easiest from Phase - Planning Lines where all Planning Lines for all Lots in the Phase are listed in one list.
Underlying Design Concepts
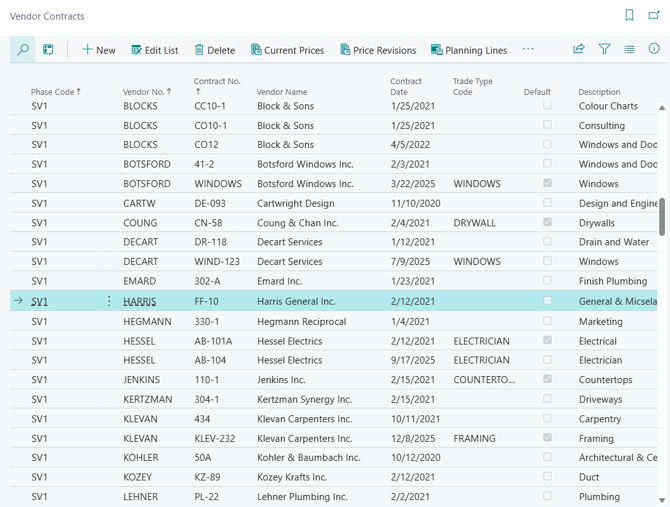
Vendor Contracts are defined for each Construction Phase. To maintain the list of Vendor Contracts for a Phase, select the Phase in the "Phases" page and click "Vendor Contract" in the page ribbon. Alternatively, the page "Vendor Contracts" can be opened using the main menu item or cue in the Role Center, or simply by using "Search".
Actions
On the Vendor Contracts page, on the Ribbon you will find the following buttons:
Actions
- Current Prices
- Price Revisions
- Planning Lines
- Copy to Phase
- Populate From Trade Types
- Work Orders
- Progress Bills
The Action "Progress Bill" is described in the section "Purchasing". The Action "Work Orders" is described in the section "Work Orders".
Current Prices
Opens the prices in the contract's current revision. This is where you review and edit what the vendor charges, and where the Export and Import actions live for sending a price sheet out to the vendor and reading it back. See Updating the Vendor Contract Price.
The action is available only once the contract has both a vendor and a current price revision. On a contract that is being held open by its Trade Type with no vendor yet, it is greyed out.
Price Revisions
Opens the contract's price revisions. Each revision holds its own set of prices and its own effective date, so that prices already used on Lots stay available after new ones come into force.
Use Create New Revision here when a vendor's prices change. The new revision is populated from the Phase and Model Items assigned to the contract, ready for the new prices to be entered or imported.
Planning Lines
Opens every Planning Line, across all the Lots in the Phase, that is assigned to this contract. This is the working list for seeing what a vendor is actually committed to build, and the place to check the effect of a price change, before running Push Unit Costs to Lots, to see what will be touched, and afterwards to confirm what was.
Copy to Phase
Copies a contract, or several selected contracts, to another Phase. Use it when a new Phase runs on the same trades and vendors as the last one, rather than setting the contracts up again.
- Select the contracts to copy.
- Run Copy to Phase and choose the destination Phase.
Each new contract carries over the Vendor No., Contract No., Contract Date, Trade Type Code, Description and Exempt from Portal setting, and is given a first price revision dated today. Contracts that already exist in the destination Phase are skipped, and copying into the Phase you are already in is refused.
Note
Prices are not copied. The new contract arrives with an empty first revision, because the destination Phase has its own Items and none of them are assigned to the contract yet. Assign the Phase Items, then use Re-populate on the Contract Revision Items page to bring them into the revision, and enter or import the new Phase's prices.
Populate From Trade Types
Creates a contract for every trade that does not yet have one in the Phase, so that the Phase starts with a complete set. See Creating a Full Set of Contracts with "Populate From Trade Types" above.
Work Orders
Opens the Vendor Work Orders raised against this contract. See the Work Orders section.
Progress Bills
Opens the Vendor Progress Bills raised against this contract. See the Purchasing section.
Fields
| Field | Definition |
| Phase Code | The Construction Phase the contract belongs to. Vendor Contracts are always defined per Phase. The column is hidden when the page has already been filtered to a single Phase. |
| Vendor No. | The vendor who will do the work. It can be left blank on a contract that is being held open by its Trade Type until the trade is awarded. |
| Contract No. | Identifies the contract within the Phase and the vendor. One vendor can hold more than one contract in the same Phase. |
| Vendor Name | The vendor's name. Display only. |
| Contract Date | The date of the contract. Mandatory, the system will not let you save a contract without one. |
| Trade Type Code | The trade this contract prices. Setting it makes the contract the Default for that trade if no other contract in the Phase holds it; clearing it also clears Default. See Trade Types and Why They Matter Here. |
| Default | Marks this as the contract the system reaches for when it needs one for this trade in this Phase. Only one contract per Phase and trade can be Default. See The Default Contract for a Trade Type. |
| Description | Free text describing the contract. It is filled in for you when a contract is created automatically, either from the Trade Type Name or from the item's Default Contract Description. |
| Current Revision No. | The number of the price revision currently in effect. Display only; revisions are created and dated on the Price Revisions page. |
| No. of Current Prices | How many priced lines the current revision holds. Drill down to open them. A zero on an awarded contract usually means the revision has never been populated, run Re-populate on the Contract Revision Items page. |
A few additional fields are hidden by default and appear only in particular set-ups. Trade Type Name repeats the trade's name beside its code and can be shown through personalisation. Exempt from Portal, Portal Status and Portal Status Date/Time appear only where the Vendor Portal is in use, and record whether the contract is shared with the vendor and how far it has travelled; see the HomeBuilder Portal articles.
Beside the list, the Vendor Contract History fact box is the quickest way to see how much a contract is actually carrying. It shows the number of Phase Items, Model Items, Phase Applicable Items, Model Applicable Items, Planning Lines, Cost Ledger Entries and Current Prices, and every count can be drilled into.
Price Revisions
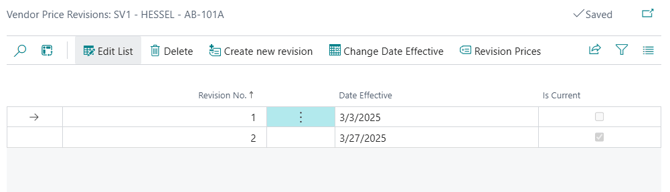
A Vendor Contract does not hold one set of prices; it holds a series of dated revisions, and the prices in force are those of the revision currently in effect. Keeping past revisions means the prices a Lot was budgeted at remain available after the vendor's prices change.
Choose Price Revisions on the Vendor Contracts page to open them. The list shows, for each revision, its Revision No., the Date Effective on which it takes over, and whether it Is Current. All three are maintained by the system; you do not type into this list, and you cannot add a row to it directly.
Price Revision Actions
Create new revision
Creates the next revision of the contract and asks for the date it takes effect. The new revision is populated with the Phase and Model Items assigned to the contract, carrying the prices forward, ready for the new ones to be entered or imported.
Use it whenever a vendor's prices change. Do not edit the current revision in place for a price change that has a date attached to it, that is what revisions are for.
Change Data Effective
Changes the date on which the selected revision takes over. Use it when a price change was entered ahead of time and the date then moved.
Changing a date can change which revision is current, since the current one is decided by the dates.
Revision Prices
Opens the prices held in the selected revision, the Price Revision Items page, described below. This is the route to a superseded revision as well as the current one, so it is how you answer "what were we paying in March?"
Note
Where the company prices from price lists rather than from Phase and Model Items, Revision Prices opens the Vendor Pricelist Lines page instead. The actions differ; the idea of a dated series of revisions is the same.
Revision Prices: the Price Revision Items Page
The Price Revision Items page is the vendor's price list for one revision of one contract: one line per thing the vendor is pricing, with the Unit Cost they charge for it. It is reached by Current Prices from the Vendor Contracts page for the revision in effect, or by Revision Prices from Price Revisions for any revision.
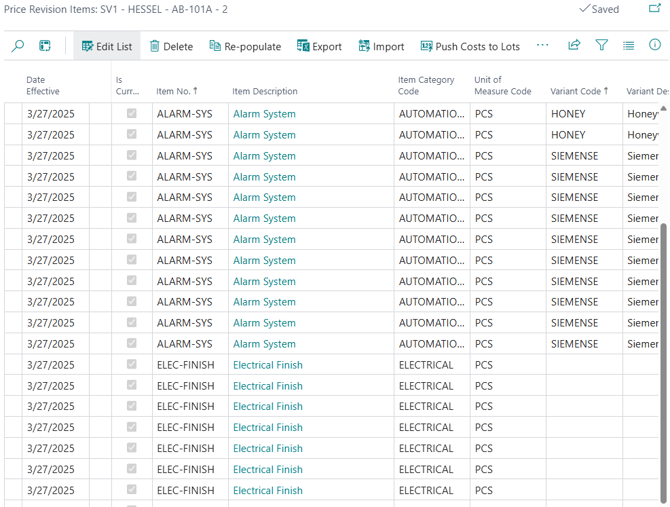
Each line carries the Item No. and description, the Item Category, the Unit of Measure, and the Variant, Model Code and House Area where those apply, how the line comes to be priced at that level is set out in Where the Prices Come From below. Origin tells you which of those levels the line's Unit Cost belongs to.
Two counts are worth knowing about, because they answer the question people actually bring to this page. Matched Planning Lines is how many Planning Lines across the Phase's Lots are already at this price; Unmatched Planning Lines is how many are not. Drill into either. Reading them before and after a price push is the quickest confirmation that the push did what you expected.
The page also shows Is Credit, for lines that are a credit rather than a charge, and Pricing Method, which is Item where the vendor charges per item and Measurement where they charge per measured quantity. Where a Payment Split Code is set, the line is paid in instalments rather than in one go, and the Split By, Number of Payments and related columns describe how.
Revision Price Actions
Re-populate
Brings in any Phase Items that are assigned to this contract but are missing from the revision, most often because they were pushed to Models after the revision was created. Nothing is selected first; it sweeps the whole contract, and confirms with "Contract Revision Items have been re-populated."
Available only on the revision currently in effect.
Add Items
Adds Phase Items that are not assigned to this contract. The usual reason is that you hold pricing from more than one vendor for the same work and want both in the system.
Choose Add Items, select the Phase Items you want on the page that opens, and choose Add to Current Prices.
That page lists the Phase's items that are available and not blocked, and whose Designation is Single Item or Component. If an item you expect is missing, the usual cause is that it has not been pushed to Models, run Push to Models from the Construction Item, which creates the Phase Item as well as the Model Items.
Available only on the revision currently in effect, and the items are added to that revision only.
Export
Exports the revision's lines to an Excel spreadsheet you can send to the vendor to price. Select the lines to export first. See Using Excel to Import Prices and Price Changes.
Import
Reads a returned spreadsheet back in, updating the Unit Cost on lines that already exist. It does not create lines. See Using Excel to Import Prices and Price Changes.
Push Costs to Lots
Pushes the Unit Cost from the selected lines onto the Planning Lines of the Phase's Lots that are assigned to this contract. This is the action that moves a new price onto budgets that already exist.
Select the lines first, usually all of them. If you select only one, the system checks that you meant to: "You only selected one line to push to Lots, most commonly people select multiple or all the lines and push them. Would you like to continue with only one line selected?"
Two things will stop it. Costs can be pushed only from the revision currently in effect, not from a superseded one. And lines that carry a Payment Split are refused, because the split has to be reworked against the new cost, those Planning Lines have to be updated by hand.
Update Items
Pushes the Unit Cost of the selected lines back onto the Construction Items themselves, the Items, Item Variants and Service BOM Components each line came from. It reports how many of each it updated.
Use it when a vendor's price is also the figure you want carried on the catalogue, so that Lots sited later start from it.
Update Global Items
The same, for the Global Items, Global Item Variants and Global BOM Components behind the Construction Items, in a global catalogue.
A line is refused where the Global Item's Is Credit setting disagrees with the Construction Item's, since pushing a cost across that disagreement would reverse its sign.
Payment Split
Opens the payment split behind the line, where the instalments are defined. Available only on a line that has a Payment Split Code.
Working in a superseded revision. Open an older revision through Revision Prices and you can read it, but Re-populate, Add Items and Push Costs to Lots are unavailable. This is deliberate: a superseded revision is a record of what was, not a working document. To change prices, create a new revision.
Price Revision Items Technical Notes
Search Vendor Contracts, click Price Revisions, then select Revision Prices.
There are eight possible origins of Revision Items in Vendor Contracts.
| Item/Variant/Bundle/Cost Scope Mix | Options Based Upon Setup |
| Phase Item | The item has a Cost Scope 'Universal'. The item has the Designation 'Single Item' or 'Component'. For Component, it is referenced from a Phase BOM Component having the flag "Use Component Cost" set to 'Yes'. It has no Variants or has the flag "Cost per Variant" set to 'No'. Output: The "Unit Cost" is defined on the Phase Item level. |
| Phase Item Variant |
The item has a Cost Scope 'Universal'. The item has the Designation 'Single Item' or 'Component'. If Component: it is referenced from a Phase BOM Component having the flag "Use Component Cost" set to 'Yes'. It has Variants and its flag "Cost per Variant" is set to 'Yes'. Output: The "Unit Cost" is defined on the Phase Item Variant level. |
| Phase Item Component |
The item has Cost Scope 'Universal' and Designation 'Component'. It is referenced from a Phase BOM Component having the flag "Use Component Cost" set to 'No'. Output: The "Unit Cost" is defined on the Phase BOM Component level. |
| Phase Additional Item |
The line comes from an Additional Item attached to a Phase Item, and is included only where that Additional Item has Override Cost/Price set. Without the override, the Additional Item is costed from the item it points at and needs no line of its own. Output: the Unit Cost is defined on the Phase Additional Item level. |
| Model Item |
The item has Cost Scope 'Per Model/HA'. The item has the Designation 'Single Item' or 'Component'. If Component: it is referenced from a Model BOM Component having the flag "Use Component Cost" set to 'Yes'. It has no Variants or has the flag "Cost per Variant" set to 'No'. Output: The "Unit Cost" is defined on the Model Item level. |
| Model Item Variant |
The item has Cost Scope 'Per Model/HA'. The item has the Designation 'Single Item' or 'Component'. If Component: it is referenced from a Model BOM Component having the flag "Use Component Cost" set to 'Yes'. It has no Variants or has the flag "Cost per Variant" set to 'No'. Output: The "Unit Cost" is defined on the Model Item level. |
| Model Item Component |
The item has Cost Scope 'Per Model/HA' and Designation 'Component'. It is referenced from a Model BOM Component having the flag "Use Component Cost" set to 'No'. Output: The "Unit Cost" is defined on the Model BOM Component level. |
| Model Additional Item |
Like in Phase Additional Item, for an Additional Item attached to a Model Item, where the cost is specific to the Model. Output: the Unit Cost is defined on the Model Additional Item level. |
- Model Code
- The Model Code is specified when the Item has Cost Scope 'Per Model/HA' and therefore the "Unit Cost" is model-specific.
- House Area Code
- The House Area Code is specified when the Item has Cost Scope 'Per Model/HA' and therefore the "Unit Cost" is house area-specific within the Model.
- Unit Cost
- On creation of a contract revision, the "Unit Cost" for a Contract Revision Item gets retrieved from the respective entity of origin (Phase Item, Phase Item Variant, Phase BOM Components, Model Item, Model Item Variant, Model BOM Component).
- On changing "Unit Cost" in a contract revision item, the "Unit Cost" in the respective entity of origin will be updated automatically in case they are assigned to this contract.
- Bundle No.
- Identifies the Bundle a component line belongs to, or the parent item an Additional Item hangs from.
- Bundle Line No.
- Together with Bundle No., specifies the Phase or Model Item Component, or Additional Item, where the "Unit Cost" originates from.