
In this article:
Overview | How to Make Choices | Using the "Item No. and Variant" Field | Components | Add Pre-defined | Validate Selected | Renumber Reference No. | Understanding the Fields in Lot Selections Choices
Overview
The Lot Selection Choices page is where a purchaser’s decisions about their new home, the cabinet finish, the flooring, the fixtures, every upgrade and extra, become a single, priced record tied to that Lot.
Each choice line pairs a House Area, such as the Kitchen or the Primary Bath, with an Item Category, such as Countertops or Cabinet Hardware, so the full set of decisions for a home stays organized the same way the house itself is organized.
Before you can make Selection Choices, you must complete the setup as described at the top of Upgrades and Extras.
One Choice line is created for each House Area Code, Item Category Code mix.
The purchaser then makes a choice by picking the Item No. and Variant Code (if applicable).
How to Make Choices
Note
To access, search Lot Selection Packages, then click the Choices Action Button.
- For Lot Selection Packages with the Type 'Color Chart', you should click on the Populate Button. The system populates a list of choices that can be made by the purchaser of the lot. The population happens based on Model Items applicable for the Model on the lot and the settings in Color Selections of the Phase.
- For all other Selection Package Types and for the Color Chart, the process is the same and is as follows:
- Click the Item No. and Variant field to pick the item and its variant in one step, or use the separate Item No. and Variant Code fields to pick them one after the other. See Using the "Item No. and Variant Field" below.
- The line will turn black if you have made a complete choice. If the line stays red then you must click on the Variant Code and make another choice.
- If you have rights, you are able to change costs and prices. Unit Cost, Vendor No., and Vendor Name are only shown if the user has the functional permission "CAN APPROVE SELECTION".
- To add an extra Choice, click on the "Add Choice" button. In the pop-up window, select "Item Category Code", "House Area Code", and press "OK". A new line will be created with a new Reference No.
- If the item selected requires multiple trades or items, then it will typically be set up as a bundle (an example is a fireplace requiring electrical, gas fitters, the fireplace, framing, etc.). To see the components, click on the Components button.
Note
If you get an error "Cannot find Model Item House Area for the Additional Choice", this can be fixed with the following steps:
1. Go to Construction Items, and push the Item to the Model
2. Go to Models, and open the Model
3. Click "Model Items"
4. Find the Item
5. Click "Applicable House Area" and make sure the line for the House Area has a Quantity or a Quantity Override defined.
Note
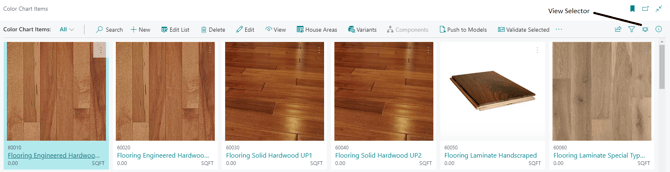
You can switch to a tile view instead of a list view and see images of the selection. You must save images to the Construction Item to be able to do this.
Using the "Item No. and Variant" Field
Most purchaser choices are really two decisions taken together: which item, and which finish of that item. Historically the Choices page asked for those in two separate fields, Item No. and Variant Code, which meant two lookups and a line that stayed incomplete (shown in red) between the first pick and the second.
The Item No. and Variant field lets the designer make both decisions in a single lookup.
What the Field Shows
The field displays the item and variant together, separated by a slash:
- For an item with a variant: Item No. / Variant Code.
- For an item that has no variant: just the Item No.
The field stays in step with Item No. and Variant Code in both directions. Pick through the combined field and the two individual fields fill in; pick through the individual fields and the combined field is rebuilt.
Searching as You Type
The field is not a plain drop-down. Whatever you type into it is used as a search string against the choices that are legitimately available for that line.
This is what makes the field quick in practice: a designer who knows the purchaser wants “Carrara” can type carrara and land directly on the right item-and-variant combination, without first having to know which item carries that finish.
Two Ways of Presenting the Choices
What the lookup looks like depends on the Use tiles for selection choices setting on the HomeBuilder Setup page.
- Tiles on — the Define Choice Variant page opens as tiles with pictures, which is the presentation used in front of a purchaser. Pick the tile and run Pick the Item and Variant. Pictures come from the Construction Item and its variants, so they must have been uploaded first.
- Tiles off — a list lookup opens instead. In this combined mode the list shows an Item Description column that is hidden when you are only picking a variant, so that you can tell the items apart.
Either way, confirming the pick sets the Item No. and the Variant Code together, and the line turns black.
Note
If you pick an item and get the message that the system cannot find the Model Item needed to determine Unit Price, Unit Cost and other attributes, the Construction Item has not been pushed to the Model for that House Area. Push the item to the Model, then pick it again.
Components
When a Choice is a Bundle, which is a single purchaser-facing choice made up of several construction items, the individual items behind it are its components. The Components action opens them.
Select the Choice line and run Components. The action is enabled only when the line’s Designation is Bundle; it is greyed out on Single Items and Customer Fees. Bundle lines are easy to spot in the list, because their Item Description is shown in bold.
The Choice Components page opens for that Bundle, in the context of the Lot, the Selection Package, the House Area and the Bundle item. It shows, for each component:
| Field | Definition |
| Type, No., Description | All define what the component is. |
| Variant Code, Variant Description | The component's finish. |
| Unit of Measure Code | How the component is measured. |
| Quantity per, Total Quantity per BOM | How much of the component does the Bundle contain. |
| Instruction | Free text passed through to the trade. |
| Unit Price | The component’s price (Read-only). The Bundle is priced as a whole. |
| Unit Cost, Unit Cost Override | The component’s cost, and a field to override it for this Lot. |
| Vendor No., Vendor Name, Vendor Contract No. | Who will supply the component. Components of one Bundle can go to different vendors. |
| Package Status | The status of the Lot Selection Package the Bundle belongs to. |
What you can change depends on the Selection Package status:
- Quantity per and Total Quantity per BOM can be edited while the package is Open.
- Instruction can be edited while the package is Open or Closed, so a note to the trade can still be added after the purchaser has signed off.
- Unit Cost Override, Vendor No. and Vendor Contract No. are editable subject to package status and to the cost permissions described below.
Note
Cost Fields on this page are visible only to users holding the CAN SEE SELECTION COSTS functional permission, and are editable only with CAN UPDATE SELECTION COSTS. Designers without those permissions can still review the components and their quantities.
Add Pre-defined
A Pre-defined Package is a ready-made set of choices such as a promotional package, a standard upgrade bundle, or a builder’s special. Rather than entering the same fifteen lines for every purchaser who takes it, the designer adds the whole package in one action.
Run Add Pre-defined on the Lot Selection Choices page. The action is available while the Selection Package is Open.
Choosing the Package
The Add from Pre-defined Package page opens, listing packages by Code and Name. By default it shows only the packages attached to this Lot’s Model, which are the ones the purchaser is genuinely entitled to.
- Show All switches the list to every Pre-defined Package in the company.
- Show for Model switches back to the Model’s packages.
Select a package and run Add Choices.
Confirmations You May See
- If you used Show All and picked a package that is not on the Model, the system asks: “You have selected a pre-defined package that was not on the model, do you want to continue?”
- If the same package has already been added to this Selection Package, the system asks twice, first when naming the package and the Selection Package, then “Are you absolutely sure?”, because adding it again will normally create duplicates of any line that is not caught by the duplicate check below.
What Gets Added
The system works through the package line by line. For each line it establishes the items that are valid for that line’s House Area and Item Category on this Lot’s Model, and then:
- if the package line names a specific Item No., the line is added only when that item is among the valid Model Items;
- if the package line names only an Item Category, the line is added only when at least one valid item exists for that category and House Area; and
- the line is skipped if a Choice for the same House Area already exists with the same item and variant, or where the package line has no item with the same Item Category.
Each Choice created this way carries the package line’s Mandatory flag, Item Description and Custom Note, and is stamped with the Source Pre-defined Package Code so you can always see where the line came from.
Reading the Result Message
The action finishes with a message of the form: “X of Y total lines from Pre-defined Package Z were added to your choices page.”
If X is lower than you expected, the message itself tells you where to look, and it is worth repeating in the article: every pre-defined package line must have a House Area that exists on the Lot, and if the line specifies an Item or a Category, that must correspond to a relevant Model Item. The usual causes are a House Area missing from the Lot, or a Construction Item that has not been pushed to the Model.
For how Pre-defined Packages are built and attached to Models, see the Setting Up and Using Pre-defined Packages article.
Validate Selected
Before releasing a Selection Package, it is worth confirming that every selected choice is actually complete and priced correctly. Validate Selected runs that check in one action.
Select the choice lines to check, then run Validate Selected on the Lot Selection Choices page. It reports:
a missing Item No., House Area, Quantity or Variant Code; or
a price that contradicts the Usage: Standard choices must be priced at zero, and Extra or Upgrade choices must not.
Findings are written to the Error Message field on the line, which is then highlighted so it stands out in the list. Run Validate Selected before releasing the package.
Renumber Reference No.
Reference No. identifies each choice on the printed selection documents. New lines added through Add Choice or Add Pre-defined, do not necessarily arrive in the right sequence.
Run Renumber Reference No. on the Lot Selection Choices page to re-sequence the Reference No. of every choice according to the default sort order, so printed documents read in sequence. Run it after adding or reordering choices, and before printing selection documents for the purchaser.
Understanding the Fields in Lot Selections Choices
There is a lot of functionality in this table, and so there is an explanation of the key fields below:
| Field | Description |
| Mandatory | This field gets populated from Color Selections. When this field is set to 'Yes', the record cannot be deleted, meaning that a purchaser must define the choice. |
| Item No. | Initially, "Item No." can be populated from the default options of the corresponding Color Selection. Later, it can be changed. |
| Item Description | Copied from the Item Description. Highlighted in bold if the Item Designation is 'Bundle'. |
| Designation | Copied from the Item, the options are 'Single Item', 'Bundle', or 'Customer Fee'. |
| Variant Code | Initially, "Variant Code" can be populated from the default options of the corresponding Color Selection. Later, it can be changed. |
| Variants Required | Indicates if a Variant must be selected. |
| Item No. and Variant | Picks the item and its variant in a single lookup, with search-as-you- type across item number, item description, variant code and variant description. |
| Print in Color Chart | By default, this is set to 'Yes'. Click off if you do not want to show this line on the Color Chart print. |
| Usage | Three options: Standard, Extra, Upgrade. 'Standard' usage must have Unit Price = 0.00. 'Extra' or 'Upgrade' must have a "Unit Price" that is non-zero. |
| Color Chart Note | Gets populated from the Model Item and cannot be changed by a décor designer. |
| Show Note to Vendor | Gets populated from the Model Item and cannot be changed by a décor designer. Determines whether the Color Chart Note is printed on the documents the trades receive, Vendor Work Orders and Purchase Orders for Extras. Notes are withheld from those documents unless this is set, so that internal notes stay internal by default. |
| Custom Note | This field is to be used to record the purchaser's comments and allows for a generous amount of text. |
| Unit Cost, Total Cost | These fields are shown only if a user has functional permission "CAN APPROVE SELECTION". |
| Vendor No., Vendor Contract No. | Only filled in if the Item No. has a Designation of 'Single Item'. These fields are shown only if a user has functional permission "CAN APPROVE SELECTION". |
| Job Task No., Job Planning Line No. | Created upon action "Release" on Lot Selection Package. See Lot Selection Packages for an explanation. |
| Released for POE | Set when an operations manager releases the choice to the trades on the Package Work Planning page. Once set, the choice's planning lines can no longer be edited and no further planning lines can be added to it, so that work already queued for a vendor does not drift. It can be reversed, but only while no Purchase Order for Extras has been issued for the choice. See Purchase Orders for Extras. |
| Reference No. | The number the choice is identified by on printed selection documents. Can be regenerated with Renumber Reference No. |
| Quantity, Total Price | How much of the item the purchaser is taking, and the resulting price. Total Price is Quantity × Unit Price. |
| Selected | Marks the line as decided. Set by the system when an item is chosen; used by Validate Selected to know which lines to check. |
| Error Message | Explains why a line cannot be completed or sited. Populated by Validate Selected and by item selection; the line is highlighted when it is set. |
A few further fields are populated automatically for traceability or display rather than everyday editing, and do not need their own rows:
- Bundle Line No. shows which Bundle a component line belongs to.
- Cost Scope and Sorting Item Category Code are copied from the Construction Item to govern costing and default sort order.
- Source Pre-defined Package Code and Portal Status / Portal Status Date/Time record where a choice came from and how far it has travelled through the Buyer Portal.
Above the list, the House Area Filter restricts the page to one House Area, and Total Package Price / Total Package Cost show the purchaser’s running totals.