
In this article:
Overview | Part 1: Creating Planning Lines | Method 1: Site the Model on the Lot | Method 2: Release a Lot Selection Package | Method 3: Add a Planning Line by Hand | Part 2: Turning Planning Lines into Purchases | Fill a Purchase Invoice | Protection Against Double Billing | Partial Billing for Long Jobs | Using Purchase Orders | Best Practices at a Glance | Related Articles
Overview
This article is for the people who buy and pay for the work on a home: purchasing, accounts payable and operations staff.
A planning line is one piece of planned work or material on a Lot. Examples are "Excavation for outside drains" or "Cabinetry Appliances" in the kitchen. Each planning line knows the lot, the item, the house area, the quantity, the cost and, usually, the vendor who will do the work.
Together, the planning lines are the budget and the to-do list of a Lot. In HomeBuilder, it is recommended that every purchase should start from a planning line. When it does:
- the cost is posted to the right Lot and task automatically.
- the price agreed in the vendor’s contract is used, so nobody has to look it up or type it in.
- HomeBuilder knows what has already been billed. This protects you from paying a vendor twice for the same work.
The process has two parts:
- Creating the planning lines
- Mostly automatic, as the Lot moves forward: when the model is sited and when the purchaser’s selections are released.
- Usually done by operations and sales
- Turning planning lines into purchases
- Every time a vendor bills you or you order work: fill the purchase document from the planning lines, then post it.
- Usually done by purchasing and accounts payable
Part 1: Creating Planning Lines
There are three main ways to create planning lines. Most planning lines on a Lot come from the first two, and HomeBuilder creates them for you.
| Method | Where you do it | What it creates |
| 1. Site Model on Lot | Lot Card | A planning line for every Base Contract item of the Lot’s model. |
| 2. Release a selection package | Lot Selection Package Card | Planning lines for the purchaser’s upgrades, extras and other choices. |
| 3. Add | Lot Card → Planning Lines | One planning line, for an item you pick. |
Tip
Let HomeBuilder create planning lines for you. Site the model and release the selection packages. Use Add only for exceptions.
Method 1: Site the Model on the Lot
Siting puts the house (the model) on the Lot. It is also the moment HomeBuilder builds the Lot’s base budget.
Before you start, the Lot needs:
- a Model Code;
- a customer. If the home is not sold yet, assign the placeholder customer your company uses for unsold homes (often called an inventory customer).
To site the model:
- Open the Lot Card.
- Choose Site Model on Lot.
- Choose Yes to confirm.
HomeBuilder takes every item of the model that is marked Base Contract. These are the standard items, at the price agreed with the vendors: the foundation, the framing, the standard finishes and so on. It creates a planning line for each house area where the item is installed. Upgrades and extras are not included. They come later, from selection packages (Method 2).
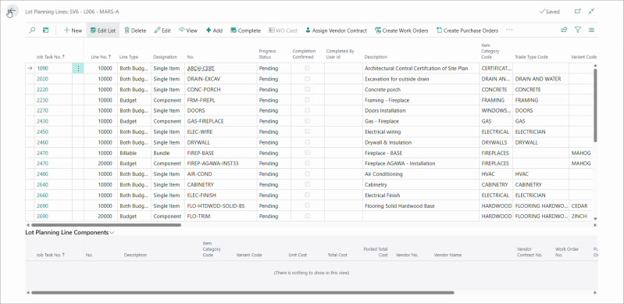
Figure 1. Lot Planning Lines right after Site Model on Lot. Each Base Contract item of model MARS-A now has a planning line with the Progress Status 'Pending'. The Add action used in Method 3 is on the same toolbar.
Note
A model is sited on a Lot once. To change or reverse a siting, see Planning > Site and Un-site the Model on the Lot.
Method 2: Release a Lot Selection Package
The purchaser’s choices are recorded in a Lot Selection Package: upgrades, extras, and the selections made for standard items. Releasing the package turns those choices into planning lines, so the trades can be told and paid.
To release a package:
- Open the Lot Selection Package Card.
- Choose Close, then Approve, then Release.
When the package is released, HomeBuilder creates the planning lines for its choices. A choice can have one planning line or several. For example, a fireplace bundle may need a framer, a gas fitter and an electrician, so it gets a planning line for each.
To see the planning lines of each choice, choose Work Planning on the Lot Selection Package Card. The top of the page lists the choices. The bottom, Choice Planning Lines, lists the planning lines of the selected choice.
Note
Color chart items get planning lines only through a selection package. They cannot be added by hand. For the full selection process, see Lot Selection Packages.
Method 3: Add a Planning Line by Hand
Use this way for exceptions: an item the Lot needs that was not created by siting or by a selection package.
- Open the Lot Card and choose Planning Lines. The Lot Planning Lines page shows all the planning lines of the Lot, however they were created.
- Choose Add. The Add Planning Item page lists the items that can be installed on this Lot, house area by house area. The item catalog decides which item fits which house area. The house areas are the Lot’s own.
- Select the line with the item, variant and house area you need. Change the Quantity if needed.
- Choose Add Item.
Add Item adds the selected line only. To add several items, repeat the steps for each one.
Note
Color chart items are not listed on the Add Planning Item page. To add a color chart item, use a selection package (Method 2).
For more, see Planning > Lot Planning Lines.
Part 2: Turning Planning Lines into Purchases
Once a Lot has planning lines, use them to fill your purchase documents. It is recommended to use the action Populate from Planning Lines that is available on both purchase invoices and purchase orders.
Fill a Purchase Invoice
- Create a new Purchase Invoice and enter the Vendor No. The Populate from Planning Lines action becomes available once the vendor is entered.
- Choose Populate from Planning Lines. The Select Planning Lines dialog opens. Use it to narrow the list to the lines this vendor is billing for.
Field Description Vendor No. Filled in from the invoice. Phase Code The Phase where the vendor did the work. Vendor Contract No. The vendor’s contract in that Phase. If the vendor has only one contract in the Phase, it is filled in for you. If there are several, pick one. Include Planning Lines without Vendor No. Also shows planning lines that have no vendor yet. To Invoice 'All', or only one kind of line: 'Base Contract' (standard items from siting), 'POE' (upgrades and extras sent to the vendor on a POE) or 'Other' (everything else). Completed Only Show only planning lines whose work is marked as completed. Include lines with zero Remaining Cost Also show lines that still have quantity left to bill but no cost left, such as no-charge items. 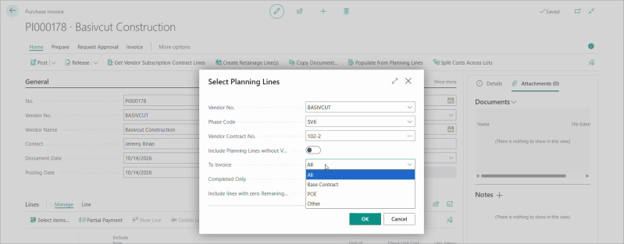
Figure 2. Populate from Planning Lines on a purchase invoice for vendor BASIVCUT. The dialog already holds the vendor, Phase SV6 and the vendor's only contract in that Phase, 102-2. The To Invoice list is open. - Choose OK. The Planning Lines selection page opens. It lists the vendor’s open planning lines, with the Lot, house area and item of each. Qty. to Invoice and Amount to Invoice are filled in with what is left to bill on each line.
- Select the lines the vendor is billing for, and choose Add Selected to Purchase Lines. The lines are added to the invoice.
- Enter the Vendor Invoice No. and post the invoice as usual.
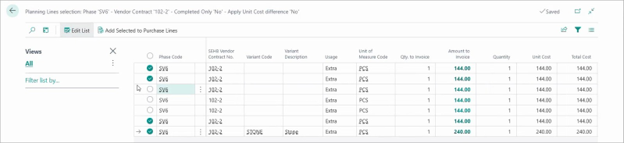
Figure 3. Four of the seven open planning lines of vendor BASIVCUT are selected. Qty. to Invoice and Amount to Invoice shows what is left to bill on each line. The Lot, house area and item columns are further to the left.
Tips
Read the vendor’s bill as a list of work done: "I installed the kitchen cabinets on Lot 1, Lot 3 and Lot 5." Each item on the bill is a planning line. Select exactly those lines.
Make sure the purchase document has a Tax Area Code before you populate it. It normally comes from the vendor card. HomeBuilder asks for it before it adds any lines.
Protection Against Double Billing
Populate from Planning Lines is also an accounting control. The system remembers what has been billed against each planning line:
- Once an invoice is posted, the billed lines (or the billed part of a line) no longer appear the next time you populate an invoice for that vendor. Only what is left to bill is shown.
- A planning line that is already on another open purchase invoice or purchase order cannot be added again. HomeBuilder stops with a message that names the other document.
If a vendor sends the same bill twice, the work they billed is simply not there to select a second time.
Note
The second check can be switched off with Allow Same Planning Line on Multiple Open Purchases on the HomeBuilder Setup page. Leave it off unless you have a clear reason.
Partial Billing for Long jobs
Some work takes weeks, such as drainage, framing or a long installation. The vendor bills as the work goes: 30% now, 30% next month, the rest at the end. Bill each part against the same planning line. Do not change the unit cost. Change how much of the line you bill.
On the Planning Lines selection page, before you choose Add Selected to Purchase Lines, enter one of these:
| The vendor bills... | Enter | Example: a line of 1 x $2,310.00 |
| A percentage of the job | Qty. to Invoice, as a fraction: 0.3 for 30% | Qty. to Invoice 0.3 → Amount to Invoice $693.00 |
| A dollar amount | Amount to Invoice | Amount to Invoice $1,000.00 → Qty. to Invoice 0.4329 |
HomeBuilder recalculates the other field. The unit cost stays the same. Next time, the line shows only what is left, for example 0.7 or $1,310.00.

Figure 4. Partial billing on a purchase invoice. The vendor bills $1,000.00 of a $2,310.00 drainage job, so Amount to Invoice is set to 1,000.00. Qty. to Invoice is recalculated to 0.4329.
Note
If someone lowers the Direct Unit Cost on an invoice line instead, HomeBuilder warns: "If your intention is to process a partial payment, you should reduce the Quantity and not reduce the 'Direct Unit Cost'."
Using Purchase Orders
Purchase orders work the same way. On a new Purchase Order, enter the Vendor No. and choose Populate from Planning Lines. The same dialog and the same selection page open. Select the lines and choose Add Selected to Purchase Lines.
From there, it is standard Business Central:
- Print or send the purchase order to the vendor, if you want to.
- When the vendor bills you, enter the Vendor Invoice No. on the order.
- Choose Post, then 'Receive and Invoice'.
To bill a purchase order in parts, use quantities:
- Set Qty. to Receive on the line, for example 0.3 for 30%. Qty. to Invoice follows. Post with 'Receive and Invoice'.
- For the next bill, Reopen the order if it is released, enter the next part (for example 0.4), and post again.
- For the last bill, the remaining quantity is already filled in. Just post.
On a purchase order, you can only bill part of a line by quantity. If the vendor bills a dollar amount, work out the quantity: amount ÷ Direct Unit Cost. For example, $1,000 ÷ $2,310 = 0.4329.
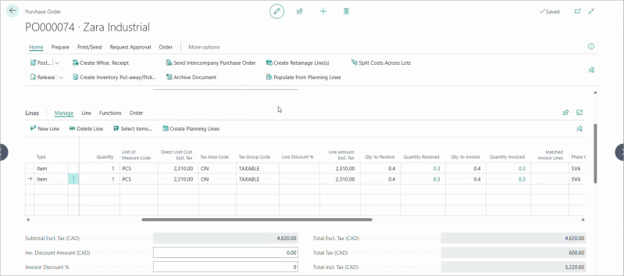
Figure 5. A purchase order for two drainage lines, billed in parts. 0.3 of each line has already been received and invoiced (Quantity Received and Quantity Invoiced). The next 0.4 is entered in Qty. to Receive and Qty. to Invoice.
Best Practices at a Glance
- Site the model as soon as the Lot has a model and a customer. Use your inventory customer if the home is not sold yet.
- Record every upgrade, extra and color chart selection in a Lot Selection Package, and release it. It is the only way to create planning lines for color chart items.
- Use Add on Lot Planning Lines only for exceptions.
- Fill every vendor invoice and purchase order with Populate from Planning Lines. Never type the lines by hand.
- Use Phase Code, Vendor Contract No. and To Invoice to keep the list of lines short.
- Bill partial work with Qty. to Invoice, Amount to Invoice or Qty. to Receive. Never change the unit cost.
- Post invoices promptly, so that what is left to bill is always up to date.
- If the planning line you need is missing, get it created first (see Part 1). Don't work around it by typing the purchase line by hand.